Using pfSense with Mullvad
Routers OpenVPN Installation Router pfSense
Letzte Aktualisierung:
This guide was verified with pfSense 2.7.0-RELEASE.
As you follow this guide, always click on any Apply or Save button as you make changes in order to reload your new settings.
This guide is using OpenVPN. For using WireGuard see the guide pfSense with WireGuard.
Get your ca.crt
- Go to the OpenVPN configuration file generator.
- Use Linux as Platform.
- Select a Location.
- Click on Download zip archive and save it to your computer.
- Extract the zip file.
Add the Ca.crt to the Certificate Manager
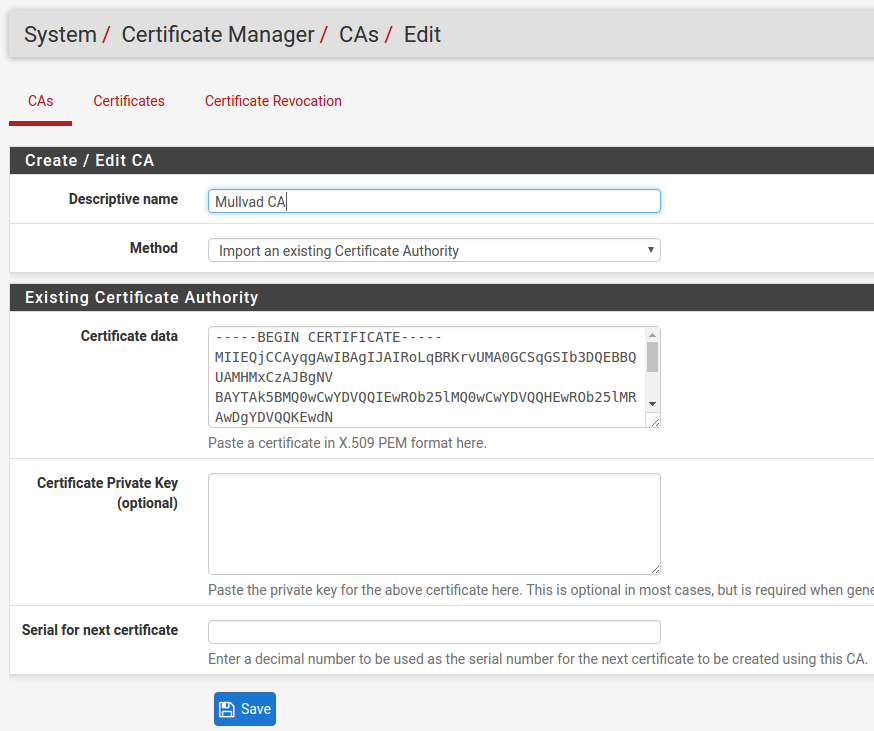
- Log in to your pfSense device click on "System" -> "Cert. manager"(pfSense 2.7.0 it's called "Certificates) -> "CAs"(pfSense 2.7.0 it's called "Authorities") and then click on "+Add"
- Edit the descriptive name and name it Mullvad CA .
- Set the Method to Import an existing Certificate Authority
- Paste the certificates found in mullvad_ca.crt that was extracted earlier into the "Certificate data" field.
- Click on Save.
Add a VPN connection
This example will make use of se-got-ovpn-010.relays.mullvad.net. You can of course replace this server with any other country, region, or specific server that you wish to use. See our list of available servers.
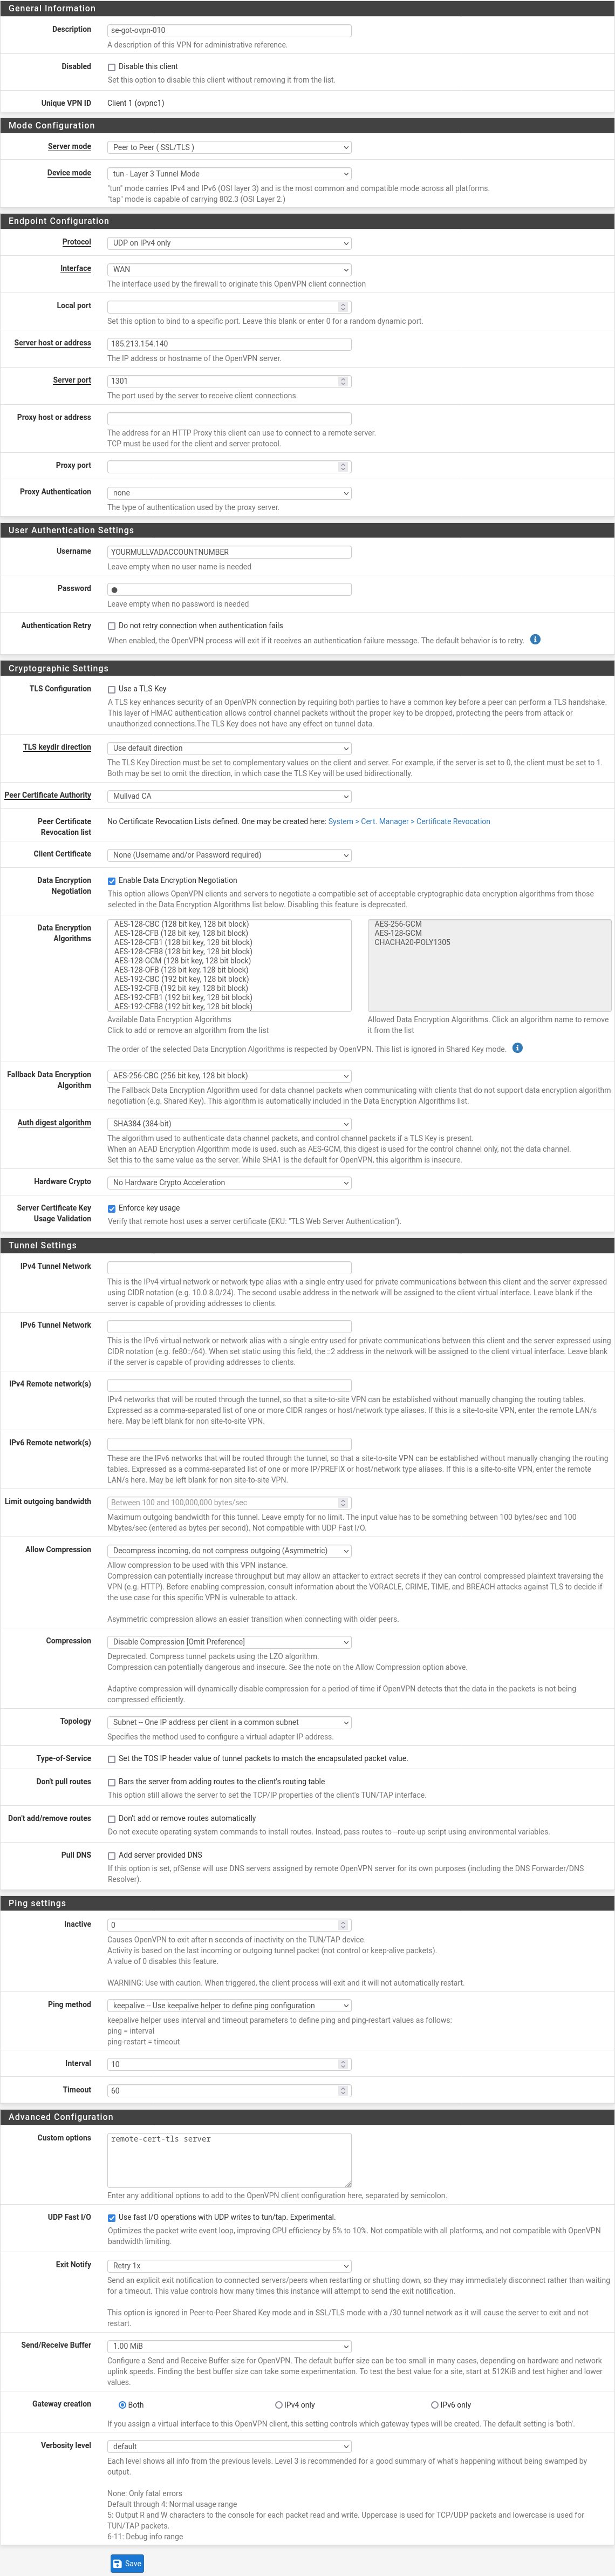
Click on VPN -> OpenVPN -> Clients and then click on +Add
- Set Description to: se-got-ovpn-010
- Set Server Mode to: Peer to Peer (SSL/TLS)
- Set Device mode to: tun Layer 3 Tunnel Mode
- Set Protocol to: UDP on IPV4 only
- Set Interface to: WAN
- Set Server host to: 185.213.154.140 (Which is se-got-ovpn-010.relays.mullvad.net)
- Set Server port to: 1301
- Under User Authentication Settings set Username to: <Mullvad account number> (Make sure it does not contain any spaces)
- Set Password to: M
- Set TLS Configuration to: Unchecked
- Set Peer Certificate Authority to: Mullvad CA
- Set Client Certificate to: None (Username or Password required)
- Set Data Encryption Negotiation to: Checked
- Set Data Encryption Algorithms to: AES-256-GCM
- Set Fallback Data Encryption Algorithm to AES-256-CBC
- Set Auth digest algorithm to: SHA384
- Set Allow Compression to: Decompress incoming, do not compress outgoing (Asymmetric)
- Set Compression to: Disable Compression [Omit Preference]
- In the Custom options field, paste: remote-cert-tls server
- Set UDP Fast I/O to : Checked
- Set Send/Recieve Buffer to: 1.00 MiB
- Click Save
Add an Interface
- Click on Interfaces -> Assignments
- Use the Drop-down menu for the Available network ports: and select ovpnc* and then click on +Add
- Click on the New interface name, it is usually named OPT1 or OPT2.
- Set Enable: Enable Interface to be checked
- Click on Save.
Add NAT rules
- Click on Firewall -> NAT -> Outbound and then select Mode: "Manual Outbound NAT rule Generation (AON) and then click on Save.
- Copy the entry that contains your local IP address (The one that does not contain port 500 nor 127.0.0.0 , In this example 172.17.1.0/24 is used, for you this will most like differ and will probably be 192.168.1.0/24) by clicking on the Copy icon found under Actions to the right of the NAT entry (Add a new mapping based on this one)
- Click on the Pen icon (Edit mapping) and change so that interface is the mullvad one and write a description.
- Make sure that both Disabled and do not NAT are unchecked
- Delete the other rules that contain your local IP that exists via WAN , (keep the 127.0.0.0) This will ensure that you can not reach the internet if the VPN tunnel is down from your clients behind the pfSense router.
- Click on Save.

DNS
- Click on Services
- Click on DHCP server
- Set DNS server 1 to: 10.8.0.1
- Click on Save
After you have completed these steps, click on Status -> OpenVPN -> and then click on the Restart openvpn Service to reload it all.
Easily check your online privacy with Am I Mullvad
While you're connected to Mullvad, your browser could still be leaking information and therefore jeopardizing your privacy. With our Connection check, you can now get a quick overview of your connection status.
Split-tunneling
In this example you will route 8.8.4.4 outside the VPN to the client 192.168.1.101
Adding a NAT rule
- Go to Firewall -> NAT -> Outbound -> Add
- Set Interface to WAN
- Set Address Family to IPv4
- Set Protocol to any
- Set Source type to Network and 192.168.1.101 / 32 for the client you wish to go outside the VPN.
- Set Destination type to Network and 8.8.4.4 / 32 for the Destination network
- Click on Save and Apply Changes, and make sure the new rule is higher than the VPN nat rule.
Add a static rule
- Go to System -> Routing -> Static Routes
- Click on "+Add"
- Set Destination network to 8.8.4.4
- Set Gateway to WAN_DHCP (or WAN)
- Click on Save and Apply Changes
Troubleshooting
I am running an older version of pfSense (2.3.x) and some things are not available or renamed. Where do I configure them?
TLS authentication is now called TLS Configuration.
UDP Fast I/O is not available as a checkbox icon on pfSense 2.3.x.
Send / Receive Buffers dropdown menu is not available on pfSense 2.3.x.