Asus Merlin and Mullvad VPN
Routers OpenVPN Installation Router Asuswrt-Merlin
Letzte Aktualisierung:
This guide walks you through how to set up Asus routers that are running the Asuswrt-Merlin firmware. You will connect to the Mullvad VPN servers using OpenVPN protocol.
Asuswrt-Merlin is an open source third-party firmware for Asus routers based on Asuswrt (the firmware developed by Asus) with more advanced VPN options. It's recommended to use this over the default stock firmware.
What this guide covers
- Supported router models
- Setup instructions
- Uploading a configuration file
- Setting up the VPN Client
- Setting up VPN Director
- Setting up the DHCP Server DNS
- Enabling IPv6
- Connecting to the VPN
- Troubleshooting
Supported router models
You can find the supported models on the Asuswrt-Merlin website.
Your VPN speed is dependent on the router's CPU. OpenVPN can only use one CPU core, and AES encryption takes quite some processing power. Some newer Asus routers have an AES-NI hardware acceleration chip that takes that care that. Here are some speed estimates from around the Internet:
RT-AC86U = 247 Mbps
RT-AC88U = 40-60 Mbps
RT-AC55U = 48-80 Mbps
RT-AC56U = 25 Mbps
RT-AC68U = 25 Mbps
Setup instructions
Open a web browser and enter the IP address of your router. For ASUS routers, the default LAN IP is 192.168.1.1 or 192.168.50.1.
In Advanced Settings click on VPN.
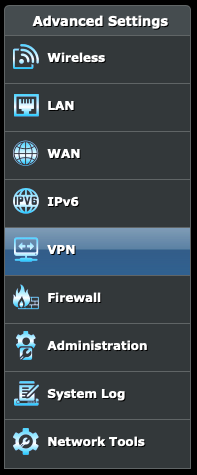
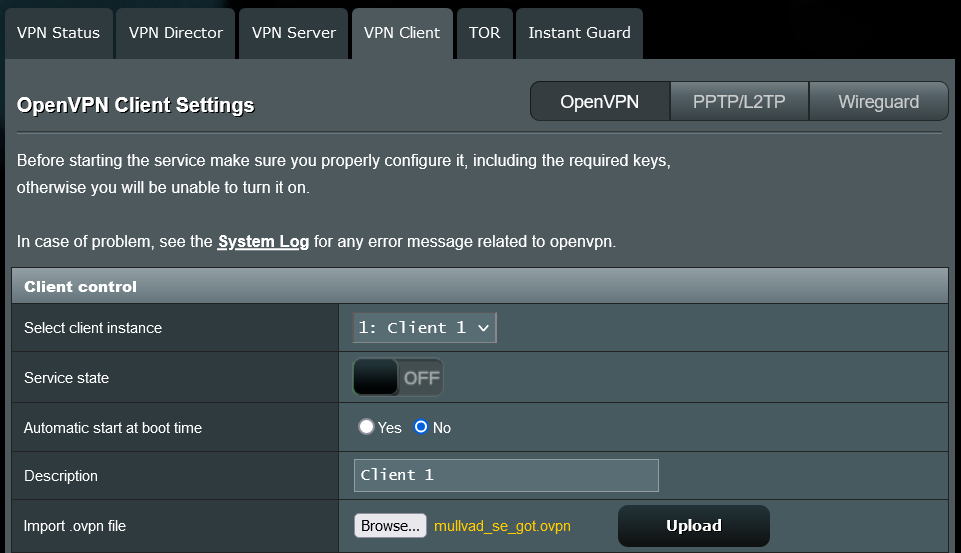
Click on the VPN Client tab at the top of your screen and then click on OpenVPN in order to create a VPN connection.
Uploading a configuration file
Download an OpenVPN configuration file from our OpenVPN configuration file generator. Make sure that "Android/ChromeOS" is selected.
- Click on the Browse... button and open your downloaded .ovpn file.
- Click on the Upload button. This loads the settings in the GUI and removes the uploaded file name.
- Enable Automatic start at boot time.
Note: If you use the ASUS stock firmware it may say File format or path is invalid! when you import the .ovpn file. In this case open the .ovpn file in a text editor and remove the line "tun-ipv6" before you import it.
Setting up the VPN Client
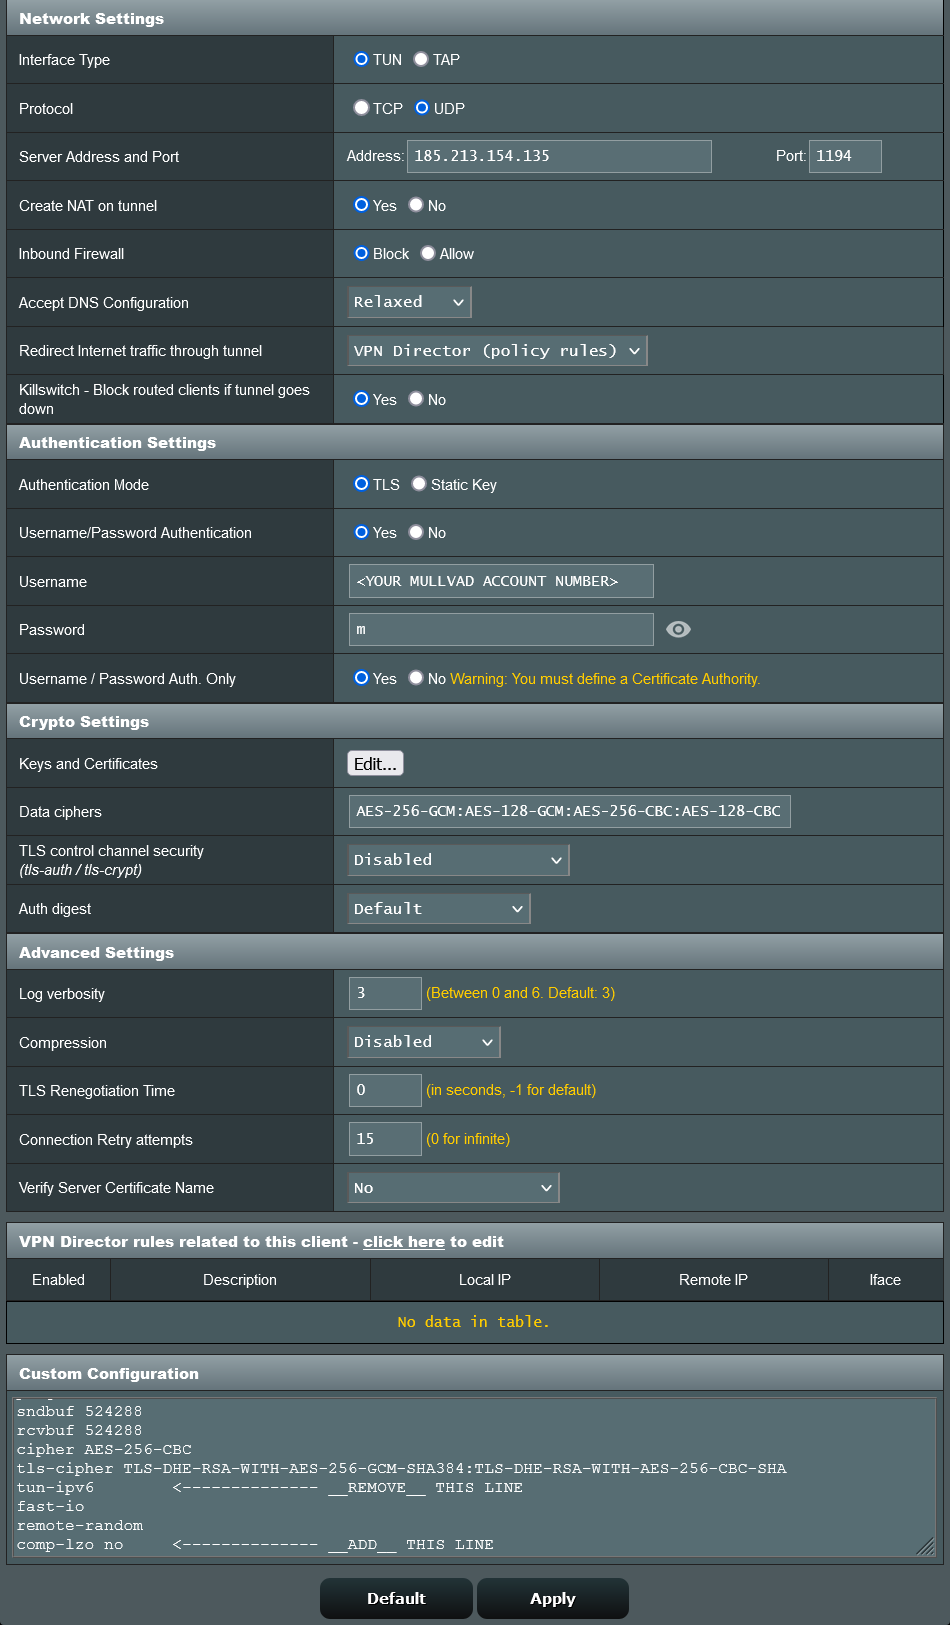
You will now see the OpenVPN client settings. Double-check that your settings match the ones in the image below. Click on it to enlarge it.
To see the full contents of the "Custom Configuration" text area you can use the scroll bar inside it.
- For Protocol the default is UDP. If you need to change to TCP then also change Port to 443.
- The Server Address and Port may vary and you can change the Address to change servers. Use an IP address, not a hostname.
- For Username/Password Authentication, choose Yes.
- For Username, enter your Mullvad account number without any spaces.
- For Password, use "m".
In the Custom Configuration text area use the scroll bar on the right side inside it and do the following:
- Make sure it does not have a line that says
tun-ipv6orcomp-lzo no.
Press the Apply button.
Setting up VPN Director
- Make sure that Redirect Internet traffic through tunnel is set to VPN Director (policy rules).
- Make sure that Killswitch - Block routed clients if tunnel goes down is set to Yes.
- If you changed the settings then press the Apply button.
Configure VPN Director
- Click on the VPN Director tab in the top.
- Click on Add new rule and add the following:
- Interface: OpenVPN 1: Client 1
- Enable: Yes (checkmark)
- Description: Mullvad
- Local IP: 192.168.1.0/24 or 192.168.50.0/24 (check which one in LAN > DHCP Server)
- Remote IP: (leave this blank)
- Click on OK.
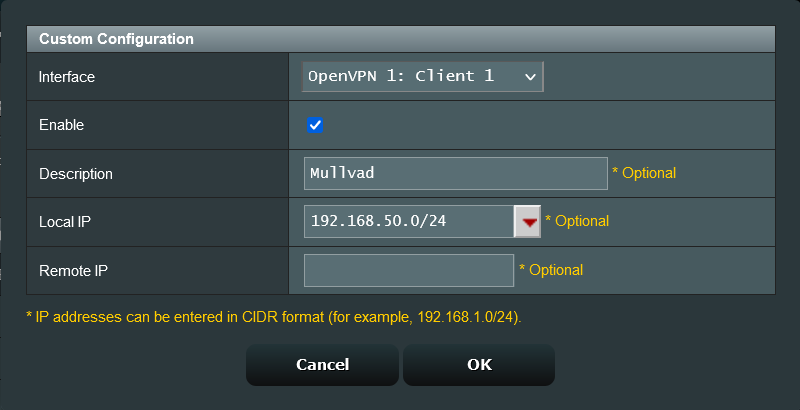
- Click on Apply.

Check the Source IP / Local IP
Make sure that the Local IP above is set to the local IP address range that the computers/devices which are connected to the router is using. You may have to refresh the IP on the computers/devices or restart them if they are using the DHCP server on the router.
Older versions (end-of-life models)
In Merlin versions older than 386.3 you can select the following on the VPN Client tab.
Rules for routing client traffic through the tunnel
- Description: Mullvad
- Source IP: 192.168.1.0/24 or 192.168.50.0/24 (check in LAN > DHCP Server)
- Destination IP: 0.0.0.0/0
- Iface: VPN
Then press the Apply button.
Setting up the DHCP Server DNS
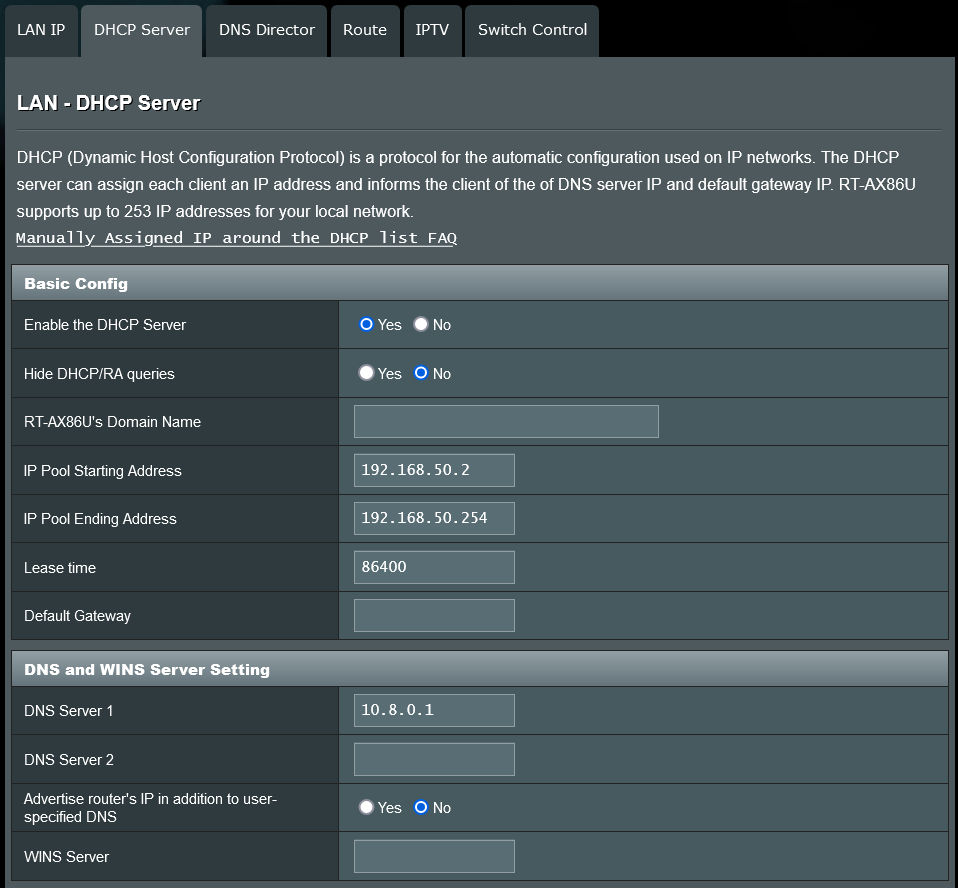
Go to LAN -> DHCP Server -> DNS and WINS Server Settings, and set:
DNS Server 1: 10.8.0.1
If you plan to exclude some computers/devices from the VPN (using VPN Director) then you need to add an alternative DNS Server 2 as well.
When you add/remove DNS servers you can restart the computers/devices in the network so they get the new settings applied.
Next to Advertise router's IP in addition to user-specified DNS, select No and press the Apply button
Do not change the IP Pool Starting/Ending Address. It normally starts with either 192.168.1.2 or 192.168.50.2.
Enabling IPv6
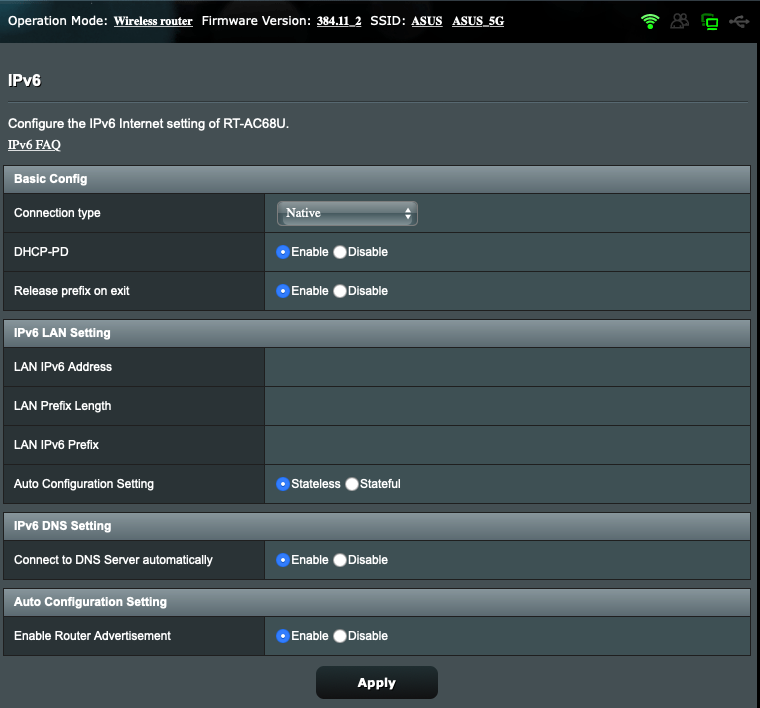
- Click on the IPv6 menu item in the left column.
- Set Connection type to Native.
- Disable Enable Router Advertisement (the sceenshot shows it as enabled).
- Click on the Apply button.
Connecting to the VPN
Click on VPN in the left column and then click on VPN Client.
Under Client control, find Service state and switch the button to ON in order to connect to Mullvad servers.
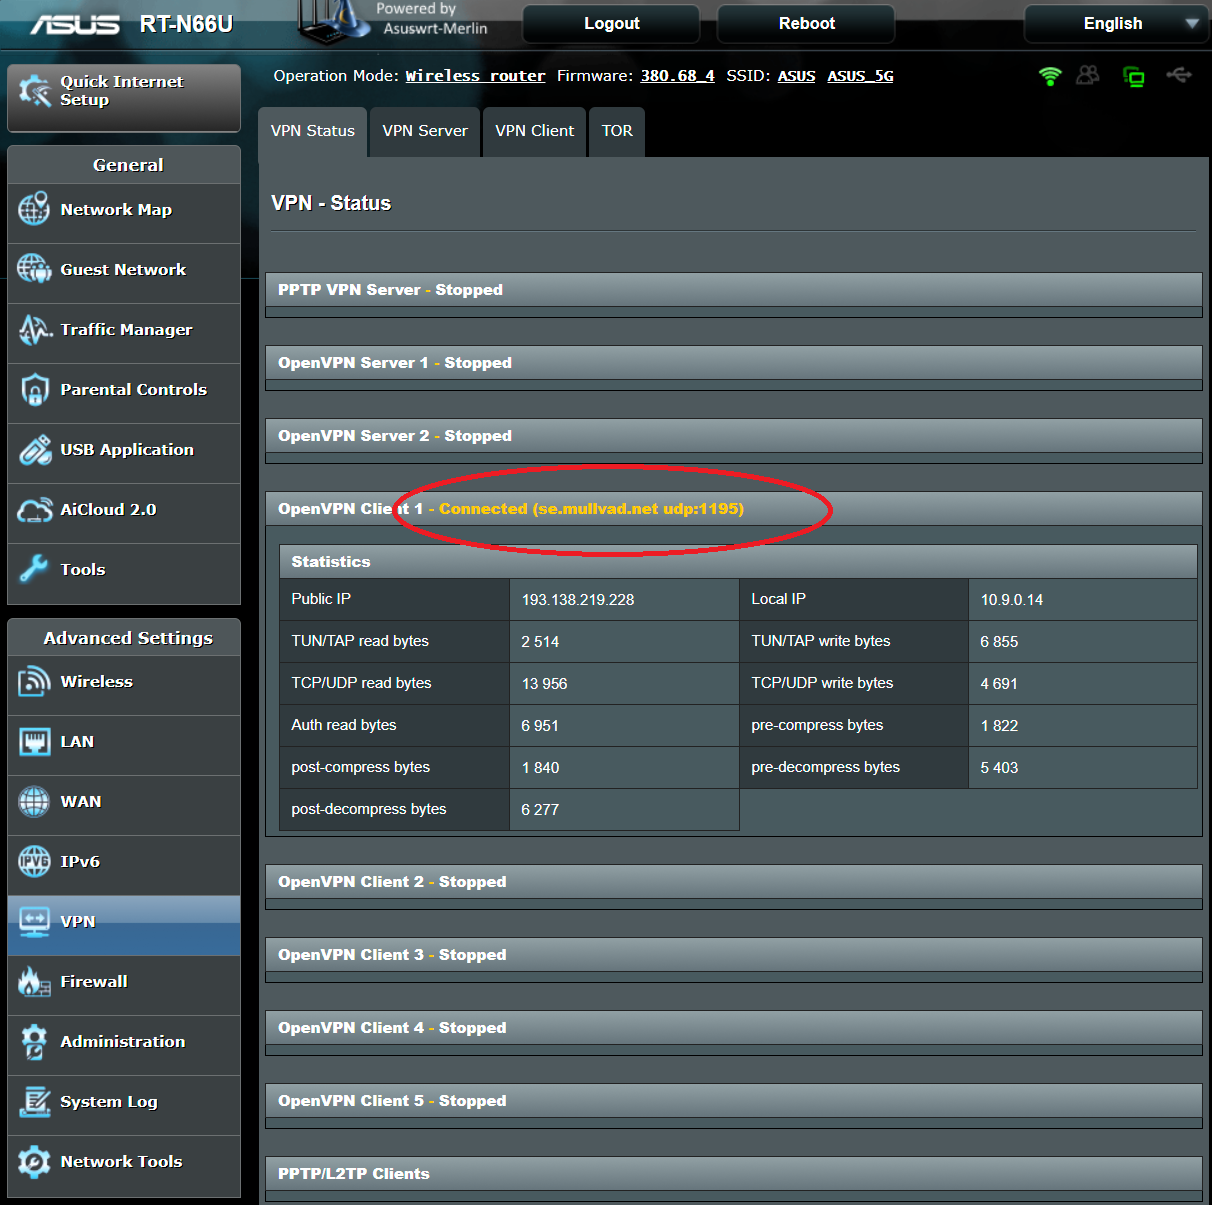
Click on the VPN Status tab to see information about your VPN connection.
You should now be connected to Mullvad. Verify your connection status by visiting our Connection check in a browser on the computers/devices that are connected to the router.
Troubleshooting
Log file
If you get into any trouble you can send us the log from Advanced settings > System Log > General Log.
IPv6 issue - Exiting due to fatal error
The log may show the following error:
ovpn-client1[1234]: Linux ip -6 addr add failed: external program exited with error status: 2
ovpn-client1[1234]: Exiting due to fatal error
Have you enabled IPv6 by setting it to "Native" in the IPv6 menu? If that doesn't help then you can disable IPv6 in the menu and edit the OpenVPN configuration file so OpenVPN won't use it. Make the following changes before you import the file:
- Replace
proto udpwithproto udp4(if using udp). - Replace
proto tcpwithproto tcp4(if using tcp). - Add the line
pull-filter ignore "route-ipv6" - Add the line
pull-filter ignore "ifconfig-ipv6"
IPv6 DNS leak
If our Connection check shows an IPv6 leak then go to the IPv6 menu and disable "Enable Router Advertisement".
Username/password
When you enter the username you should use your Mullvad account number without any spaces. The password is "m".
"Unrecognized option"
Download the OpenVPN configuration file for Android, not another platform. Use Chrome when downloading.
"Cannot resolve host address"
Check the option "Use IP addresses" in the Advanced Settings of the OpenVPN configuration file generator.
"Certificate verify failed / TLS handshake failed"
Set the time and date correctly in the router.
"You must define CA file (--ca) or CA path (--capath)"
Try to go to Administration > System and select the option to format JFFS on next boot. Click on Apply and then Reboot. Wait a couple of minutes after it reboots and then reboot again. If it does not help then log in with SSH and run "df" and check that you have a jffs partition. The certificate should normally appear in VPN Client > Crypto Settings > Keys and Certificates > Edit > Certificate Authority.
The router connects to the VPN and gets a Mullvad IP address, but the computer/device does not.
Make sure that the Source IP in "Rules for routing client traffic through the tunnel" is set to the local IP address range that the computer/device which is connected to the router is using. You may have to refresh the IP on the computer/device or restart it if it's using the DHCP server on the router.
Something is missing in the guide
Check the Asuswrt-Merlin 386/NG Changelog for new changes.
