Using Mullvad VPN on Android
Mullvad app Android Mobile Using
การอัปเดตล่าสุด:
This guide explains how to use the Mullvad VPN app on Android devices.
For information about the installation of the Mullvad VPN app see the guide Install Mullvad app on Android.
What this guide covers
- Purchasing time for Mullvad
- Log in
- - Too many devices
- - Connection screen
- Connect
- - Switch location
- - Disconnect
- Account
- - Manage Devices
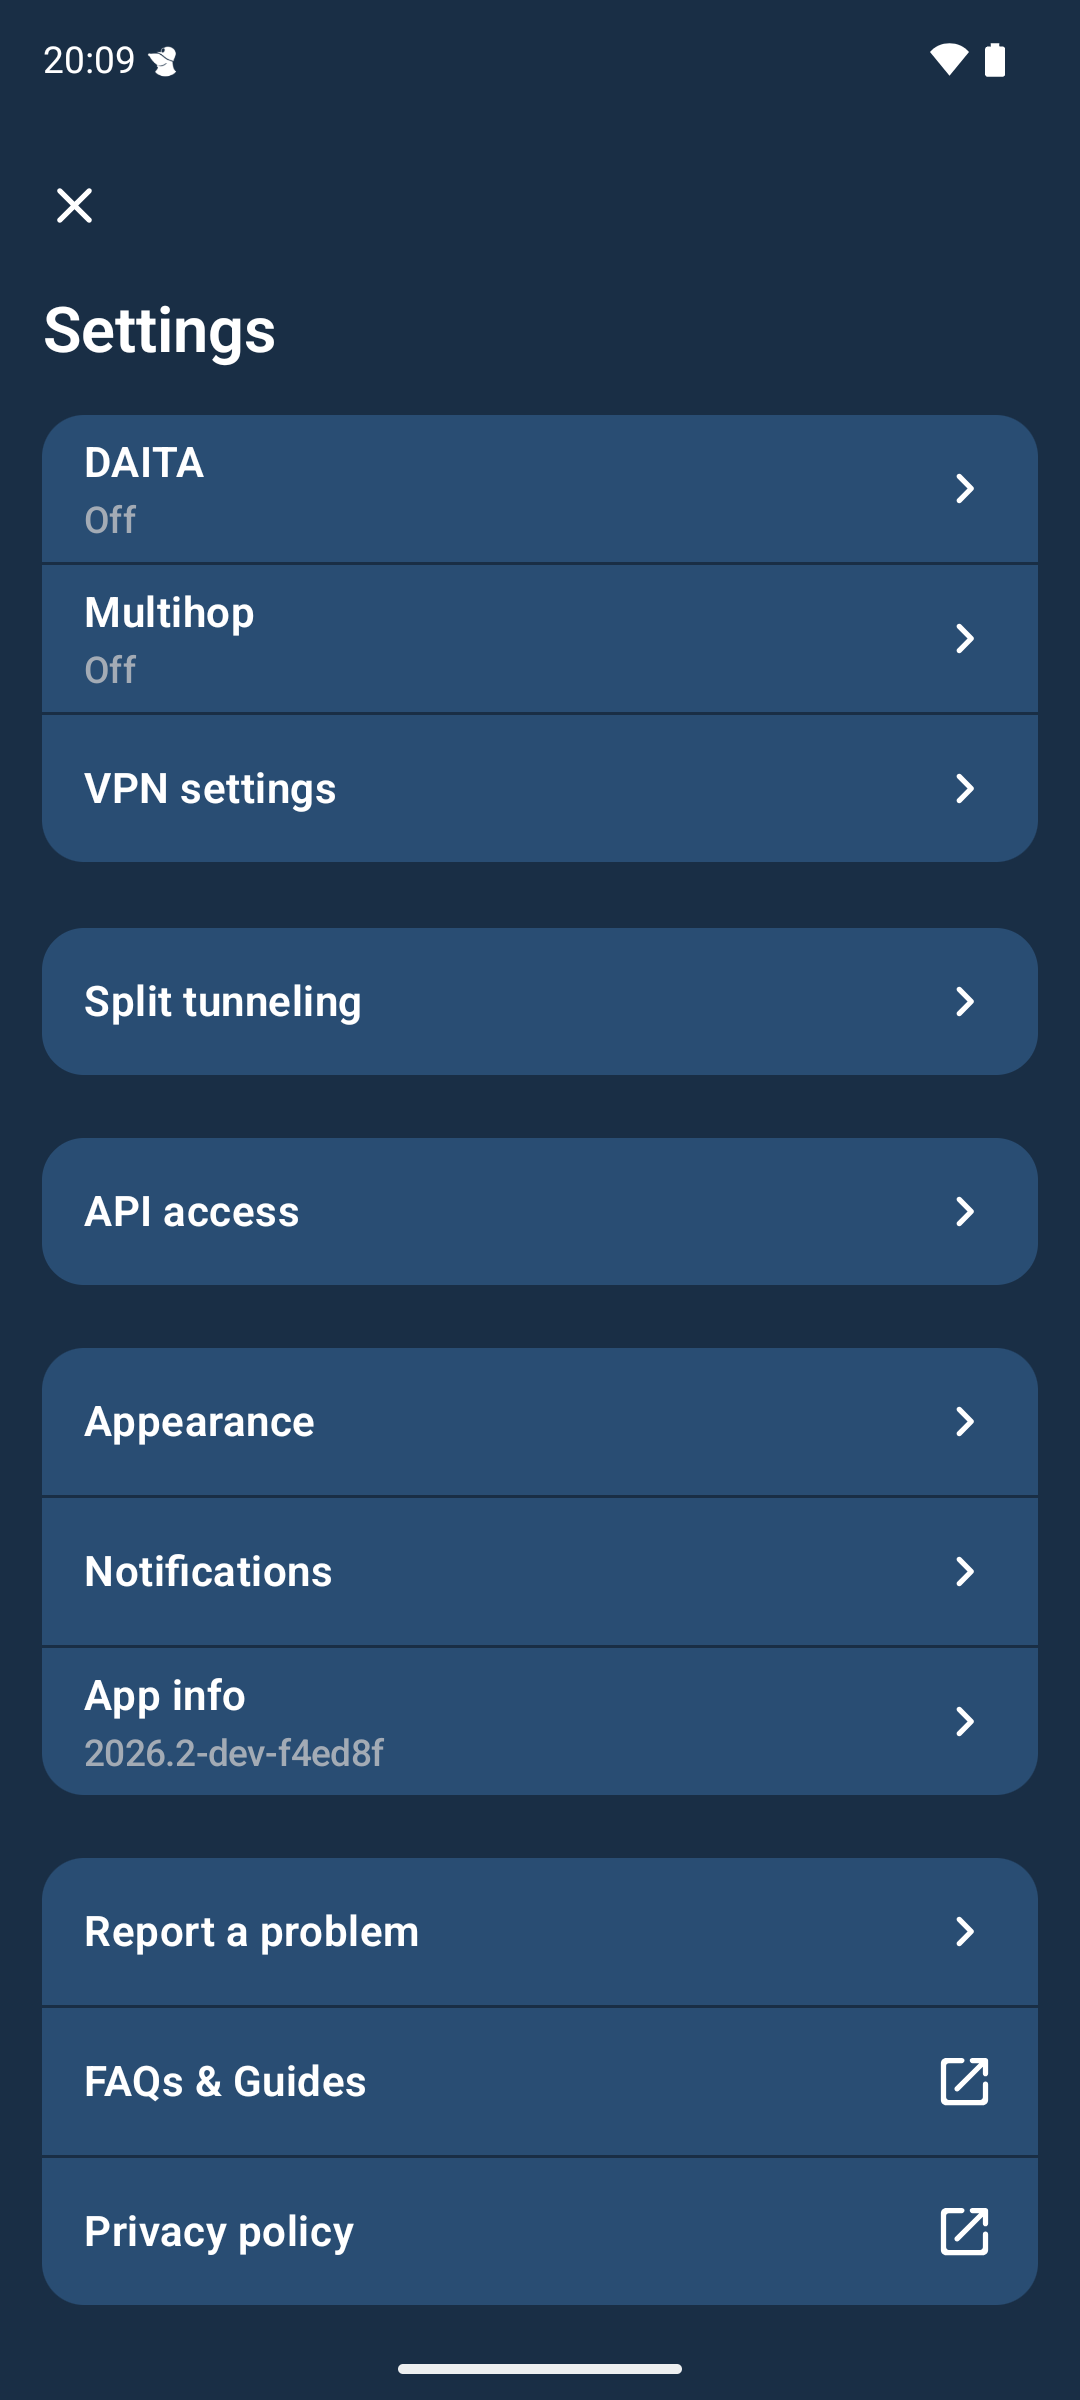
- Settings:
- - DAITA
- - Multihop
- - VPN settings
- - Anti-censorship
- - Split tunneling
- - API Access
- - Report a problem
- Android VPN settings
- - Connecting to Mullvad when the device starts
- - Blocking connections without VPN
- Vulnerabilities
- Battery optimization - preventing disconnections
- FAQ
Purchasing time for Mullvad
Using Google Play
If you have downloaded the Mullvad VPN app from the Google Play Store, then you have the option to make an in-app purchase. For this you need to have a payment method set up first. You can read more about that in the Google Play Learning Center. Then follow these instructions:
- Tap on Create account in the bottom of the login screen.
- Make sure to save the account number in a safe place.
- Tap on Add time.
- Proceed with the purchase.
Using the Mullvad website
More payment methods are available on our website. You have two options for making a Mullvad account:
1. Create a new account on our website (or use an existing account)
If you create a new account on our website, or log in with an existing account there, then make sure to log in with the same account number in the Mullvad VPN app. This is important since the payment will go to the account that you are logged in with on our website. If you are logged in with the wrong account number in the Mullvad app then tap on the Account icon in the top right corner of the Mullvad app and then tap on Log out. Then log in with the account number that you created on our website.
2. Create a new account in the Mullvad app
If you create a new account in the Mullvad app by tapping on Create Account, then make sure to log in with the same account number on our website before you pay.
Finding a lost account
If you recently (less than 20 days ago) made a payment on our website, and you do not know the account number, then use our account recovery tool.
If you made the purchase using Google Play then we are not able to recover the account. If you paid less than 20 days ago then see our Refunds guide.
Redeem voucher
If you have a voucher code that you purchased from one of our resellers then you can redeem it on our website, or tap on Create account in the Mullvad app and then tap on Redeem voucher. If you do not have a voucher then tap on the Account icon in the top right corner of the Mullvad app to view your Mullvad account number or log out.
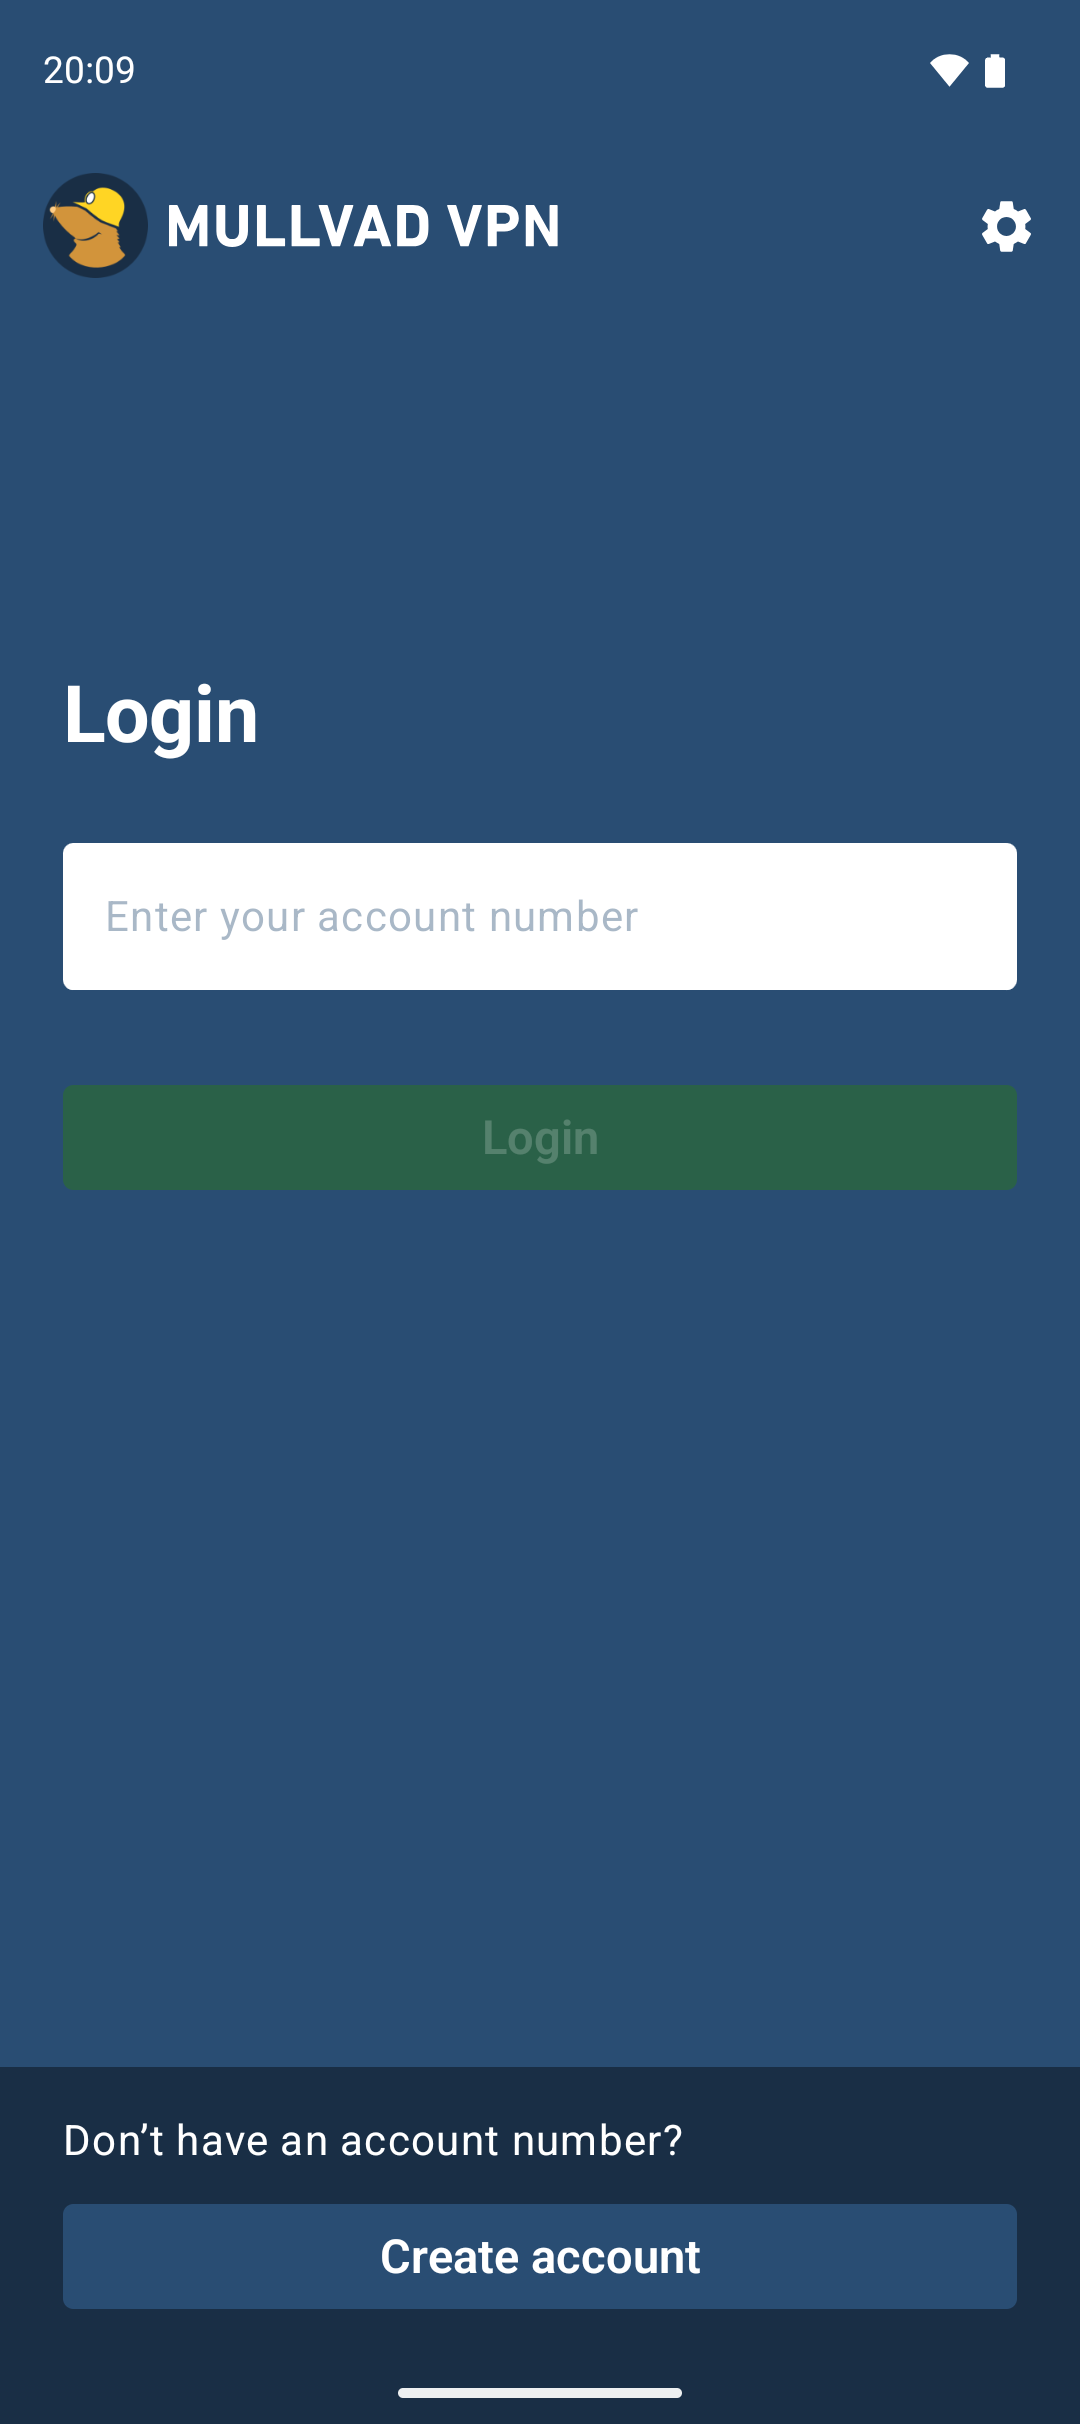
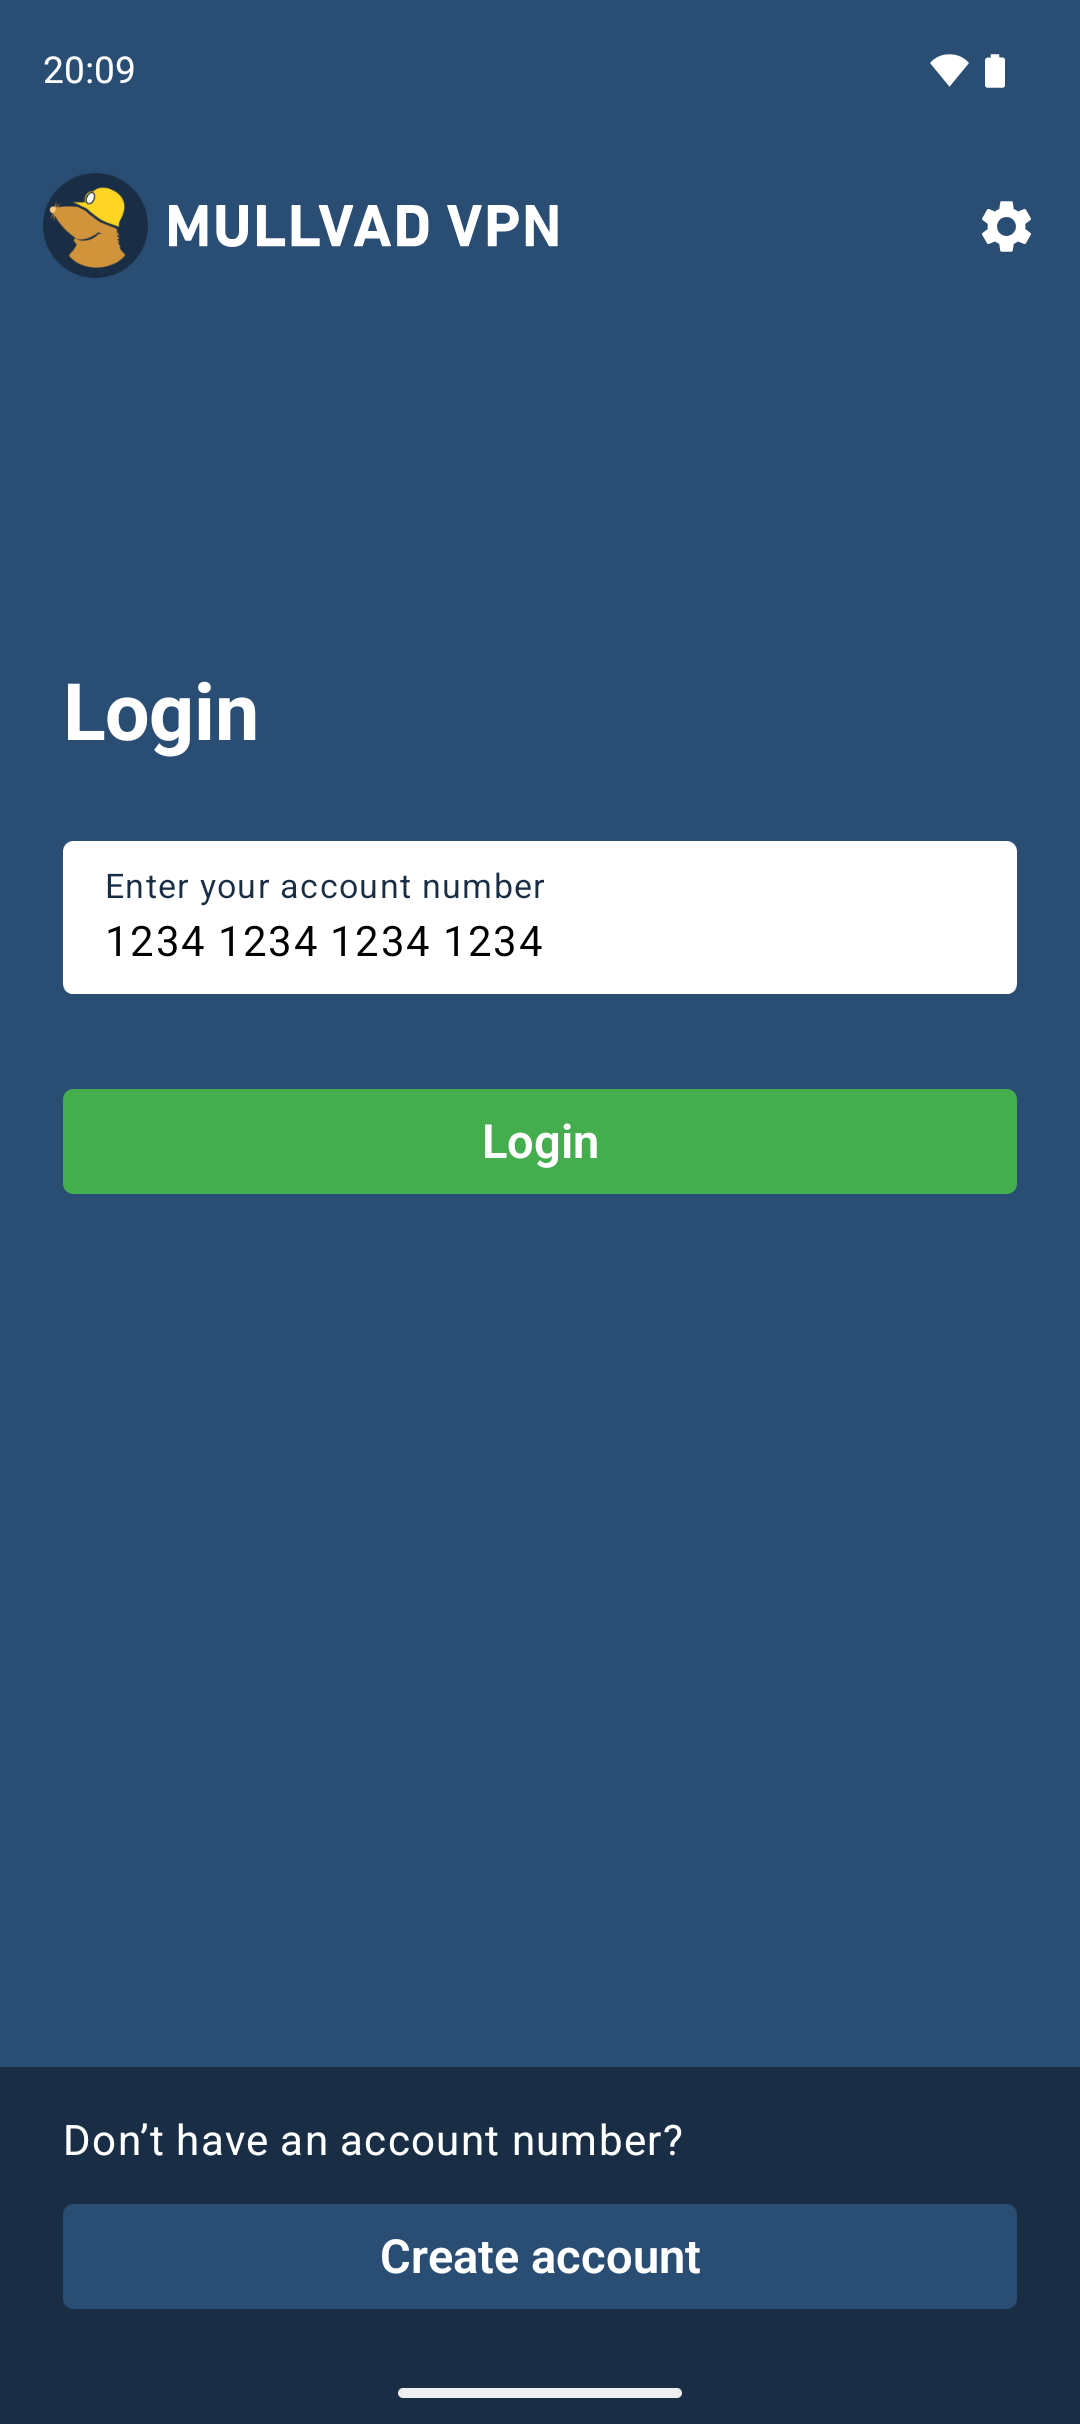
Log in
Enter your Mullvad account number, then tap the green login button.
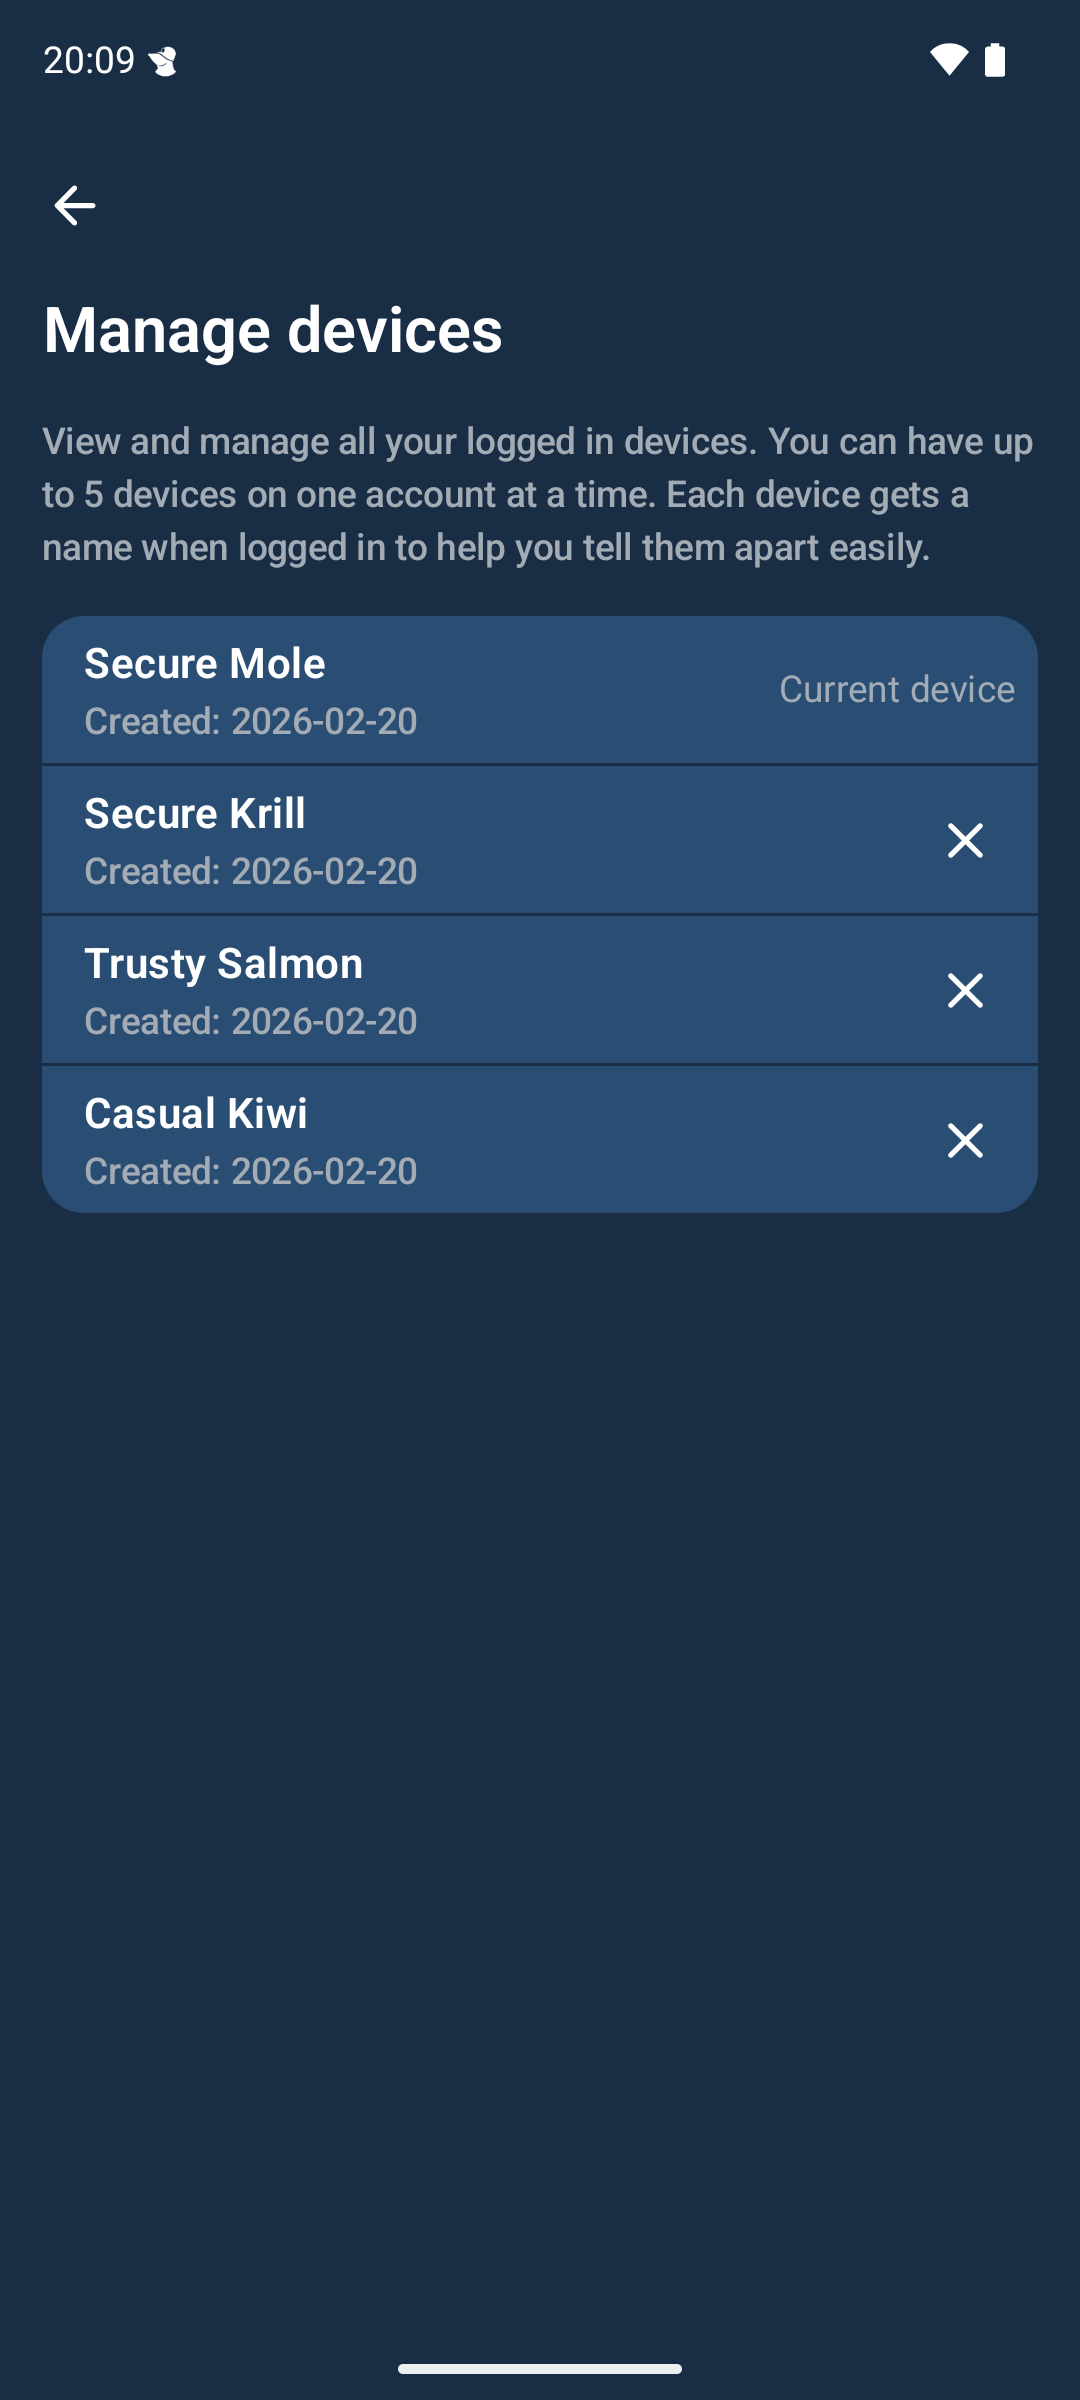
Too many devices
You can use a Mullvad VPN account on up to 5 devices. If you log in with an account that already has 5 devices associated with it, then you will see a list with all the device names.
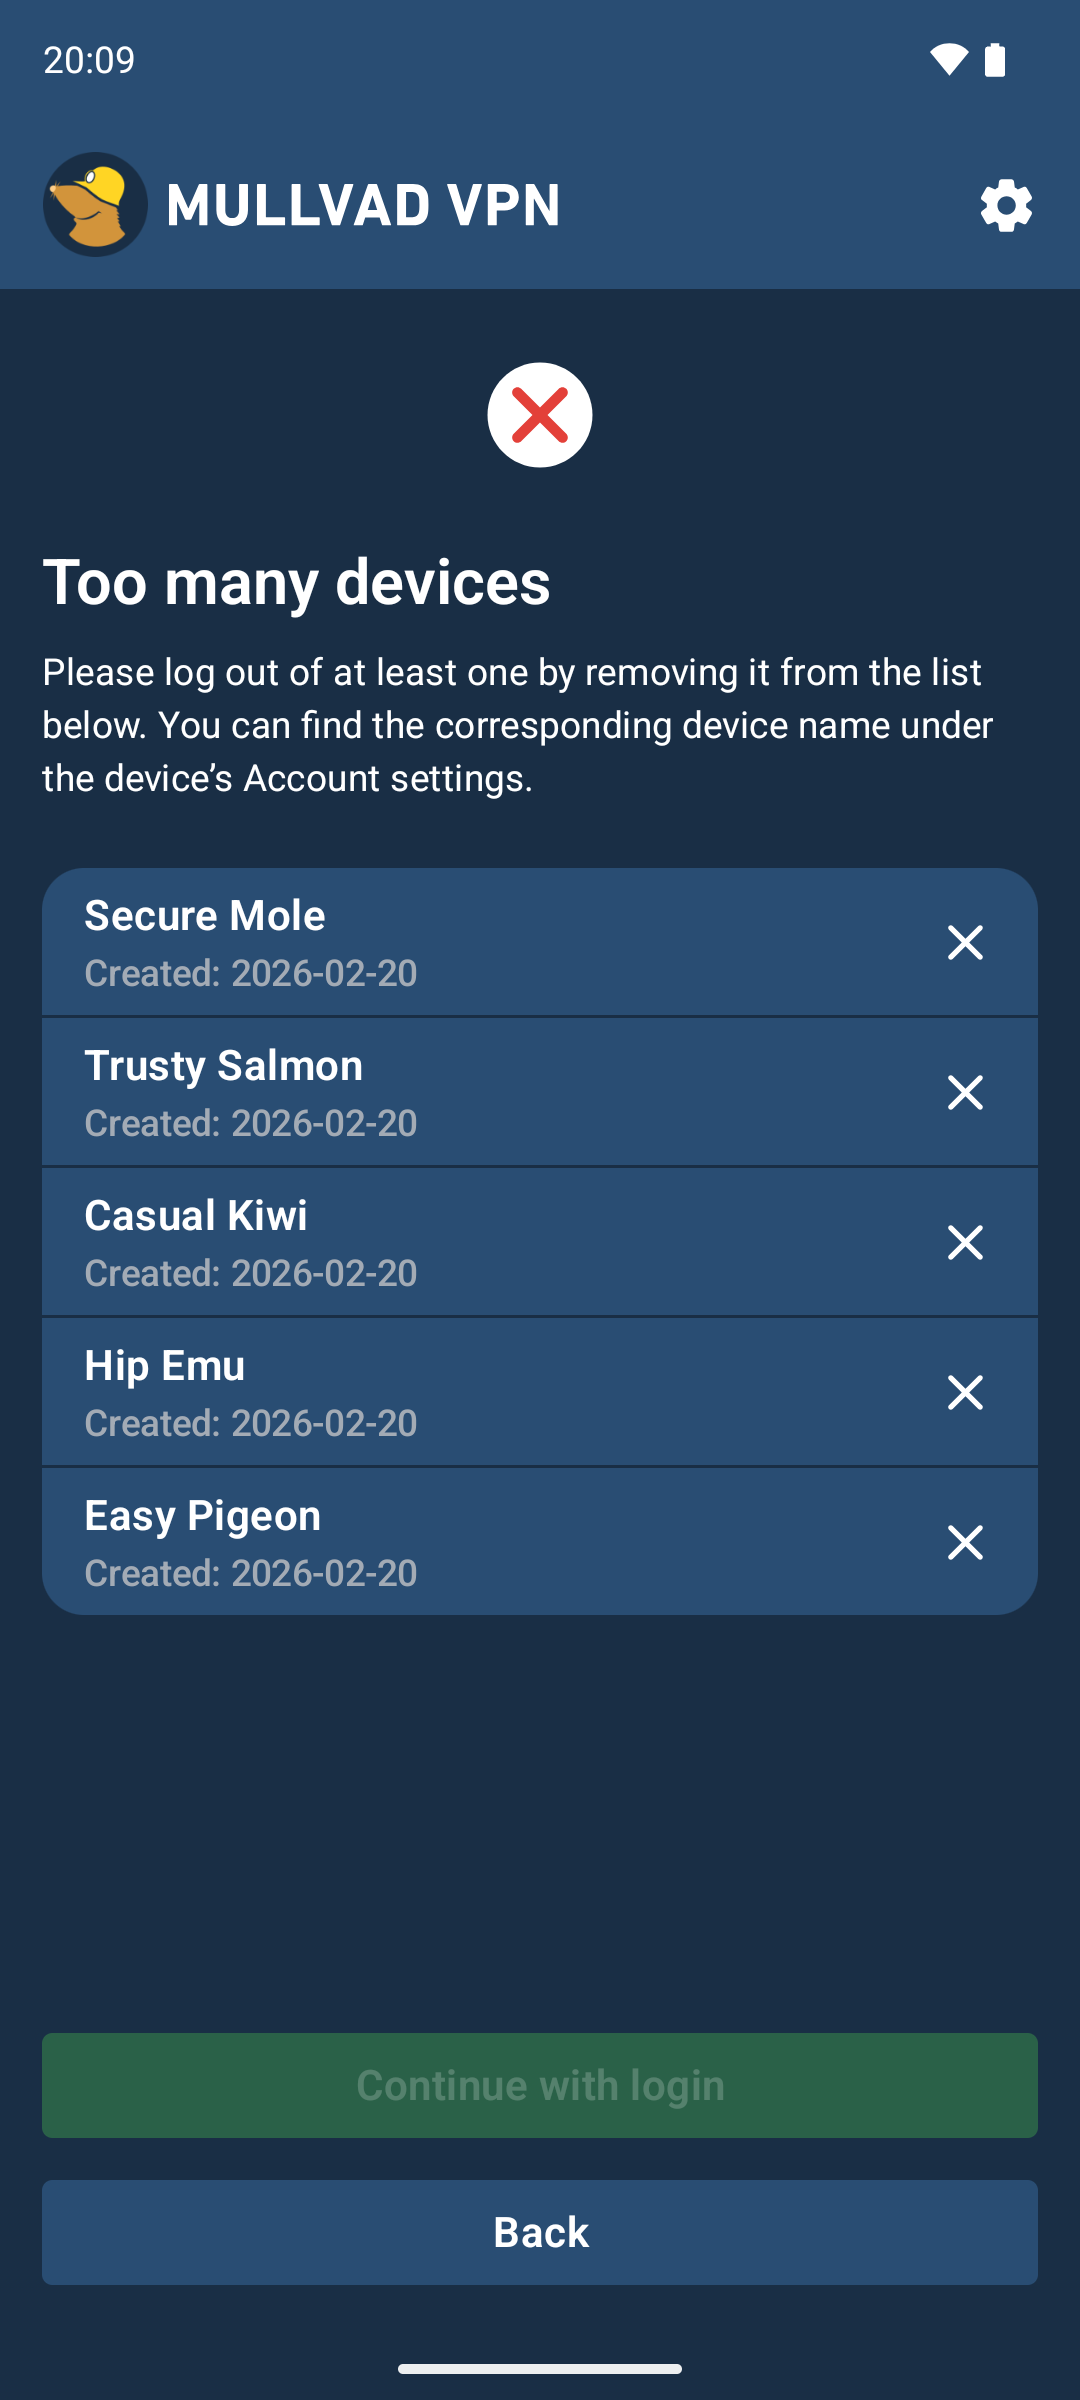
The device names are generated when you log in, using two random words (an adjective and an animal). If it is the first time you see this and it shows more devices than you have then don't worry, just follow these instructions:
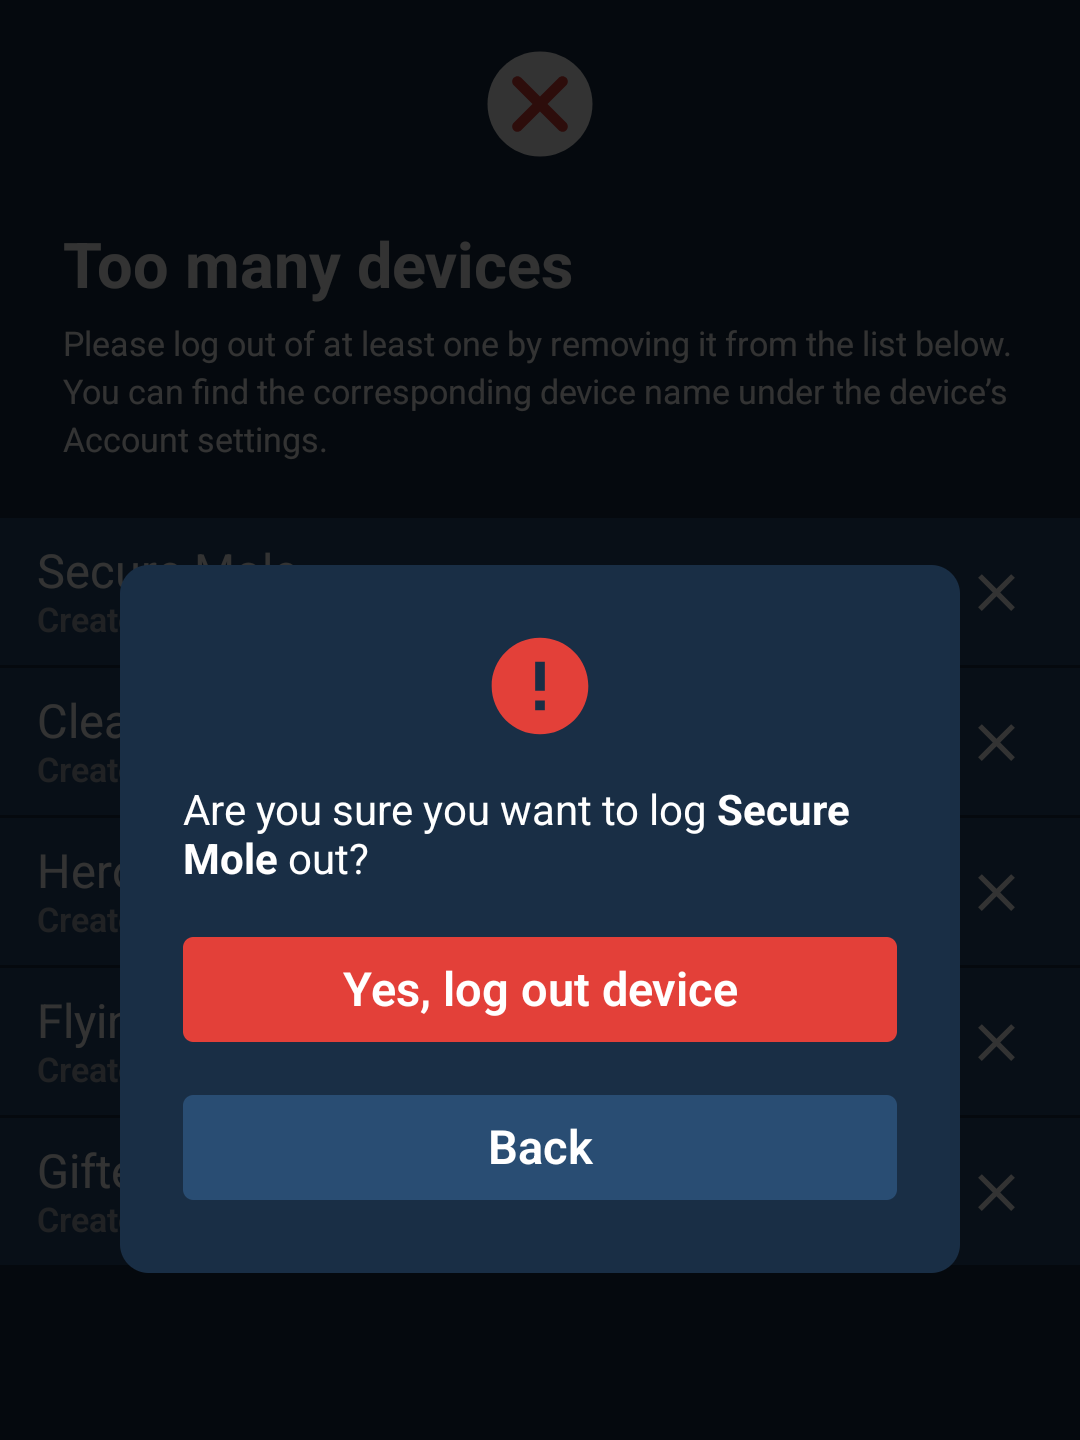
- To be able to log in you will need to remove at least one of the devices, by tapping the ✖ to the right of the device name. To check so you don't delete a device that you are using, open the Account settings in the Mullvad app on each of your devices to see their device names.
- Tap on Yes, log out device.
- Tap on Continue with login to log in on the device.
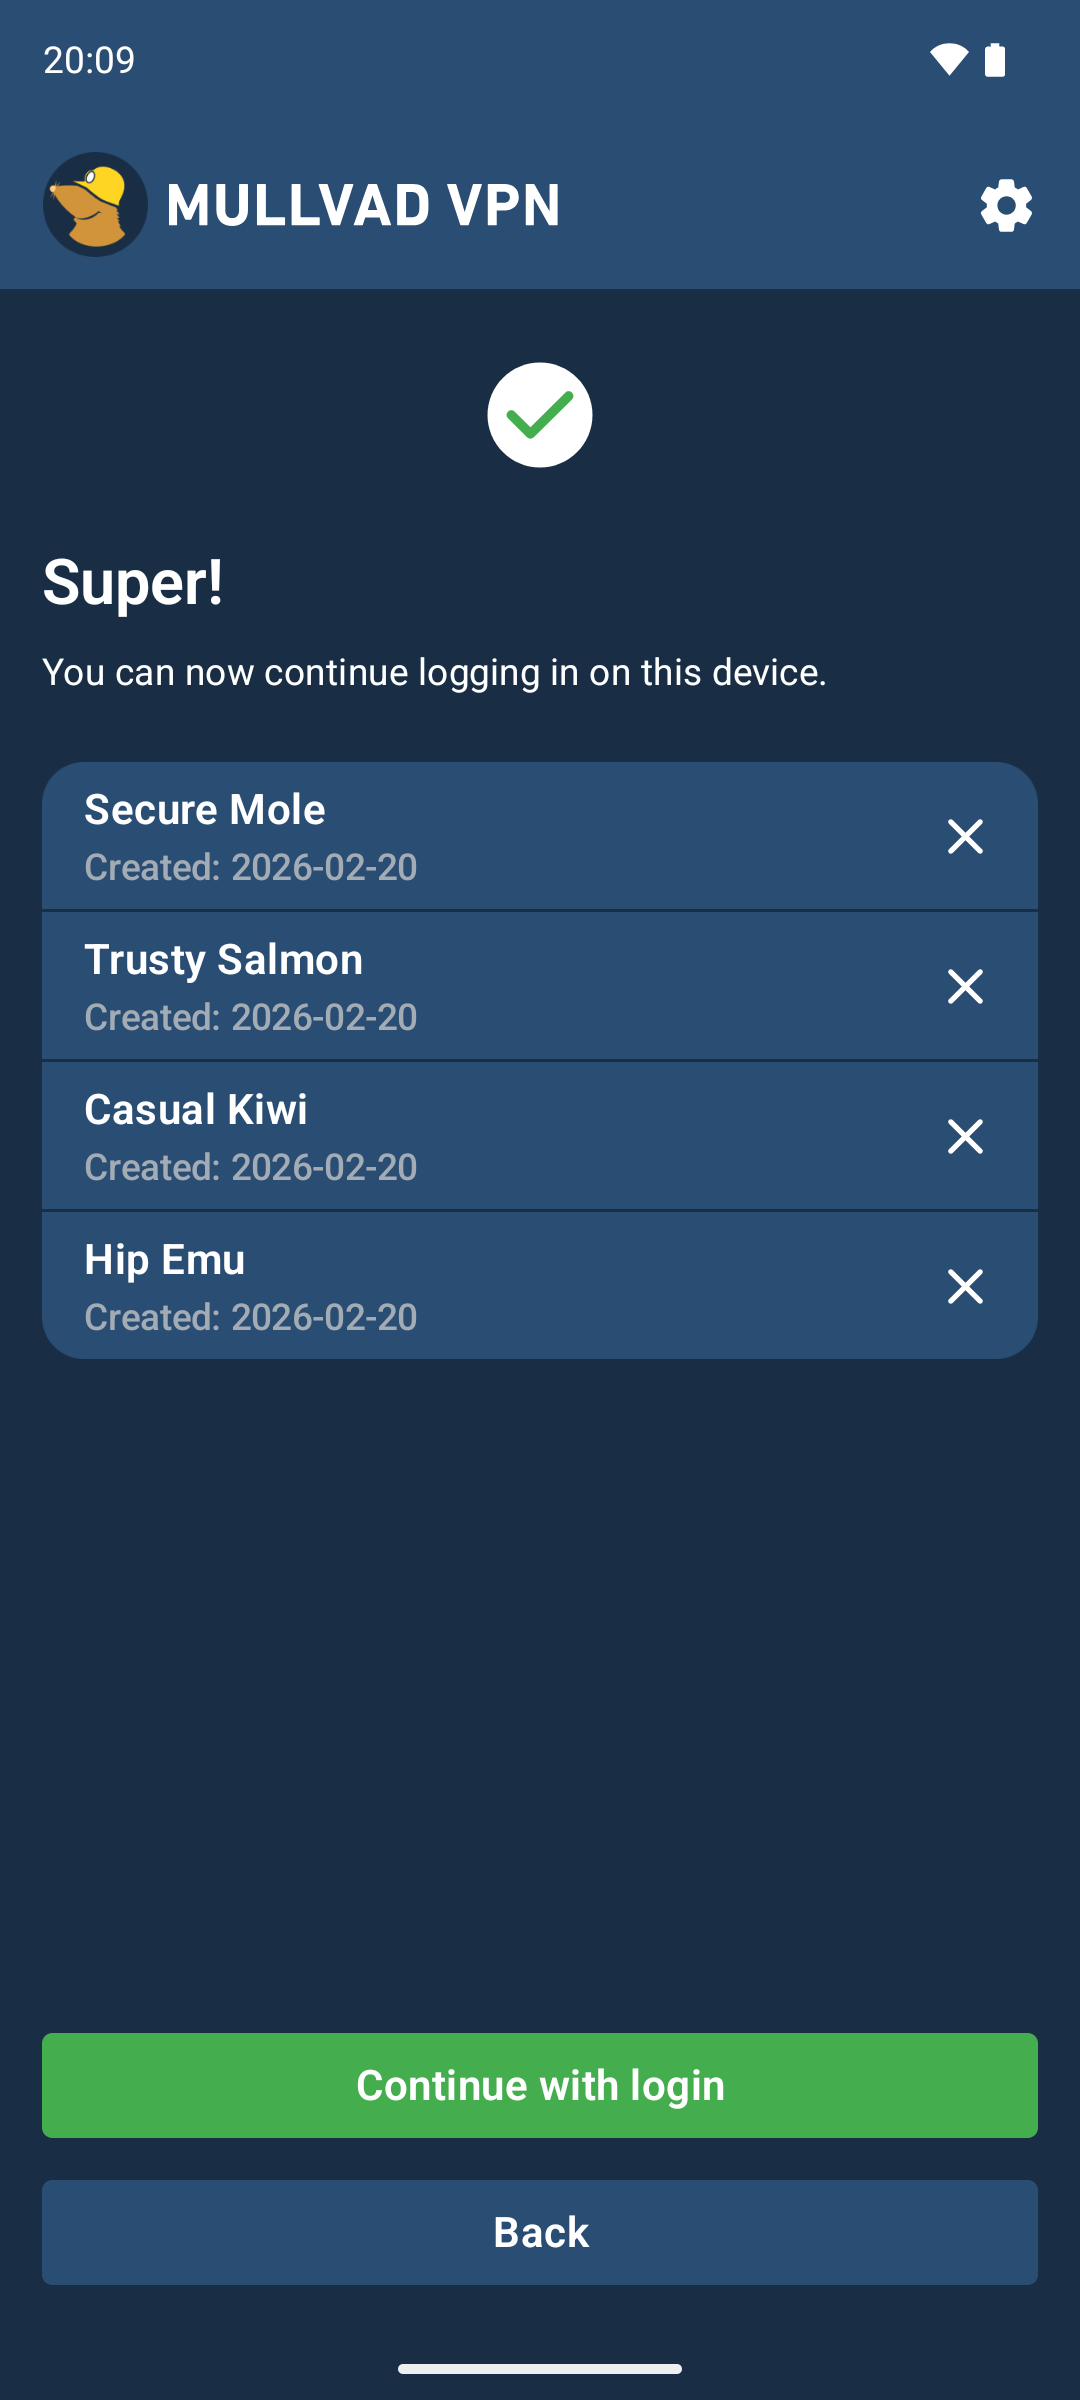
- You will get a notification with the new device name at the top of the connection screen. You can also check your device name by going to Account.
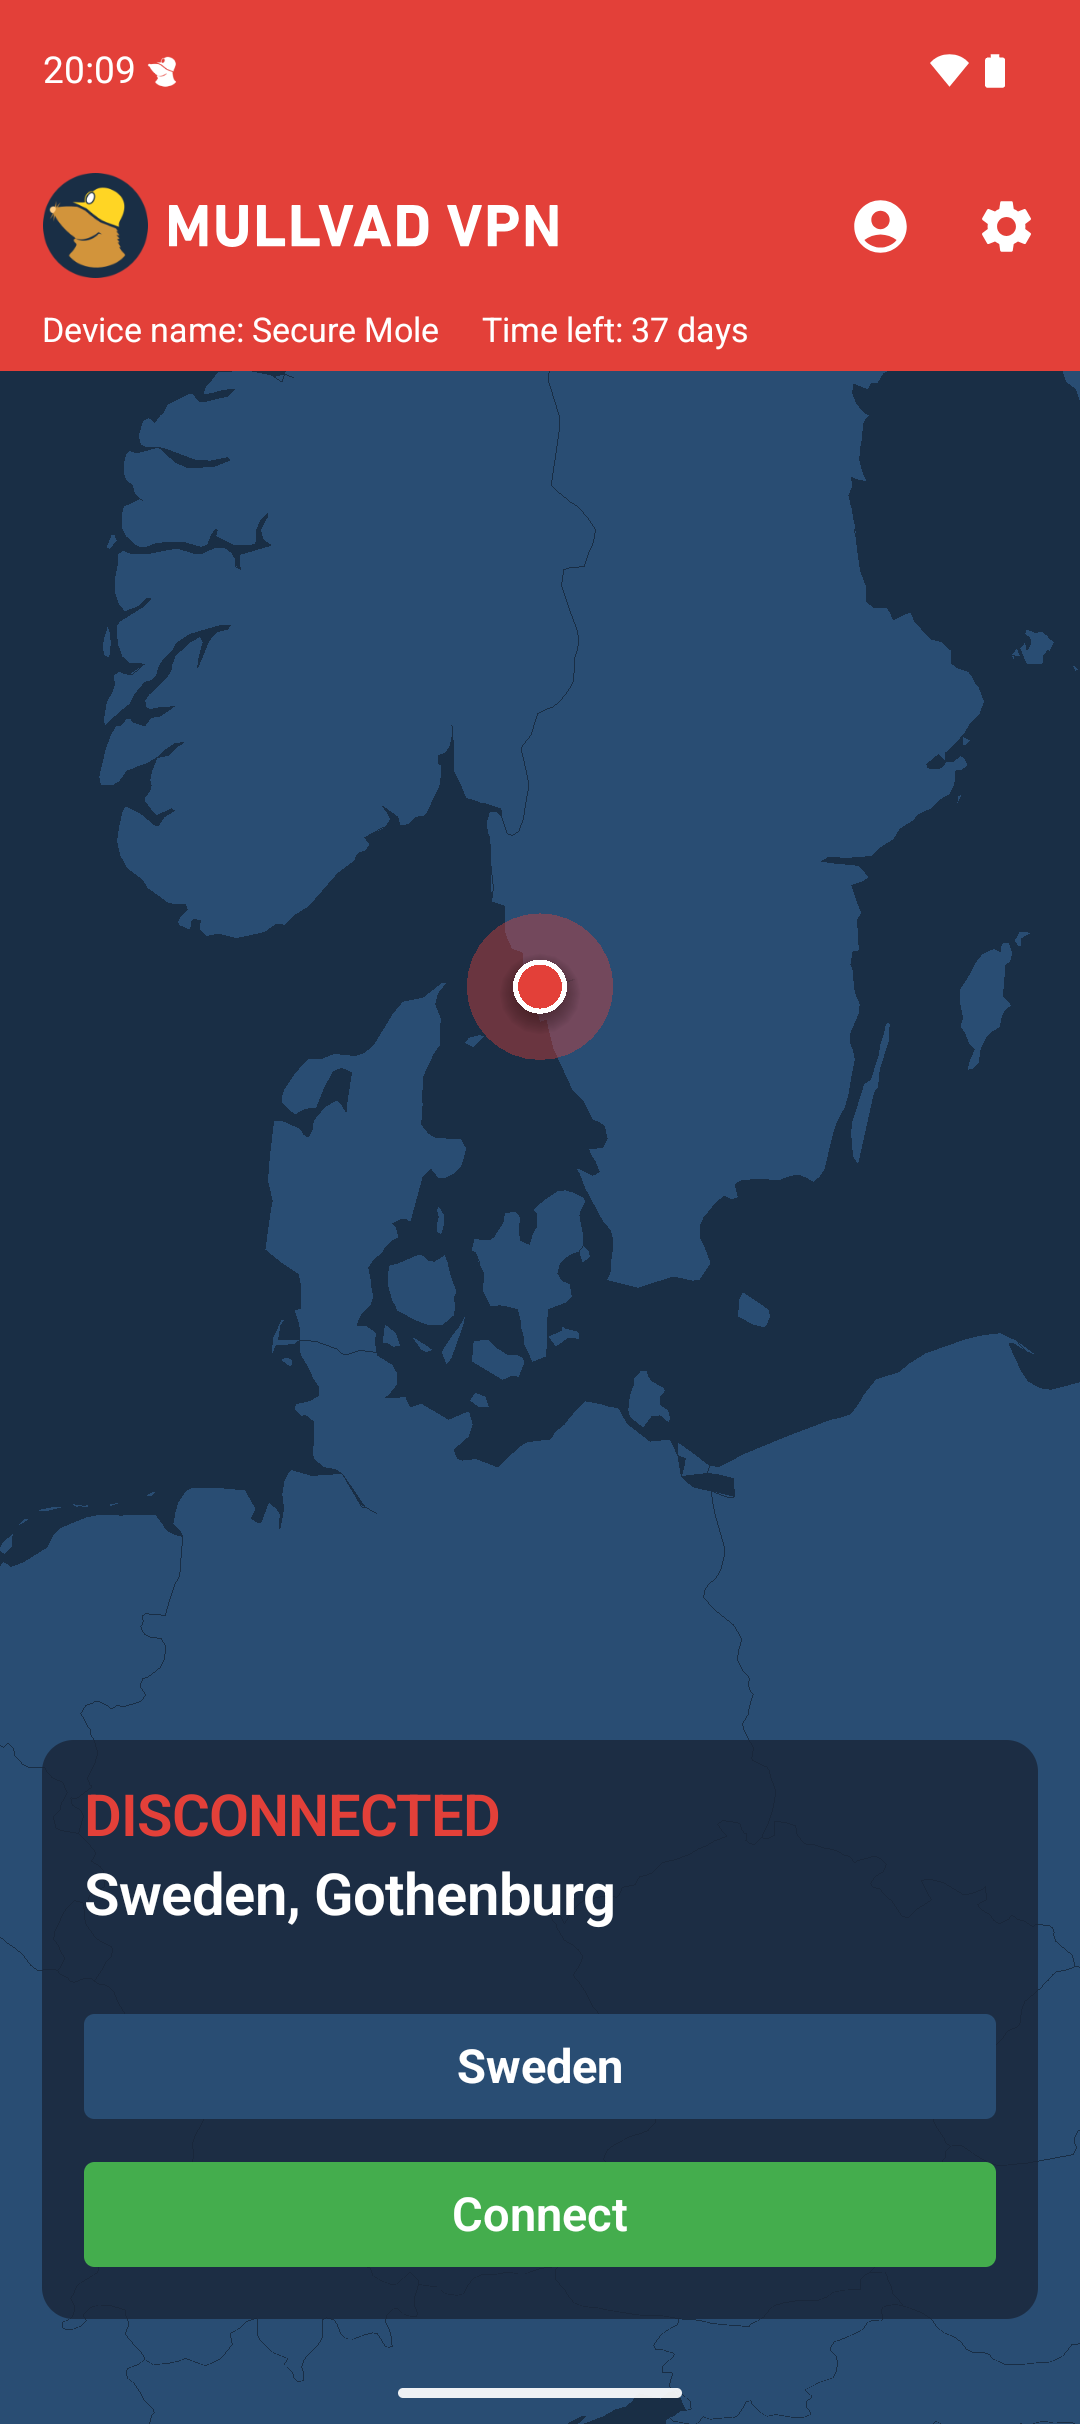
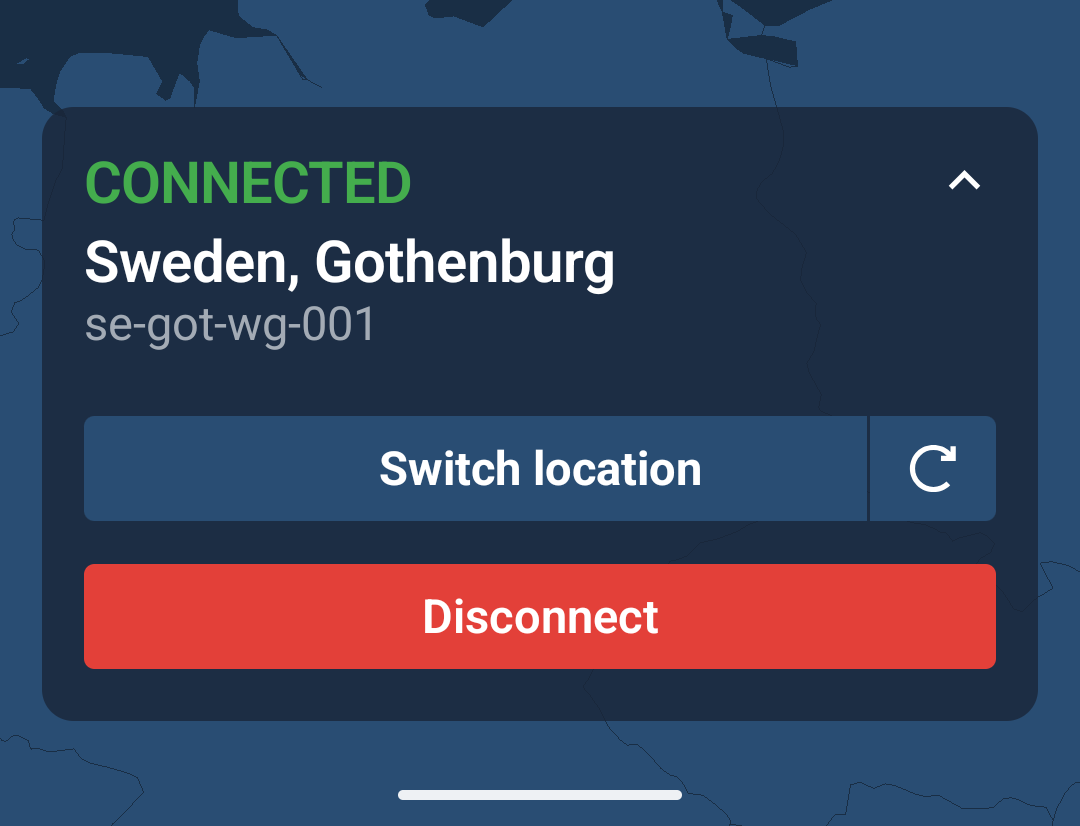
Connection screen
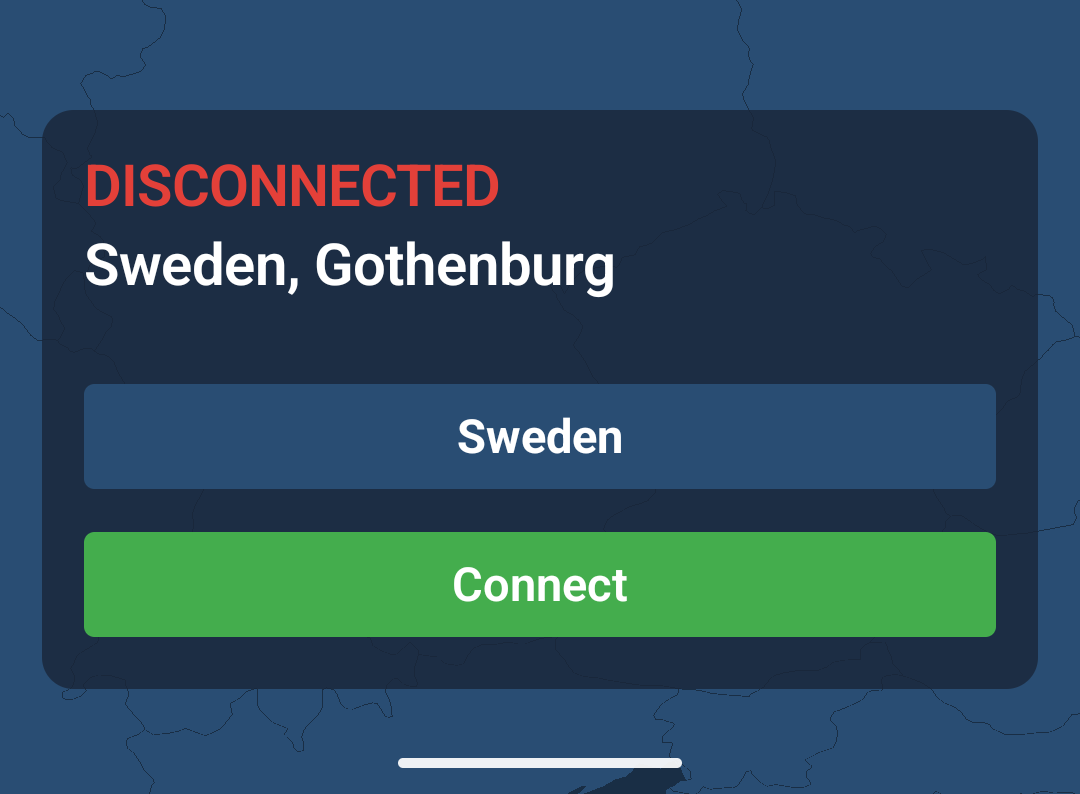
Once logged in, you will see the status of your connection on the app’s connection screen. When you are disconnected, the top bar of the app will be red and Disconnected will be displayed on the connection screen.
Connect
To connect, tap Connect.
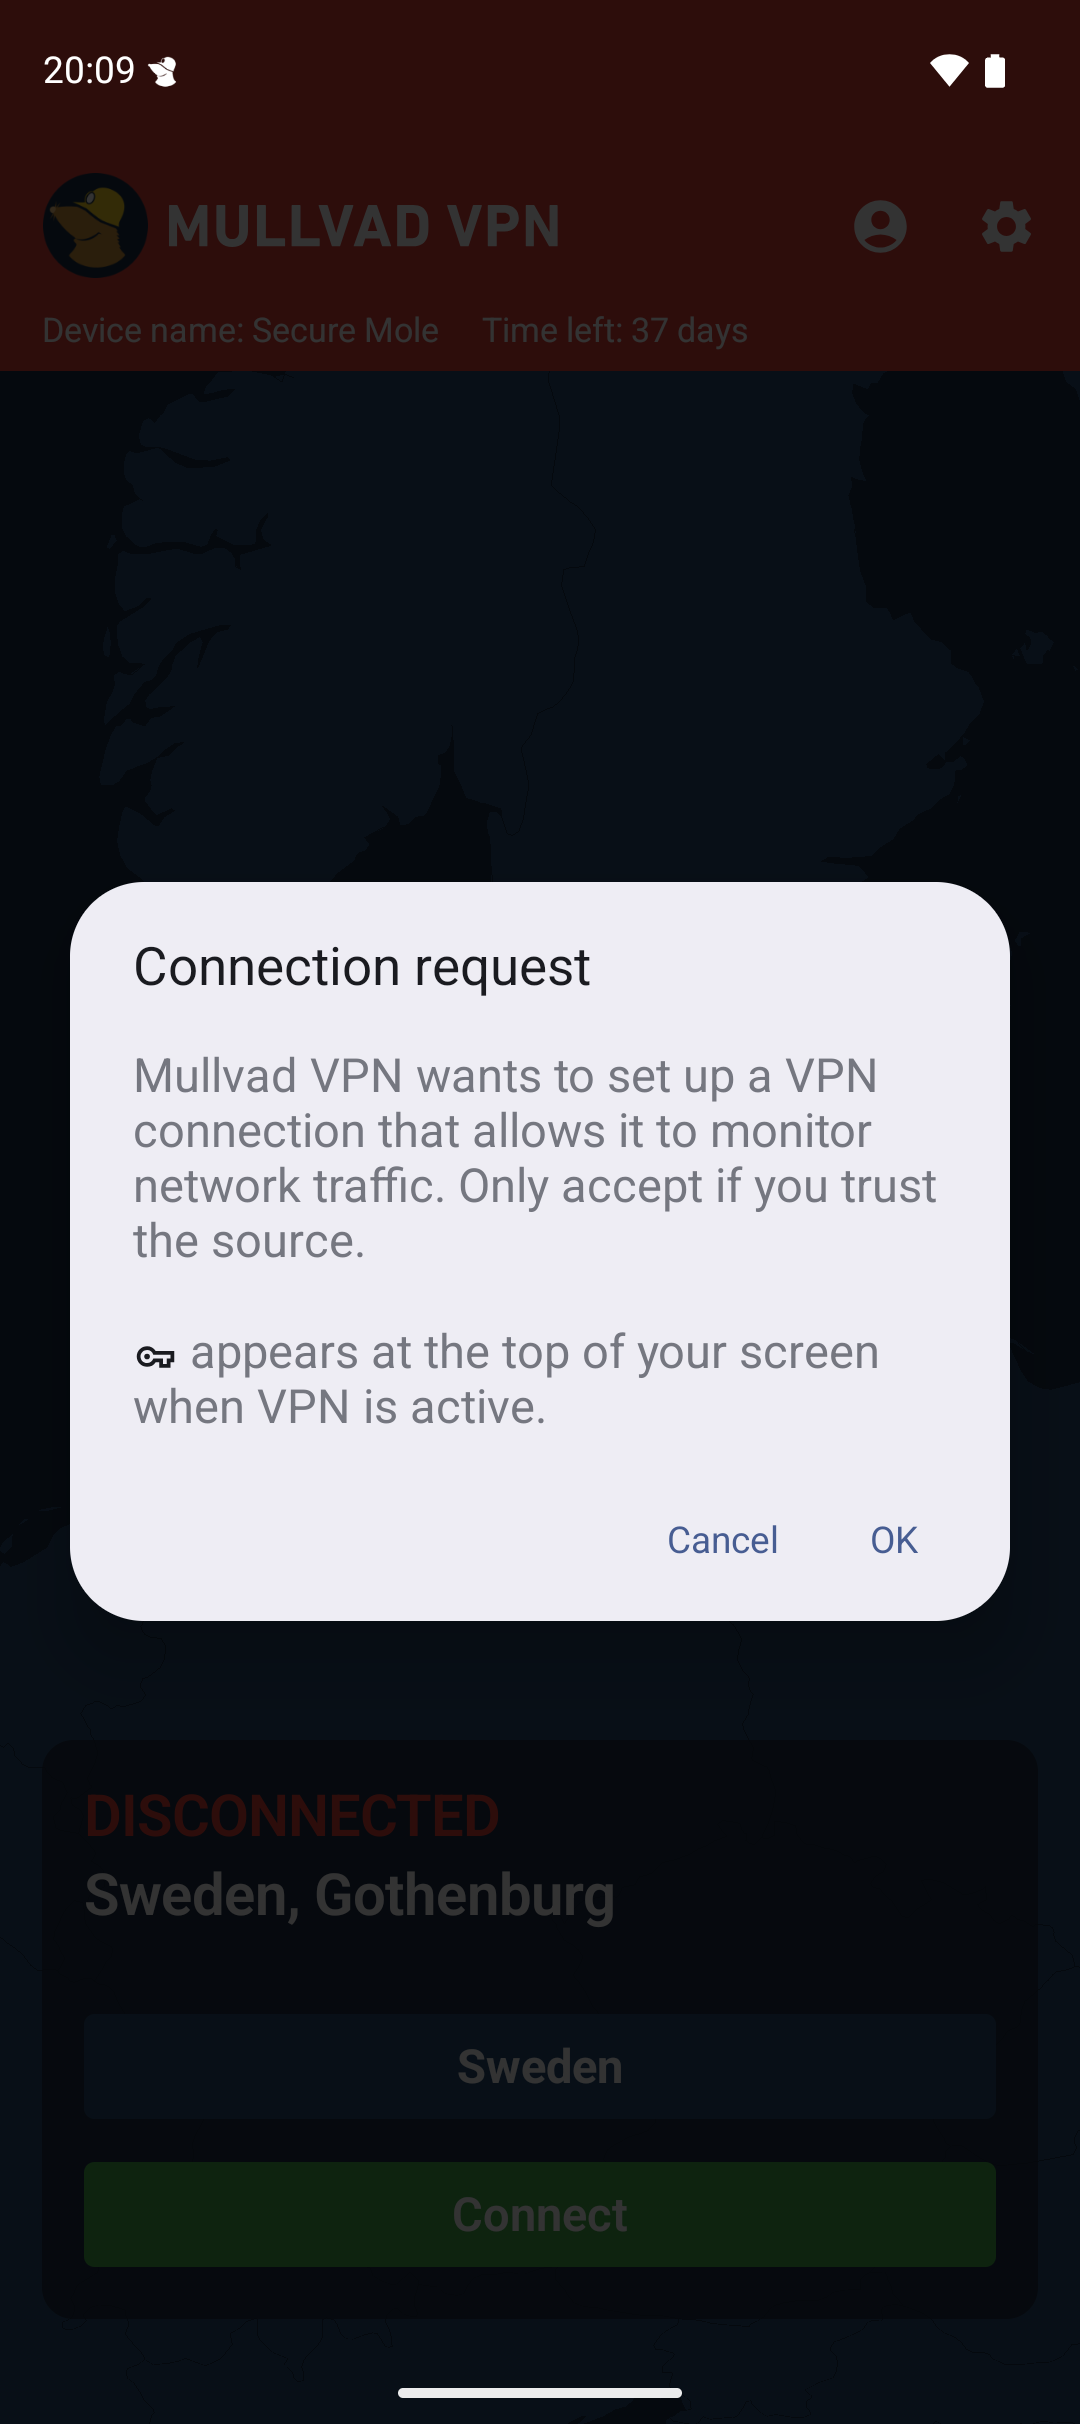
The first time after you install the app, it will ask for your permission to set up a VPN connection on your device.
Tap OK.
Once you are connected, the top bar of the app will be green, a VPN icon will display in the top notification bar of your device, and Connected will be displayed on the connection screen.
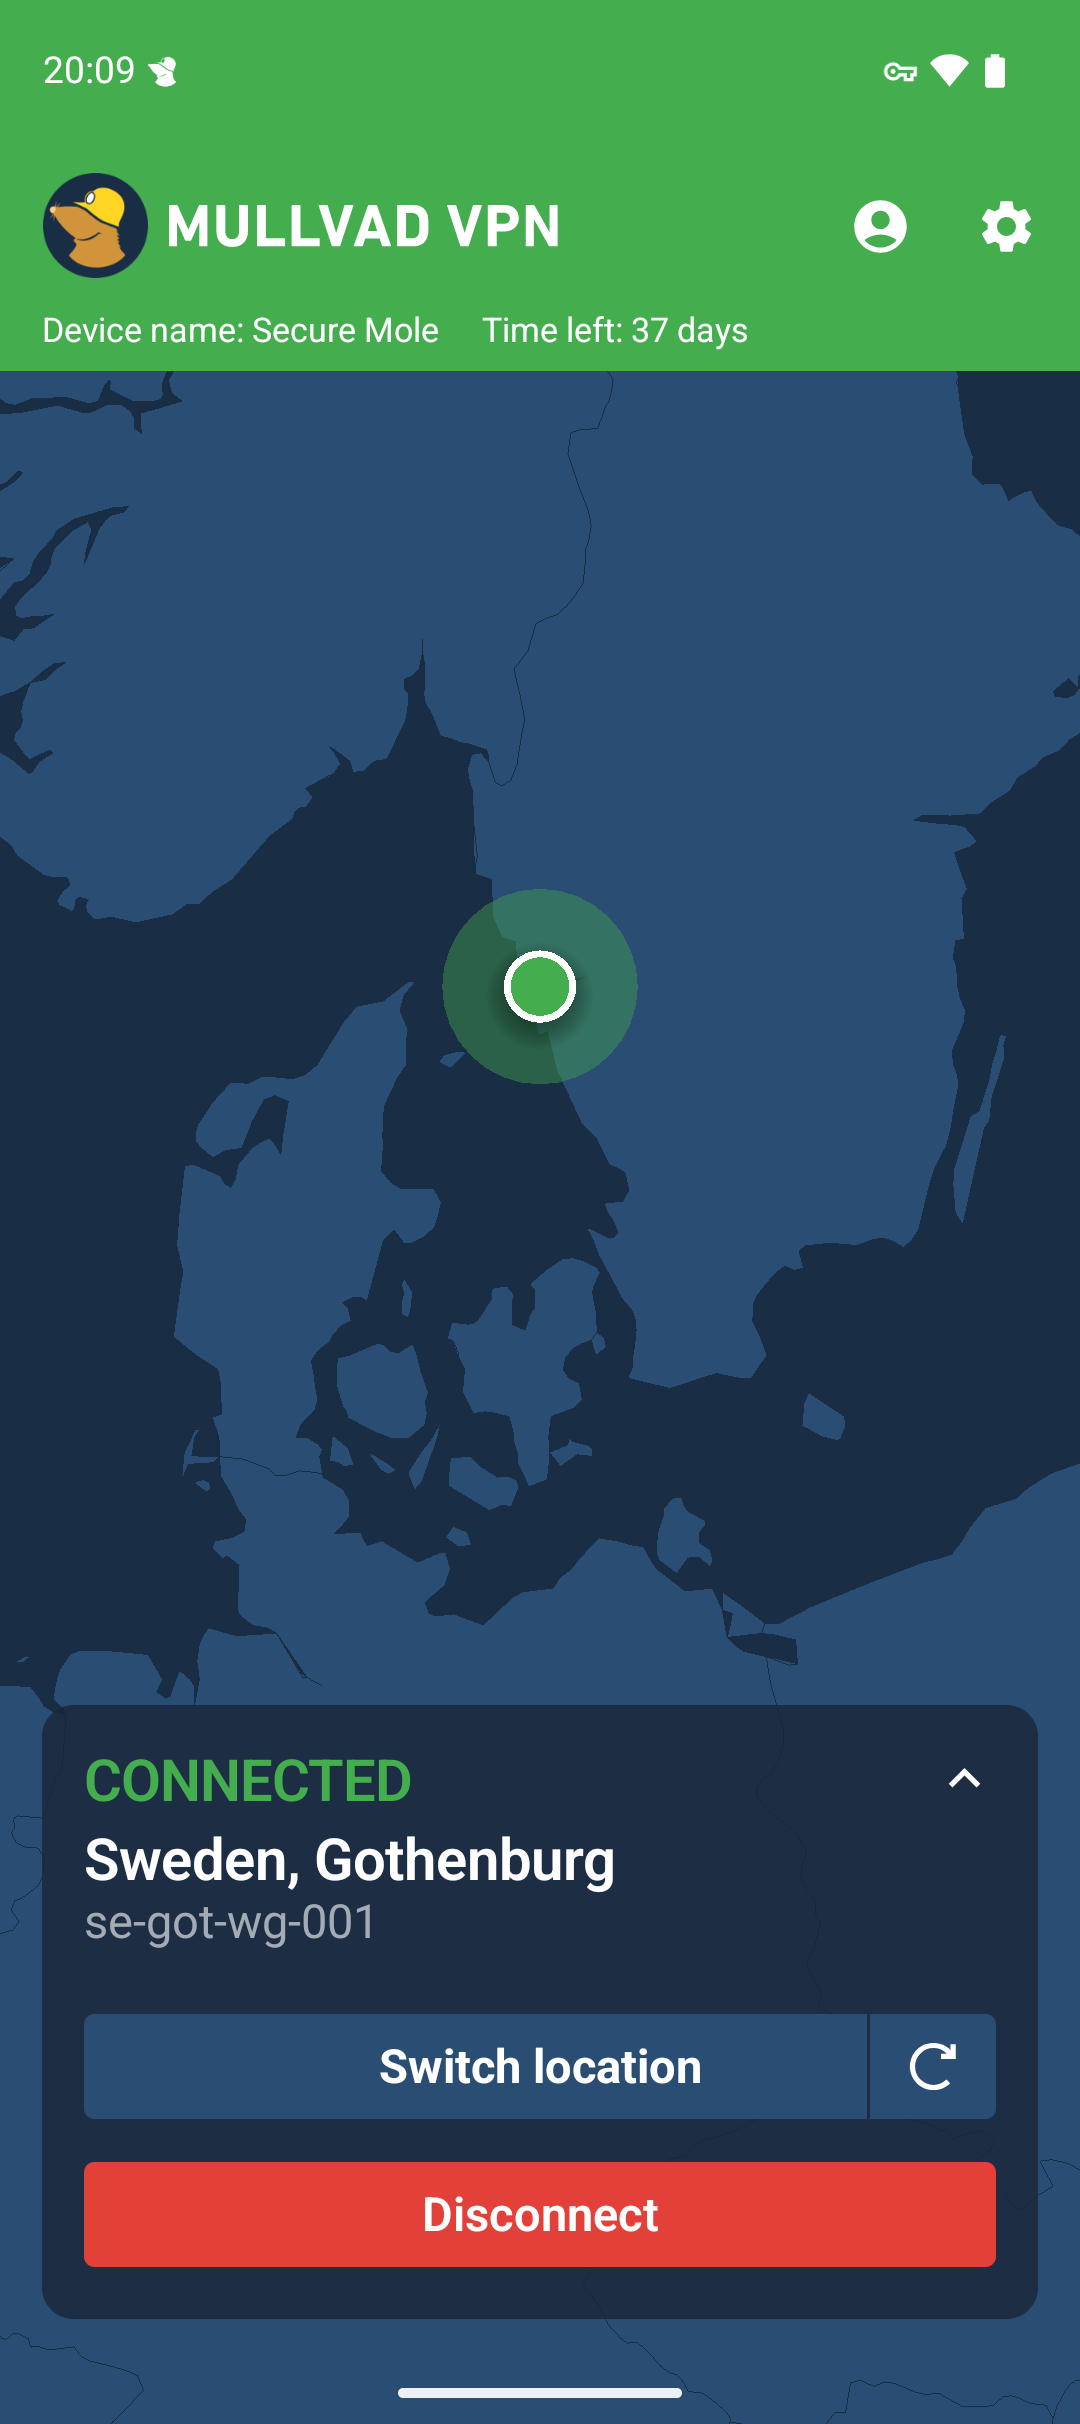
By default, the app will initially connect to a server that is close to your location. If you choose a different location, the app will remember your latest selection for the next time you start the app.
Switch location
To choose a different server, tap the Switch location button.
Scroll down and tap the country that you prefer and the app will reconnect automatically.
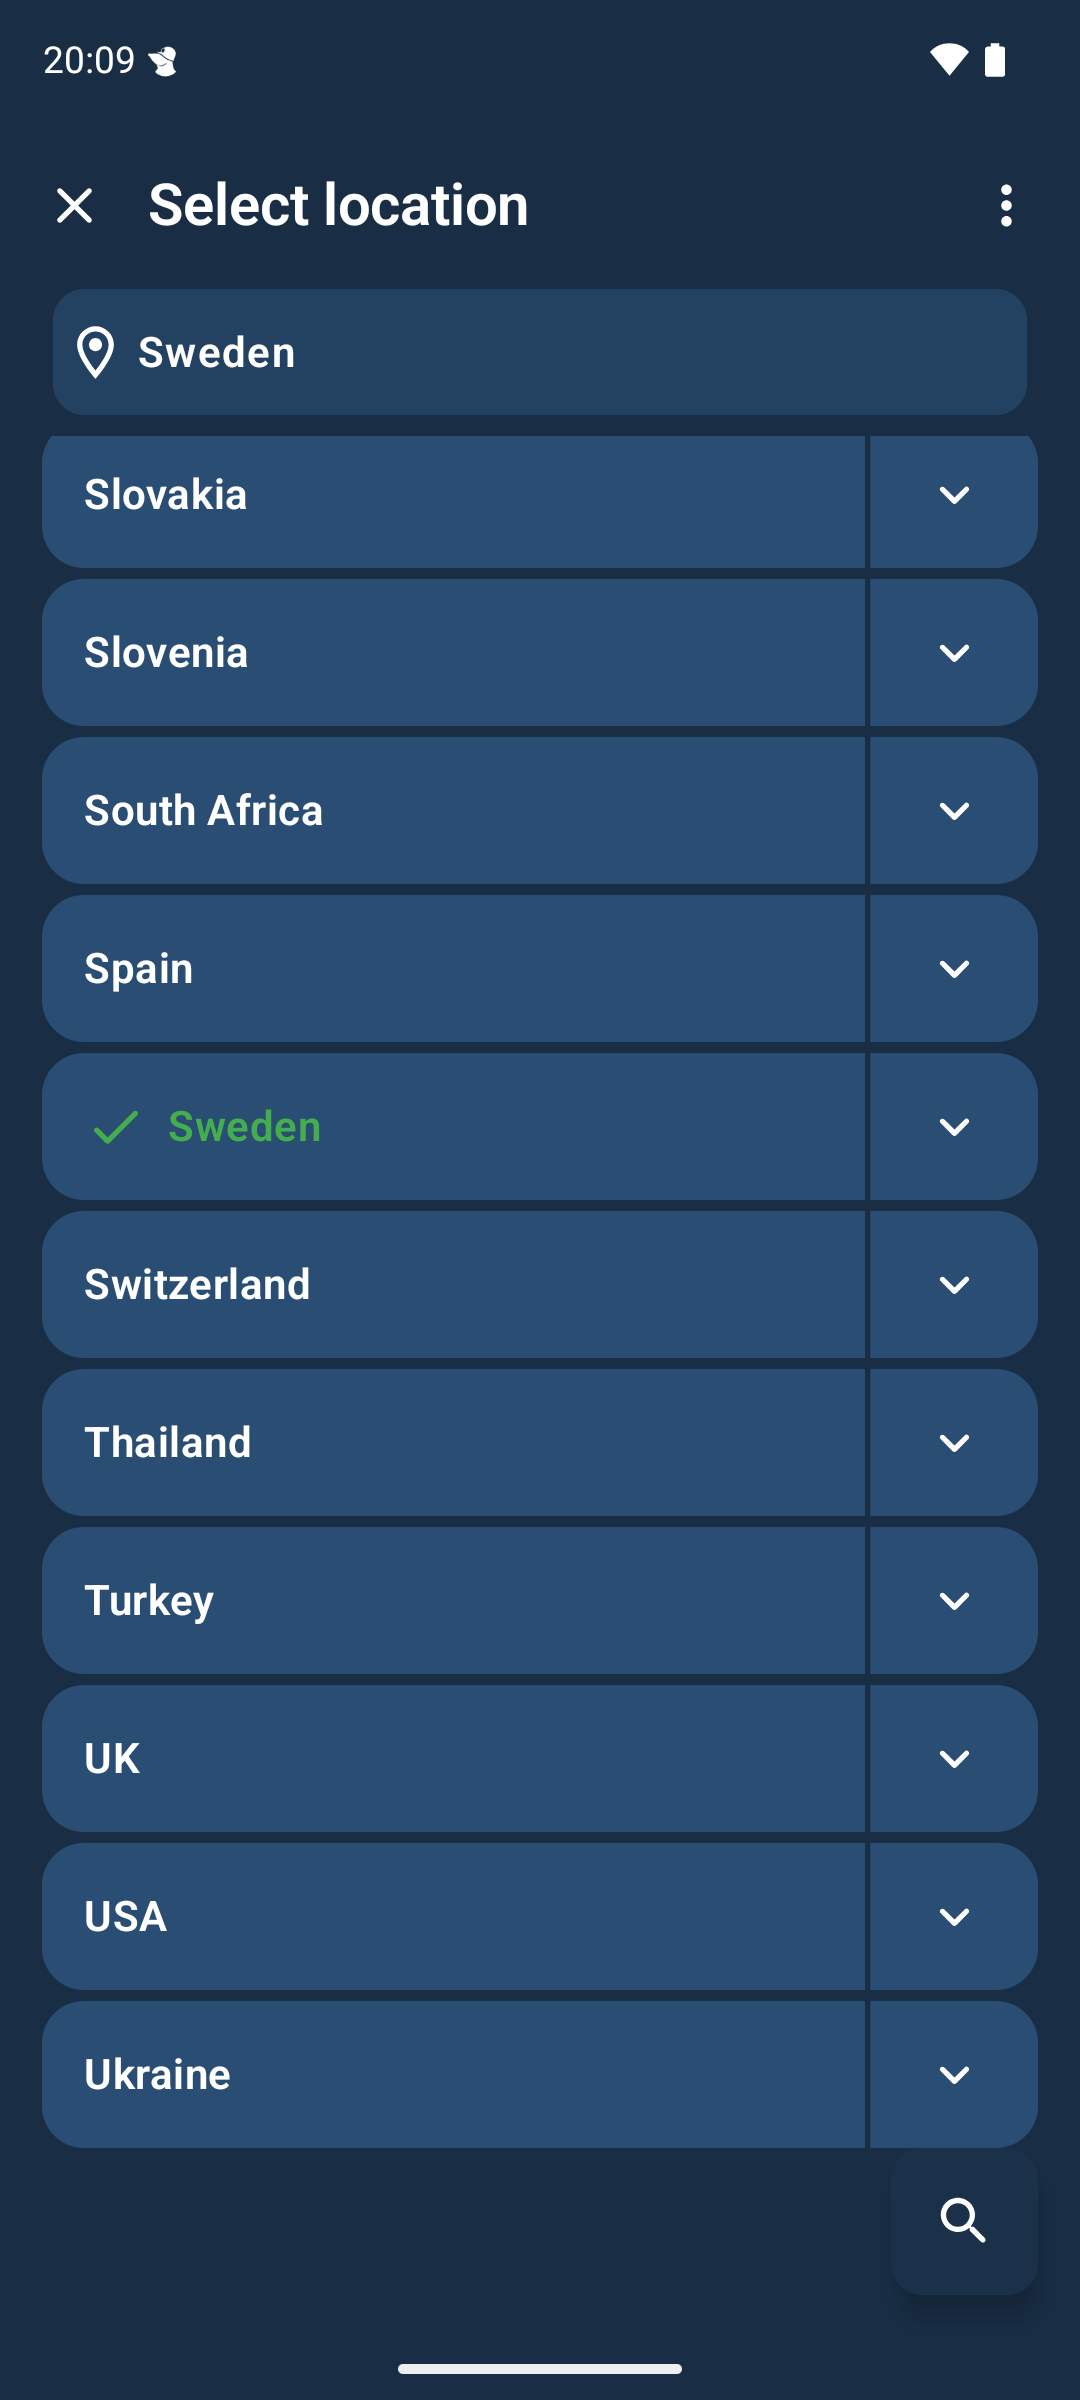
Tapping on the down arrow to the right of a country will reveal cities and specific servers that you can choose to connect to.
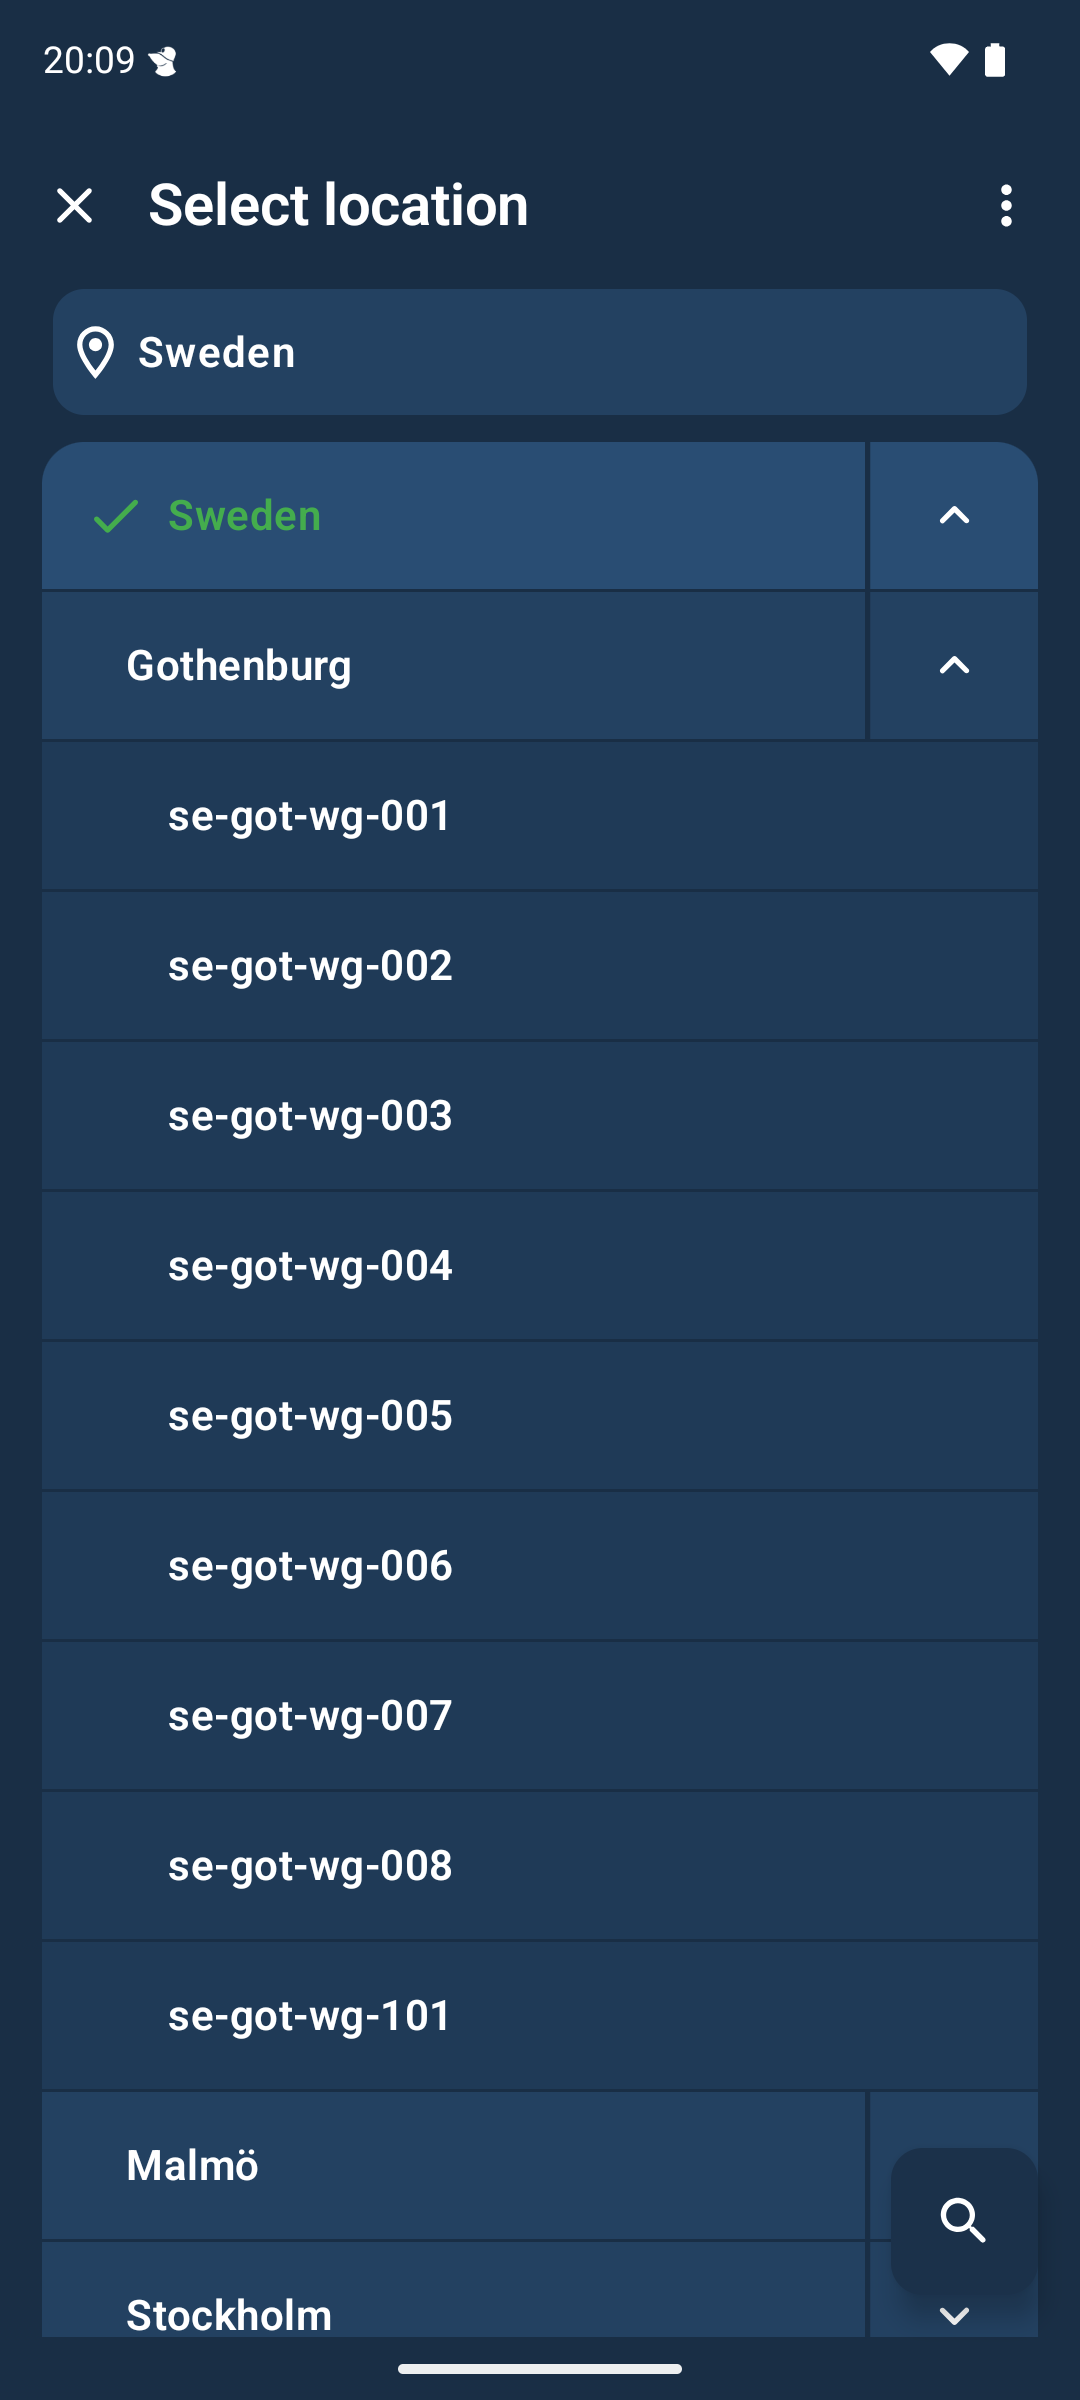
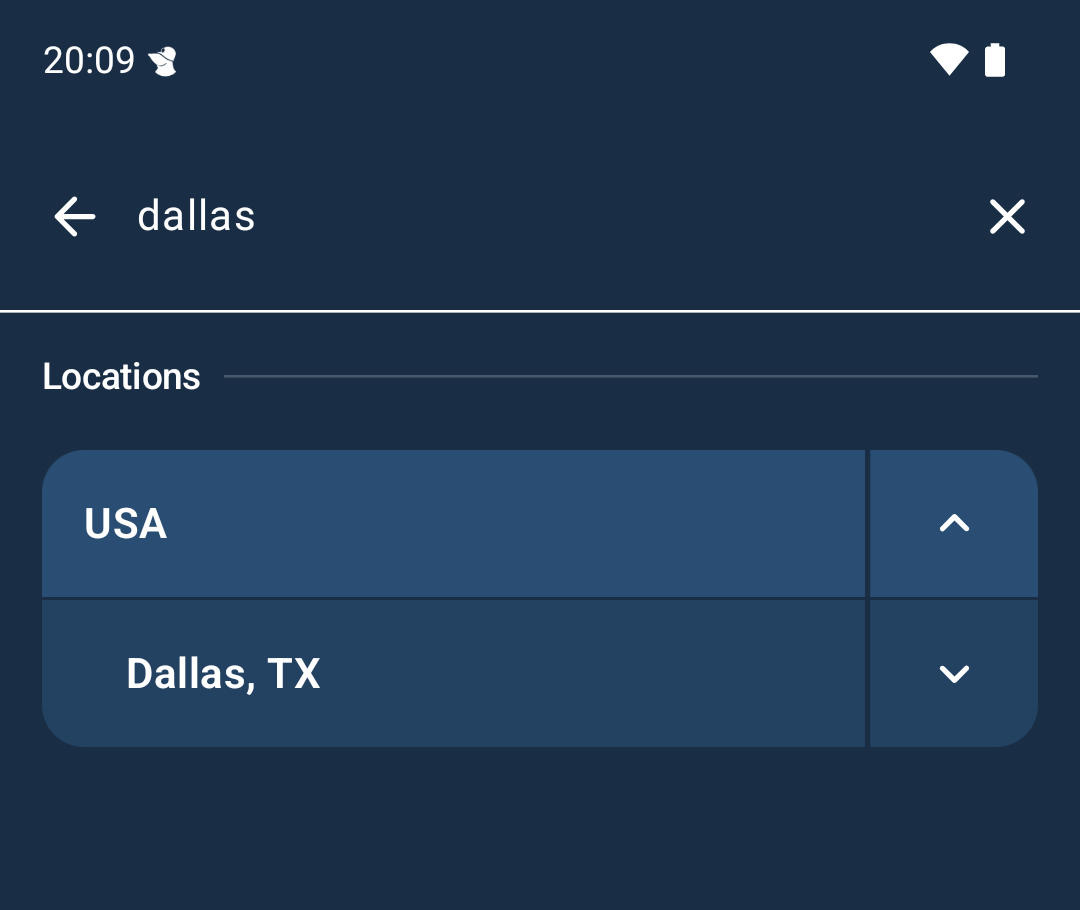
You can also search for a location by tapping on the search icon (🔍) at the bottom right of the screen.
Disconnect
To disconnect, just tap Disconnect on the connection screen.
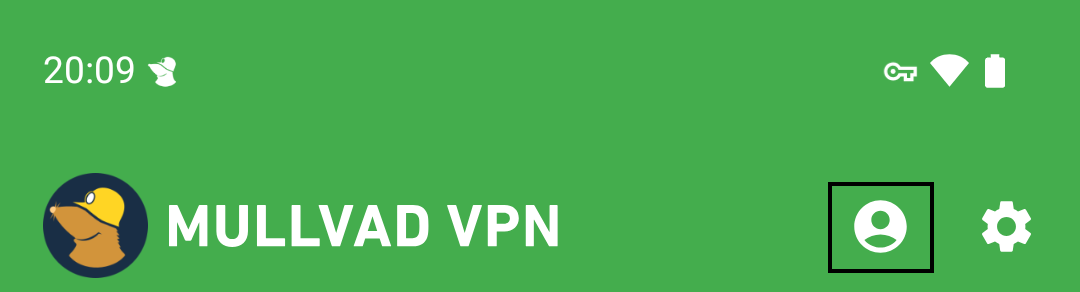
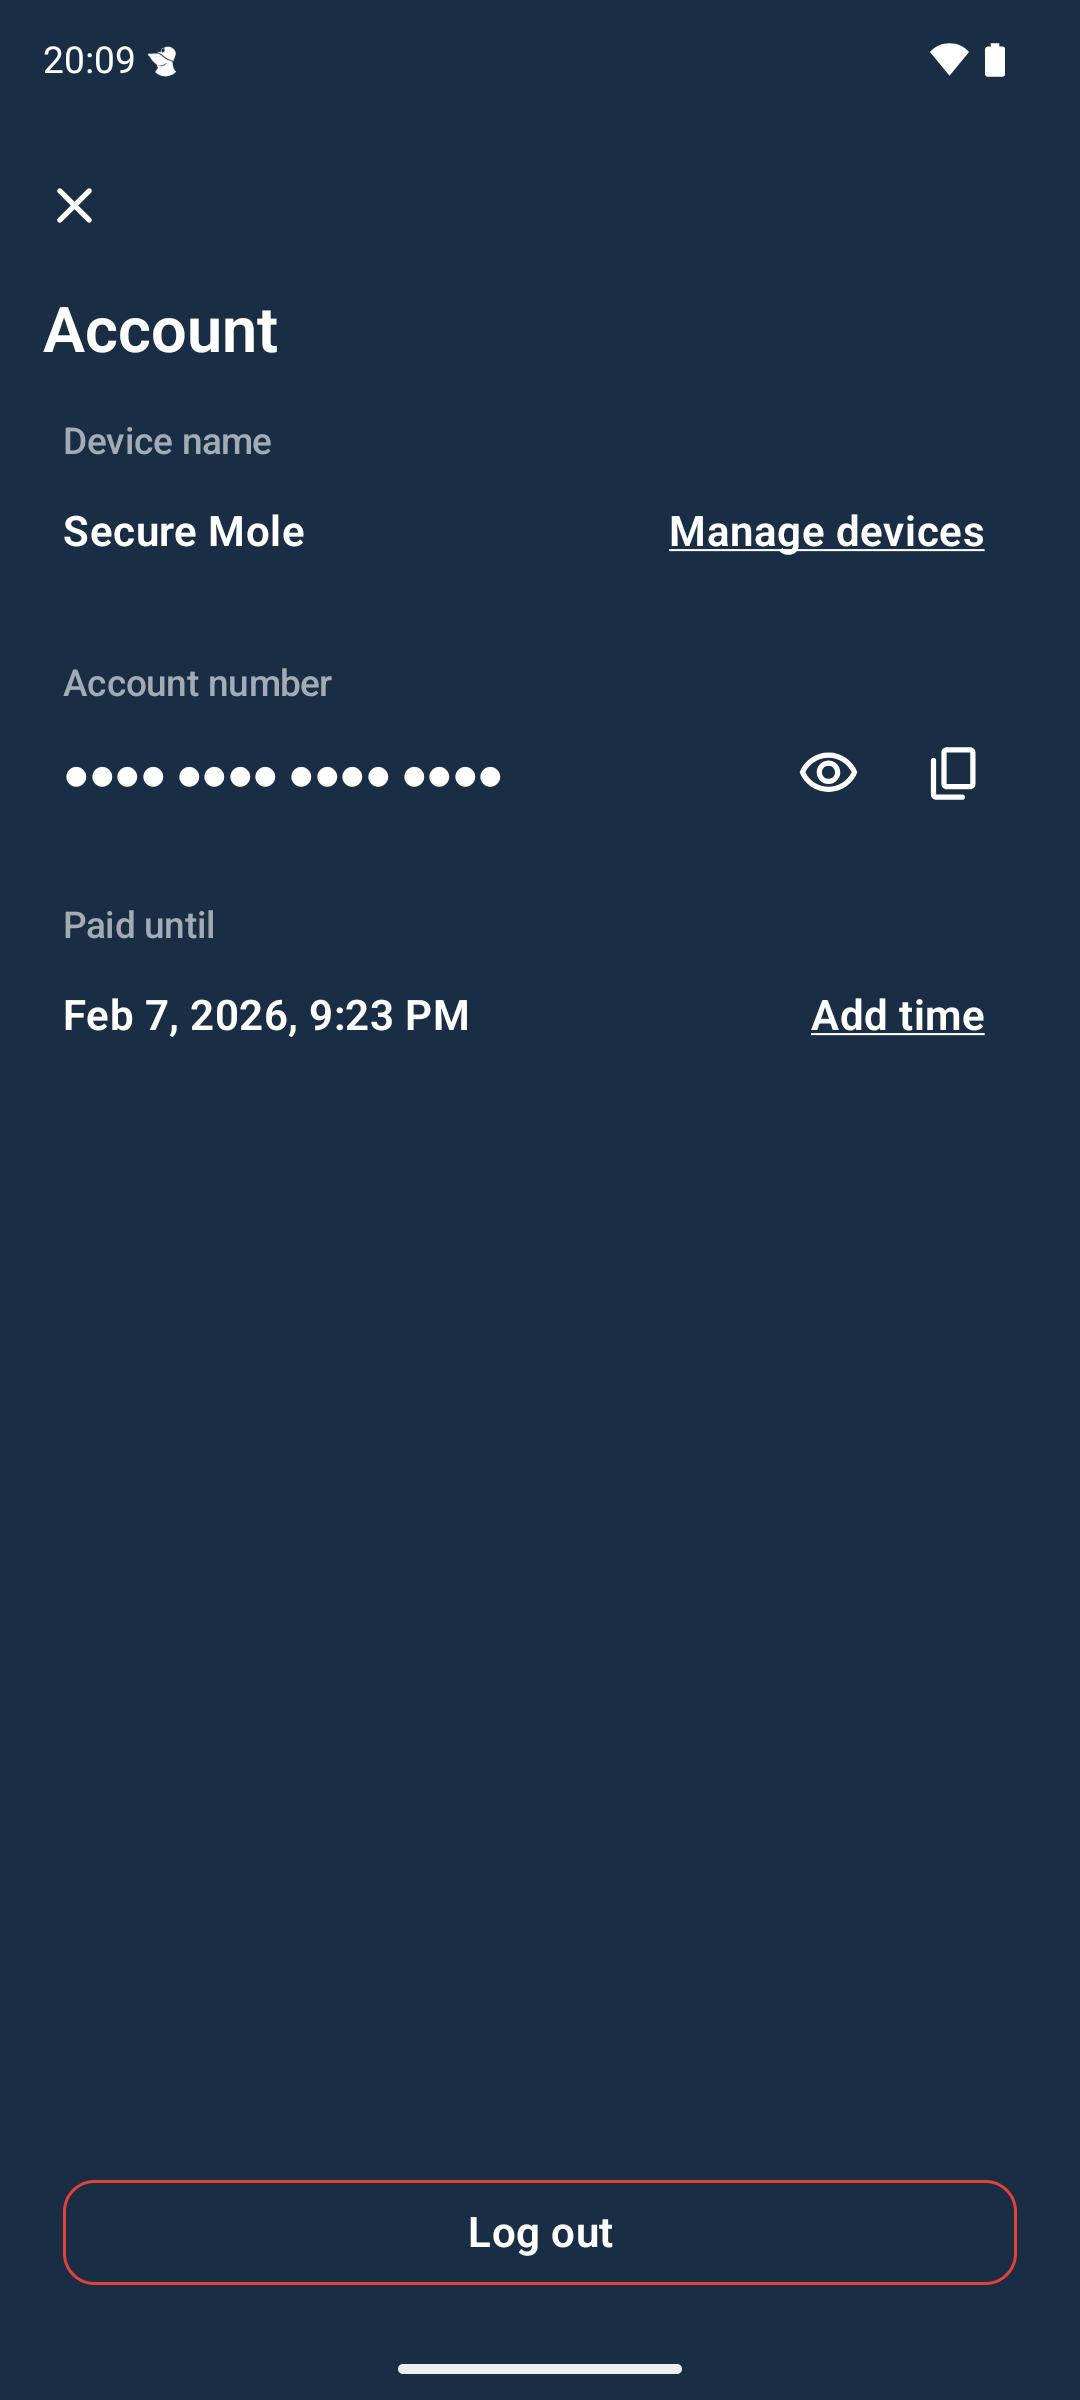
Account
The Account view can be accessed by tapping on the account button in the top right corner, next to the settings button.
Here you can manage your devices, view your account number (tap on the eye icon), copy the account number (tap on the copy icon) and see when your paid VPN time runs out.
You can also add more time to your account here. You can either add time via the homepage or a voucher code. If you have downloaded the app via Google Play you can also buy more time with in-app purchases.
This is also where you log out if you wish to log in with another account number, or if you want to remove the current Mullvad device.
Manage devices
Here you can logout your other devices. This can be useful if you can’t log out on that device for some reason.
Settings
The Settings menu can be accessed by tapping on the gear icon in the top right corner.
Here there are different submenus that are described below.
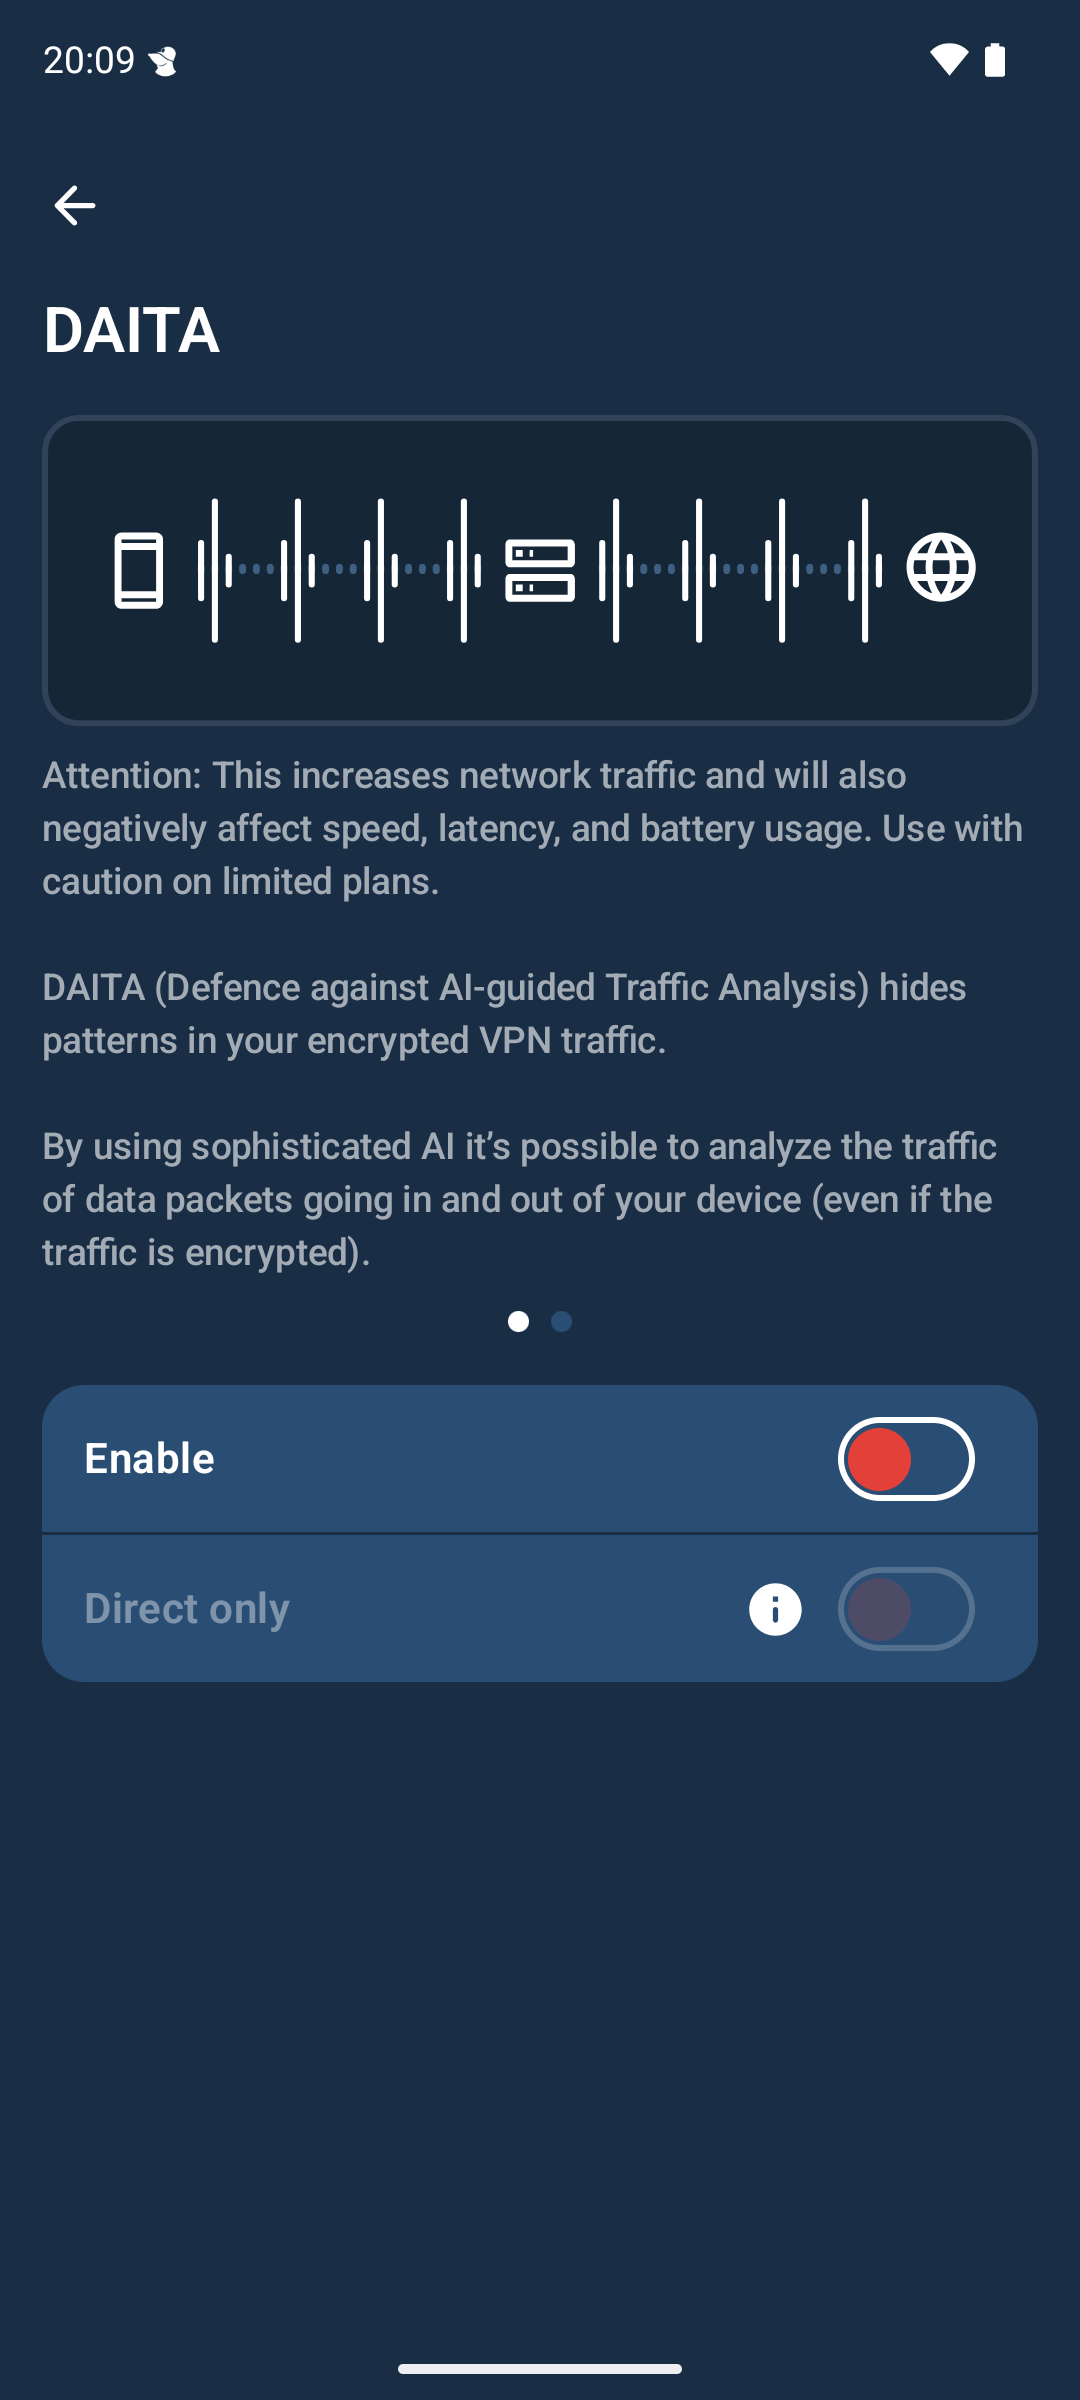
DAITA
DAITA is a countermeasure for network traffic analysis, which may potentially be able to identify the websites you are visiting. You can read a short description on the two pages in the DAITA settings.
Since not all our servers are DAITA-enabled the app will automatically route your traffic through one of our DAITA-enabled servers using Multihop. If you want to disable this behavior turn on Direct Only.
If you want to know more about DAITA you can read our overview.
Attention: DAITA will increase your network traffic and battery usage. Please use caution when using limited mobile data or limited Wi-Fi.
Multihop
In case server network traffic is being monitored, Multihop can increase your anonymity by routing you traffic into one Mullvad server and out another.
Multihop can also be useful in restrictive locations where it's only possible to connect to a limited number of Mullvad servers, and you want to exit the traffic in a location you can't directly connect to.
Attention: Multihop can cause slower speeds and increased latency.
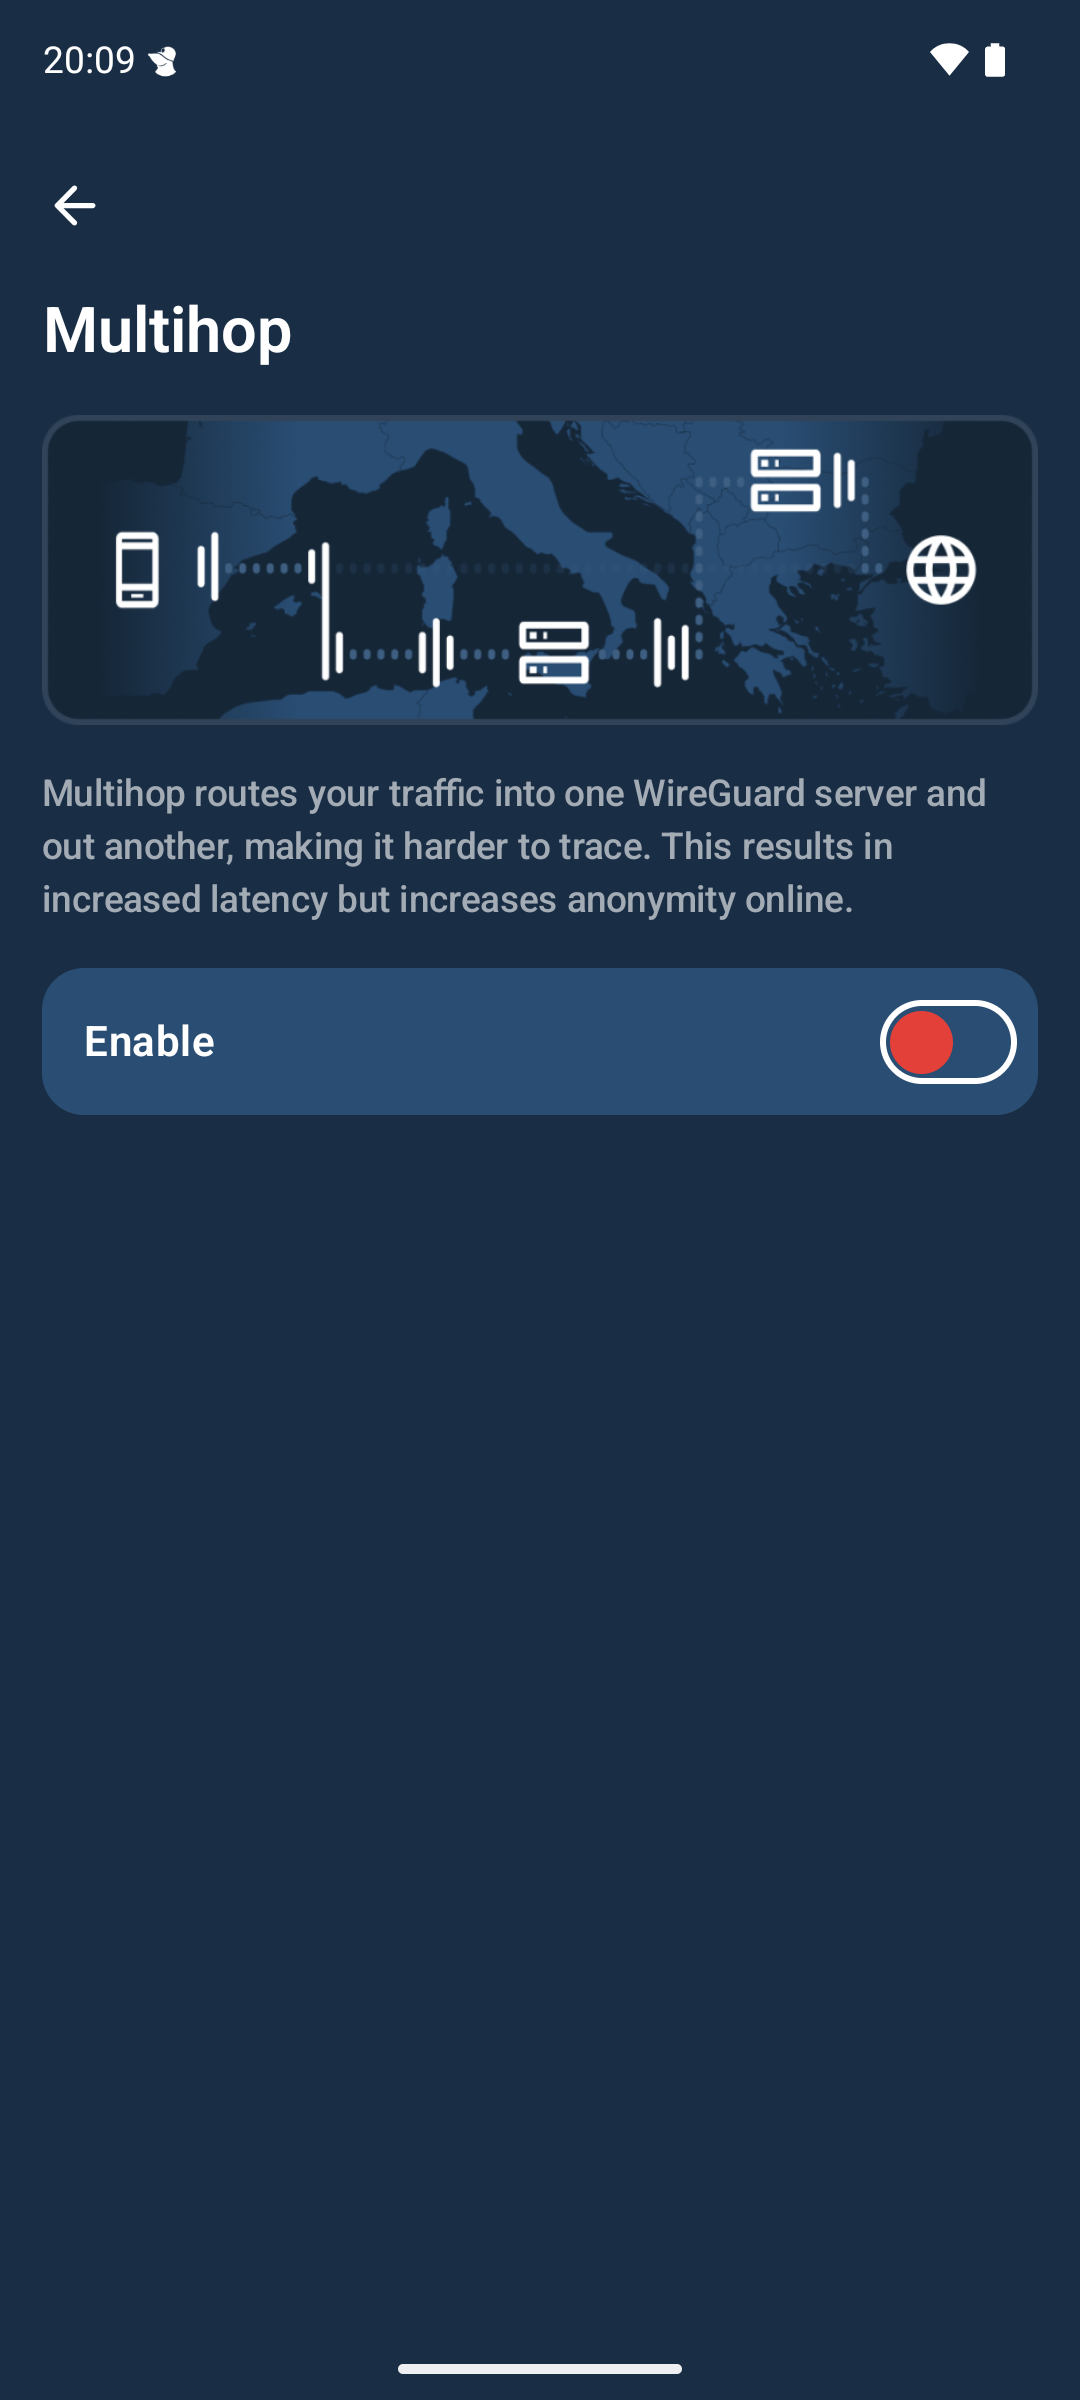
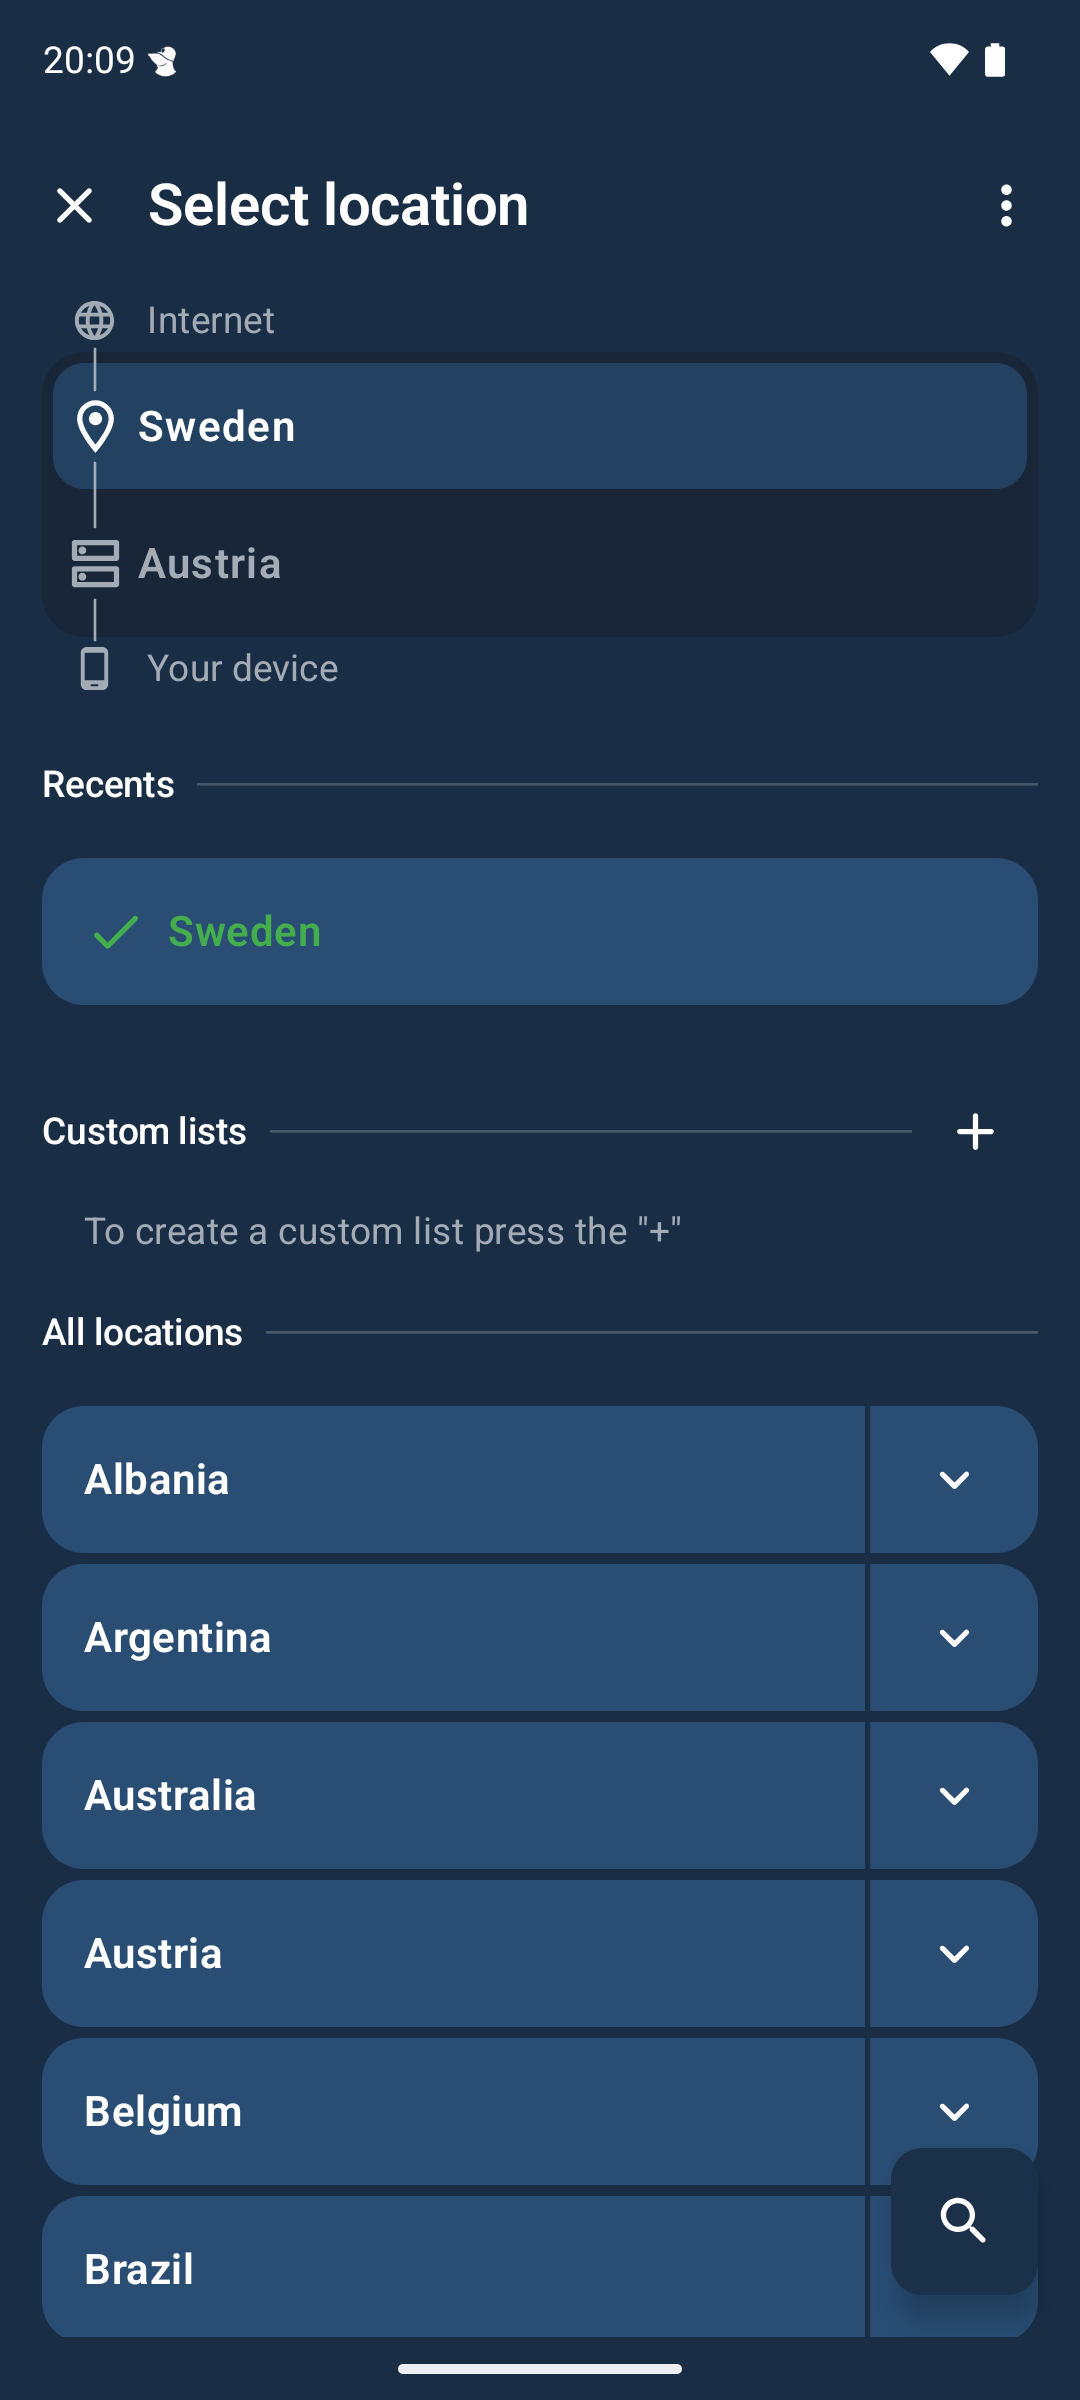
After this feature is enabled, you can set the Entry and Exit servers by going to Select Location and pressing the Entry location (bottom) and Exit location (top) rows at the top of the screen. In the example below, Austria is the Entry location and Sweden is the Exit location.
Data will be routed from your device to the entry server, from the entry server to the exit server, and finally from the exit server to the Internet.
VPN settings
Read more below about the settings that you can set here.
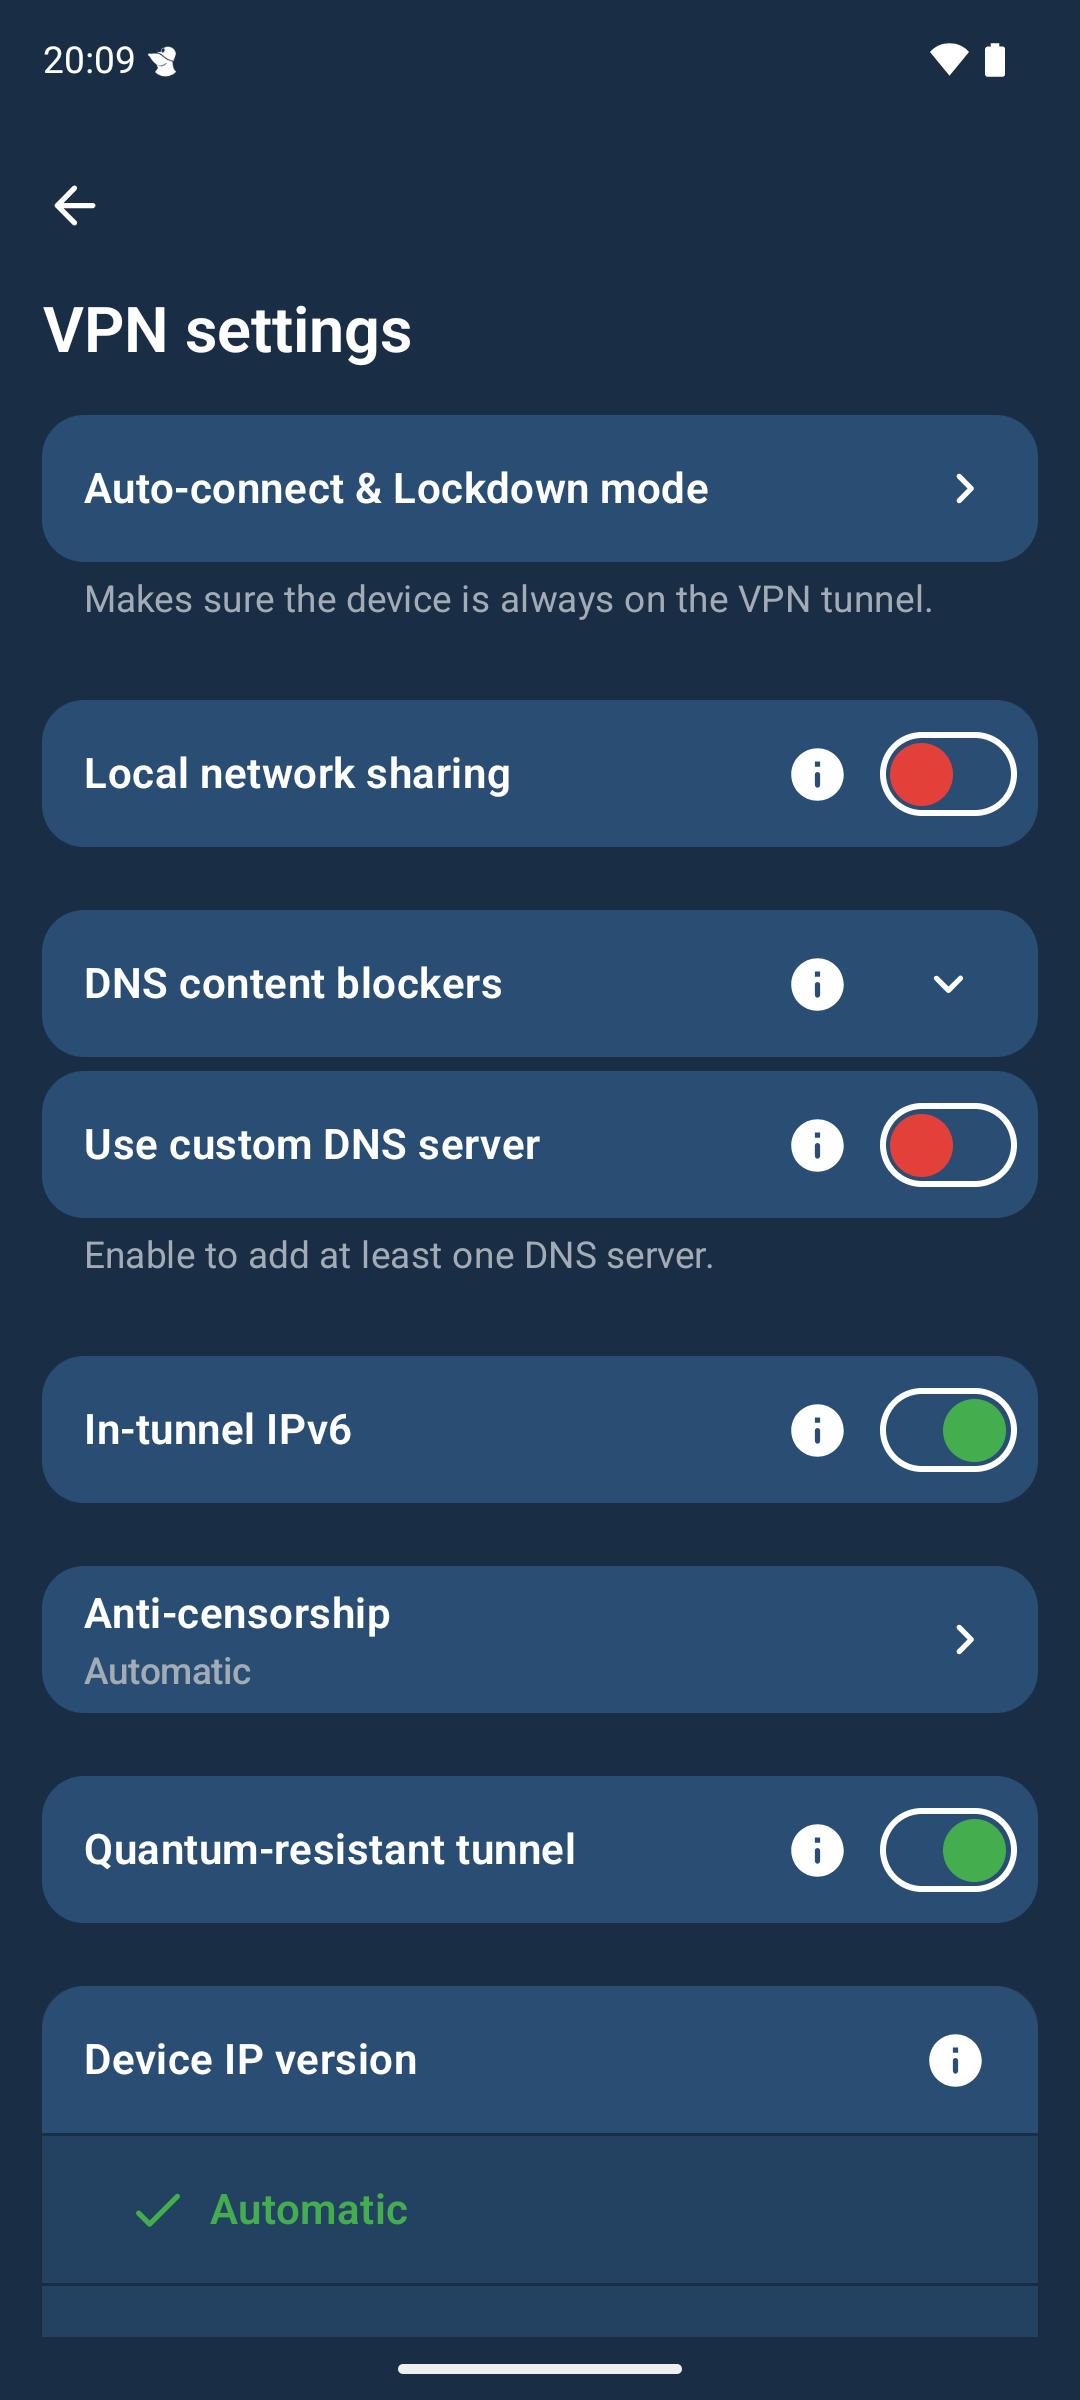
Auto-connect & Lockdown mode
"Auto-connect" and "Lockdown mode" refers to the settings with the same names that you can find in the Mullvad VPN desktop app. Enabling this will make sure that Mullvad connects automatically when you restart your device, and block Internet usage without Mullvad VPN. These settings are dependent on the underlying Android VPN features which are called "Always-on VPN" and "Block connections without VPN".
To find out how it works, read the three included guide pages in this setting. Then tap on Go to VPN settings in the bottom and perform the actions from the guide pages.
Attention: "Block connections without VPN" will block apps that you exclude with Split tunneling, as well as local network (LAN) connections. Not all traffic can be blocked, see Vulnerabilities.
Local network sharing
Enable this setting if you want to access other devices in your local network. However this setting will not work if you have enabled Block connections without VPN. Use the IP-address of the device when you connect to it. It is recommended to turn this off if you connect to a public Wi-Fi network.
DNS settings
Attention: If you want to use the DNS settings in the Mullvad app, make sure to turn off Private DNS in Android and Secure DNS in your web browser. For more information, see How to prevent DNS leaks.
Here you can enable the different content blockers which will prevent some of these types of content from loading in your web browser and other apps. This feature uses blocklists from various providers.
Note that the Social media blocker will block Facebook, Instagram, Tiktok, Snapchat and X (Twitter).
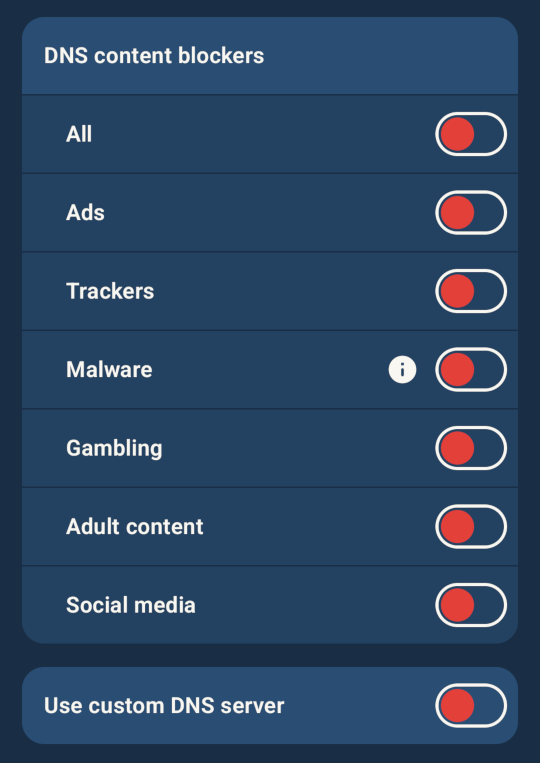
Use custom DNS server
Enable this option if you want to use another DNS server instead of the DNS on the Mullvad VPN server. You can enter an IPv4 or an IPv6 address, but not DNS-over-HTTPS or DNS-over-TLS servers. Attention: All DNS content blockers must first be turned off.
In-tunnel IPv6
This is enabled by default. You can disable this option if you have issues with connecting to some website as they can block your Mullvad IPv6 address.
Anti-censorship
Here you can enable various settings that can help you connect in the case that Mullvad is blocked by your Internet provider. See the Anti-censorship section for more details.
Quantum-resistant tunnel
Set this option to On if you wish to enable encryption that may withstand decryption attempts from quantum computers in the future.
- Automatic - Since version 2025.8 this means the same thing as On (in older versions this means Off).
- On - Enables Quantum-resistant tunnel.
- Off - Disables Quantum-resistant tunnel.
Device IP Version
If the app is slow to connect or is unable to connect you can set this to either IPv4 or IPv6. While this is set to Automatic it will use the IP version(s) that it can detect on the network. If both versions are detected it will try IPv4 first.
MTU
The default MTU used by the app is 1280. It is not recommended that you change this unless you have a specific reason.
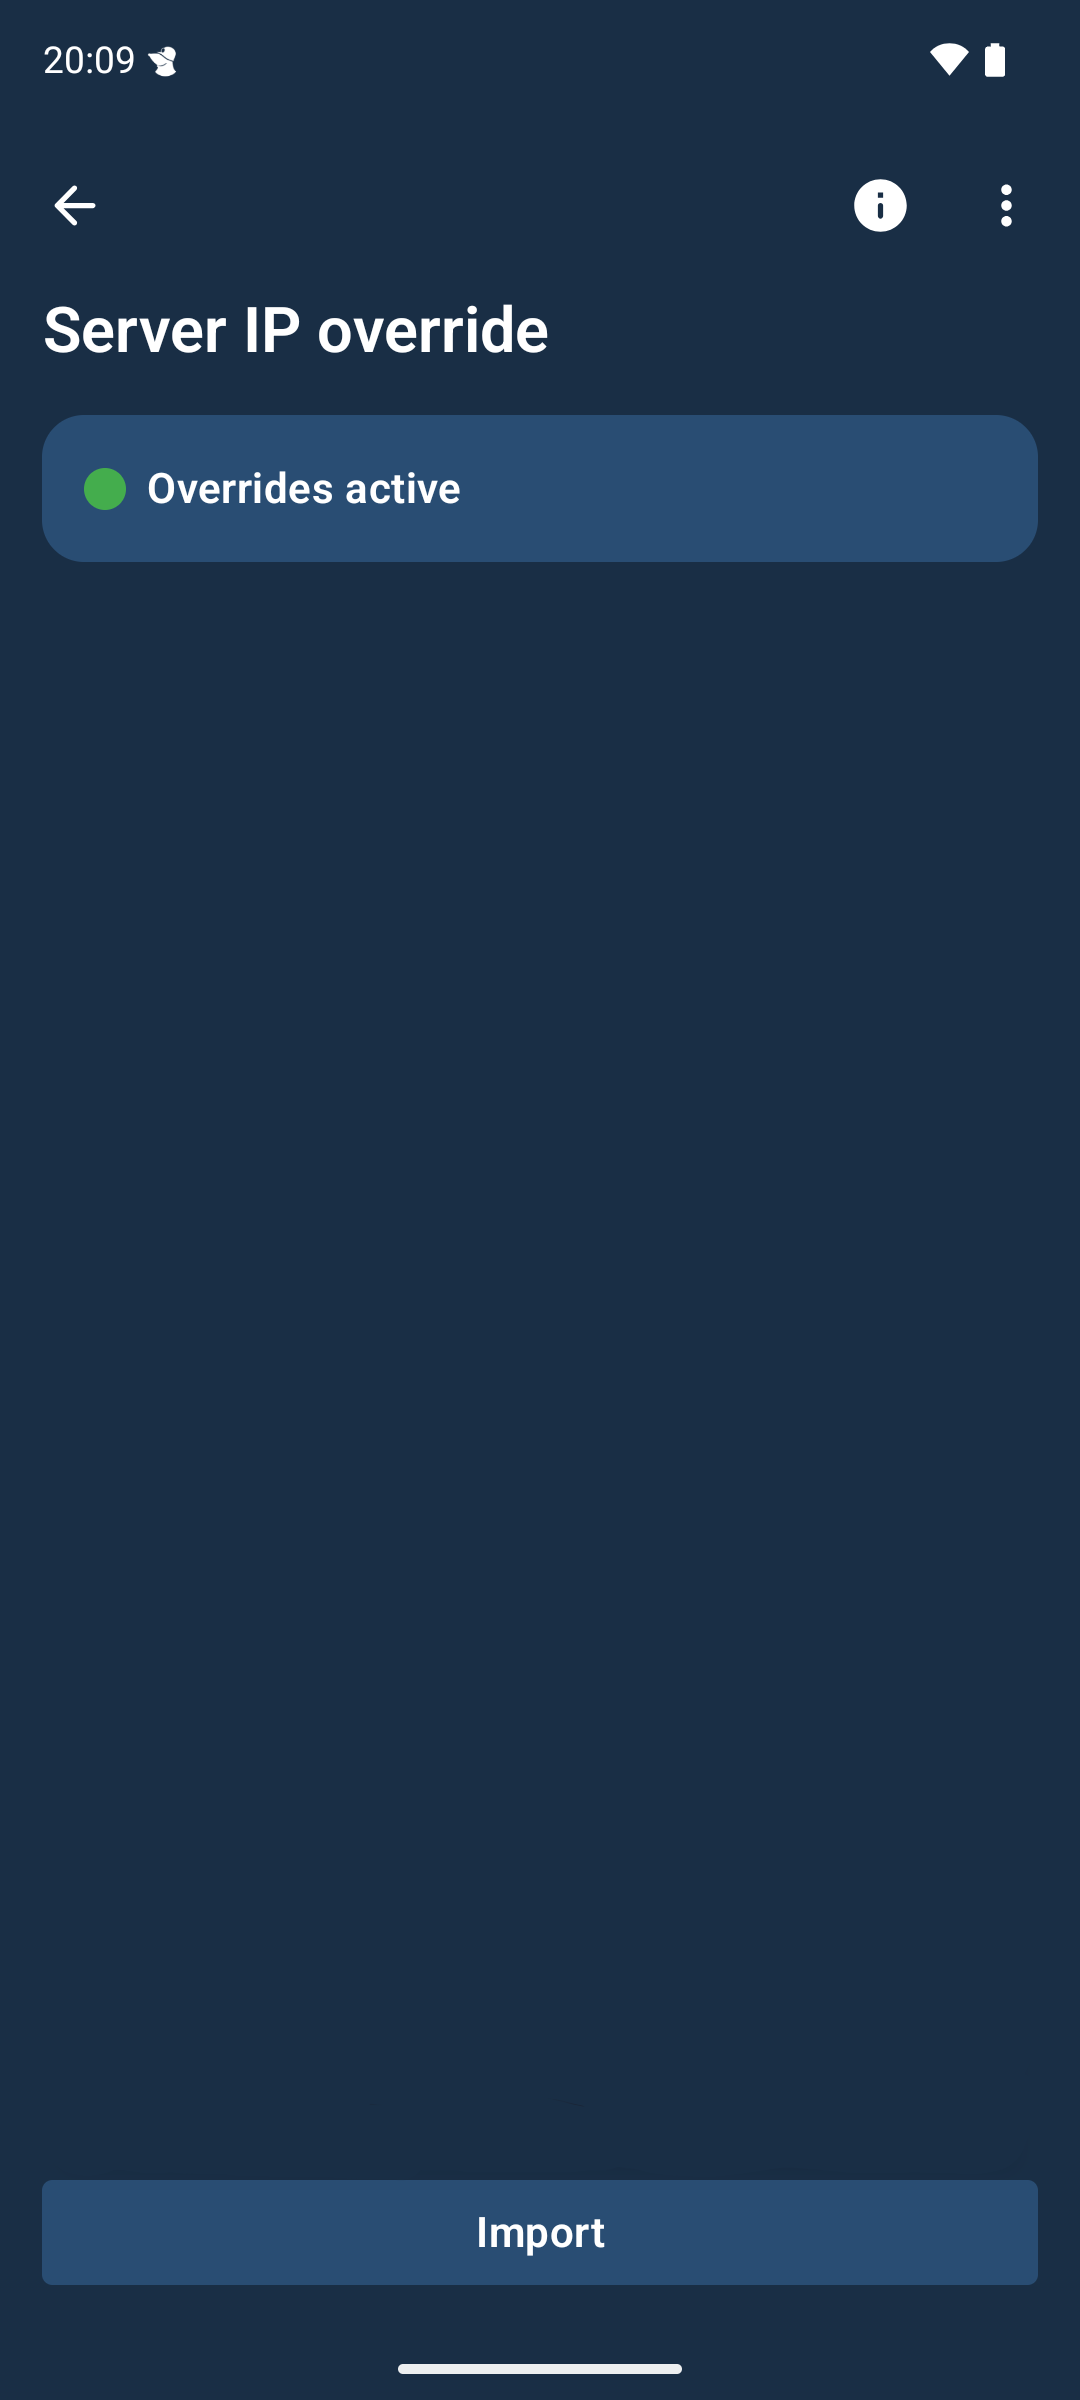
Server IP override
If you are in a restrictive country where our VPN servers are blocked, it may be possible to connect to one using a server entry IP override. This may be provided, if deemed necessary, by Mullvad Support. You can find the e-mail address in the bottom of this website.
Attention: Server IP override has no impact on services and websites which block our server exit IPs since it only changes the entry IP.
Anti-censorship
These methods may be useful in situations where you are blocked from reaching Mullvad. When “Automatic” is selected, the app will attempt all methods until one works.
Attention: Please note that these methods do not unblock websites, and may increase system utilization and battery consumption. Only enable it if you can not connect without it.

WireGuard port
This option may be useful if the network you are connecting from only allows traffic on certain ports.
Shadowsocks, LWO and QUIC
Select Shadowsocks, LWO (Lightweight Wireguard Obfuscation) or QUIC if you have a problem connecting in a restrictive location such as a country where VPN services are blocked.
UDP-over-TCP
Select UDP-over-TCP if you have a problem to connect mostly in public Wi-Fi networks or mobile networks, which may be blocking UDP traffic.
Split tunneling
Split tunneling allows you to exclude selected apps from the VPN. Please note that this feature does not work if you have enabled Block connections without VPN on your device. For more information see the guide Split tunneling with the Mullvad app. Also read the split tunneling FAQ below.

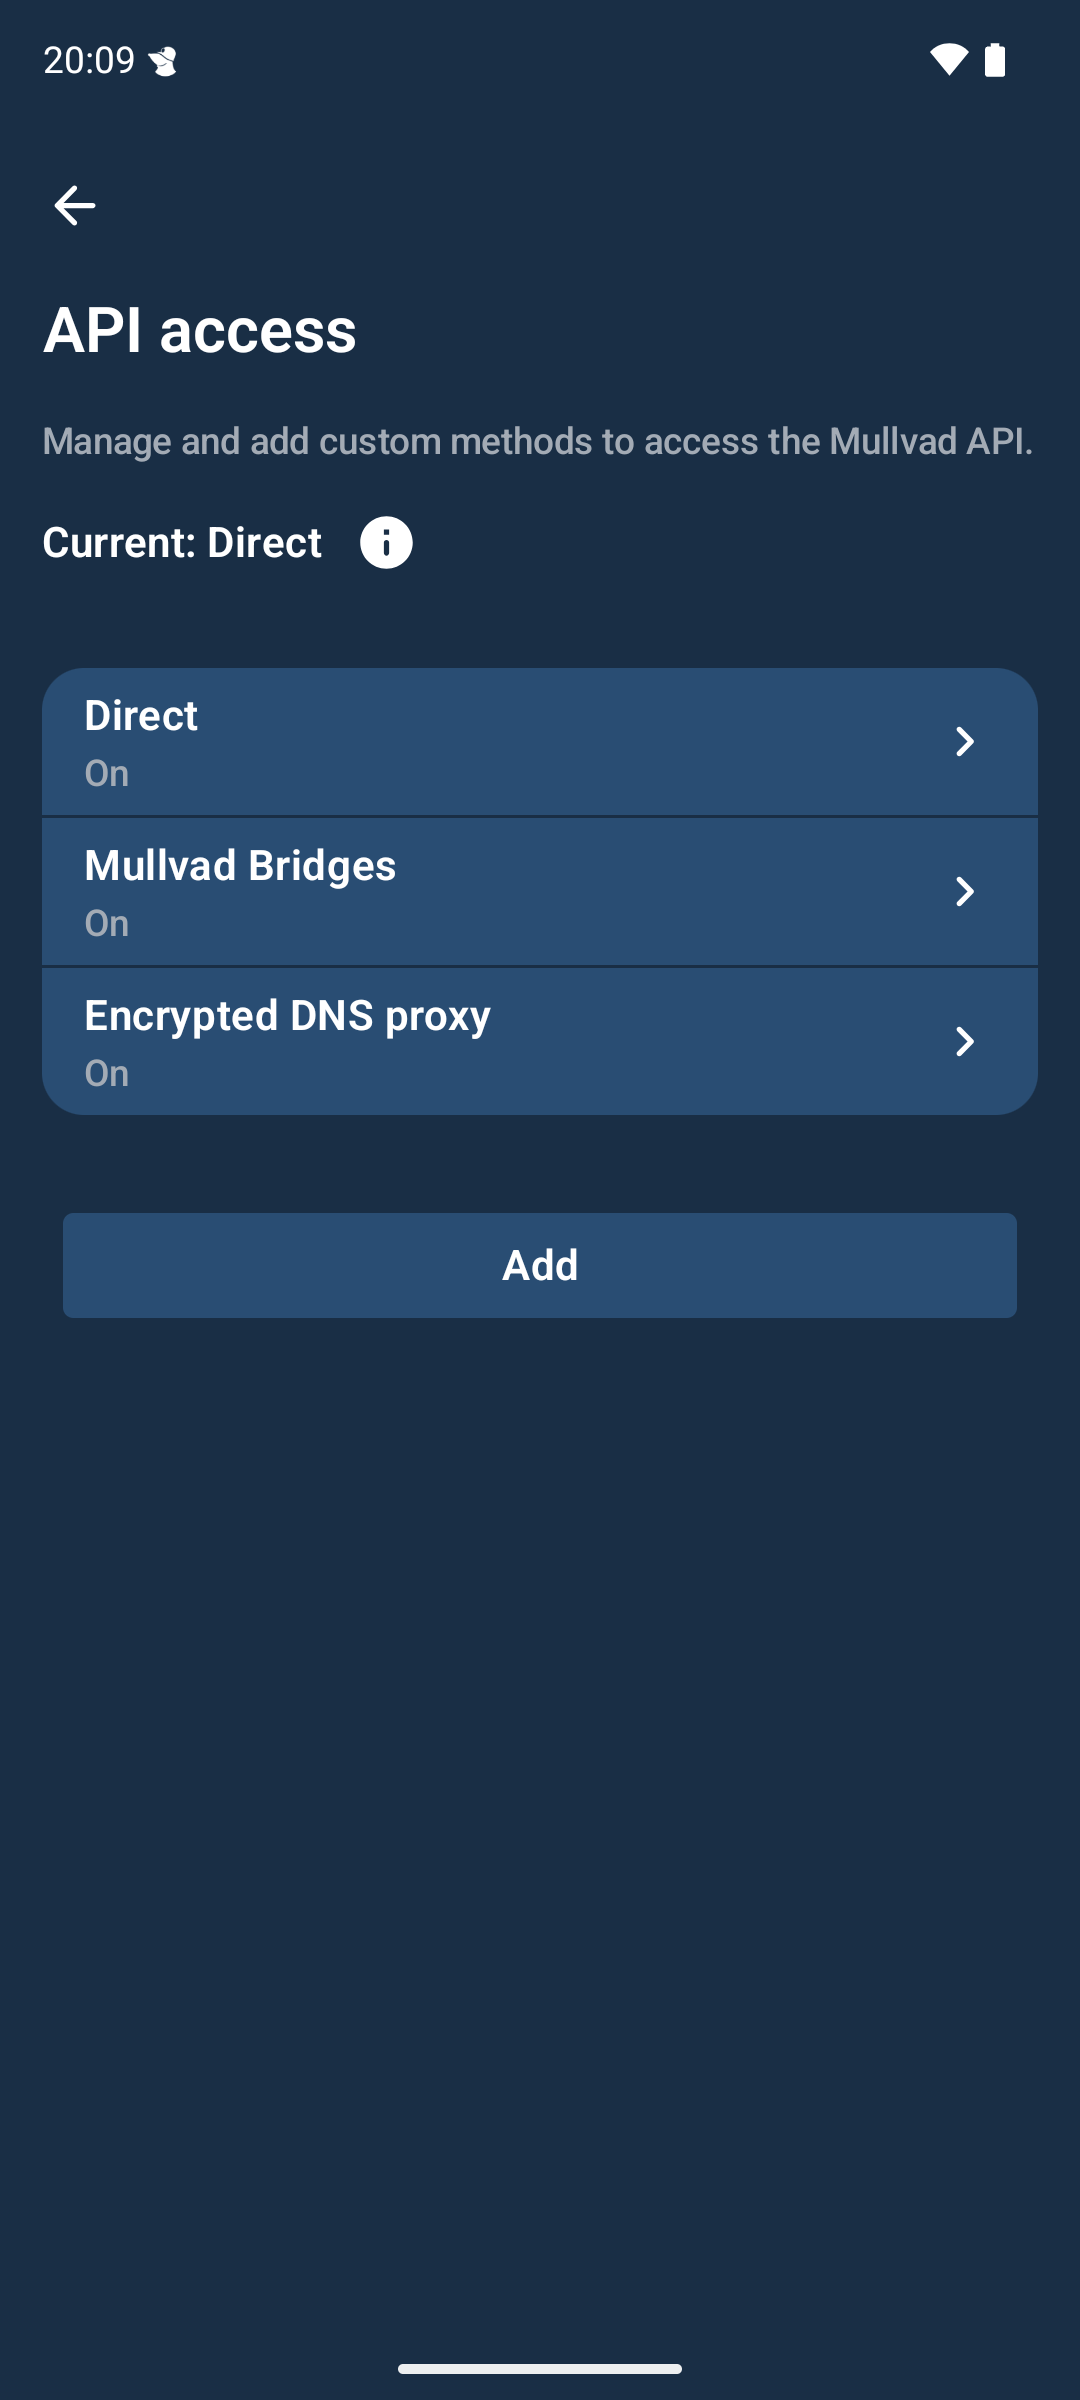
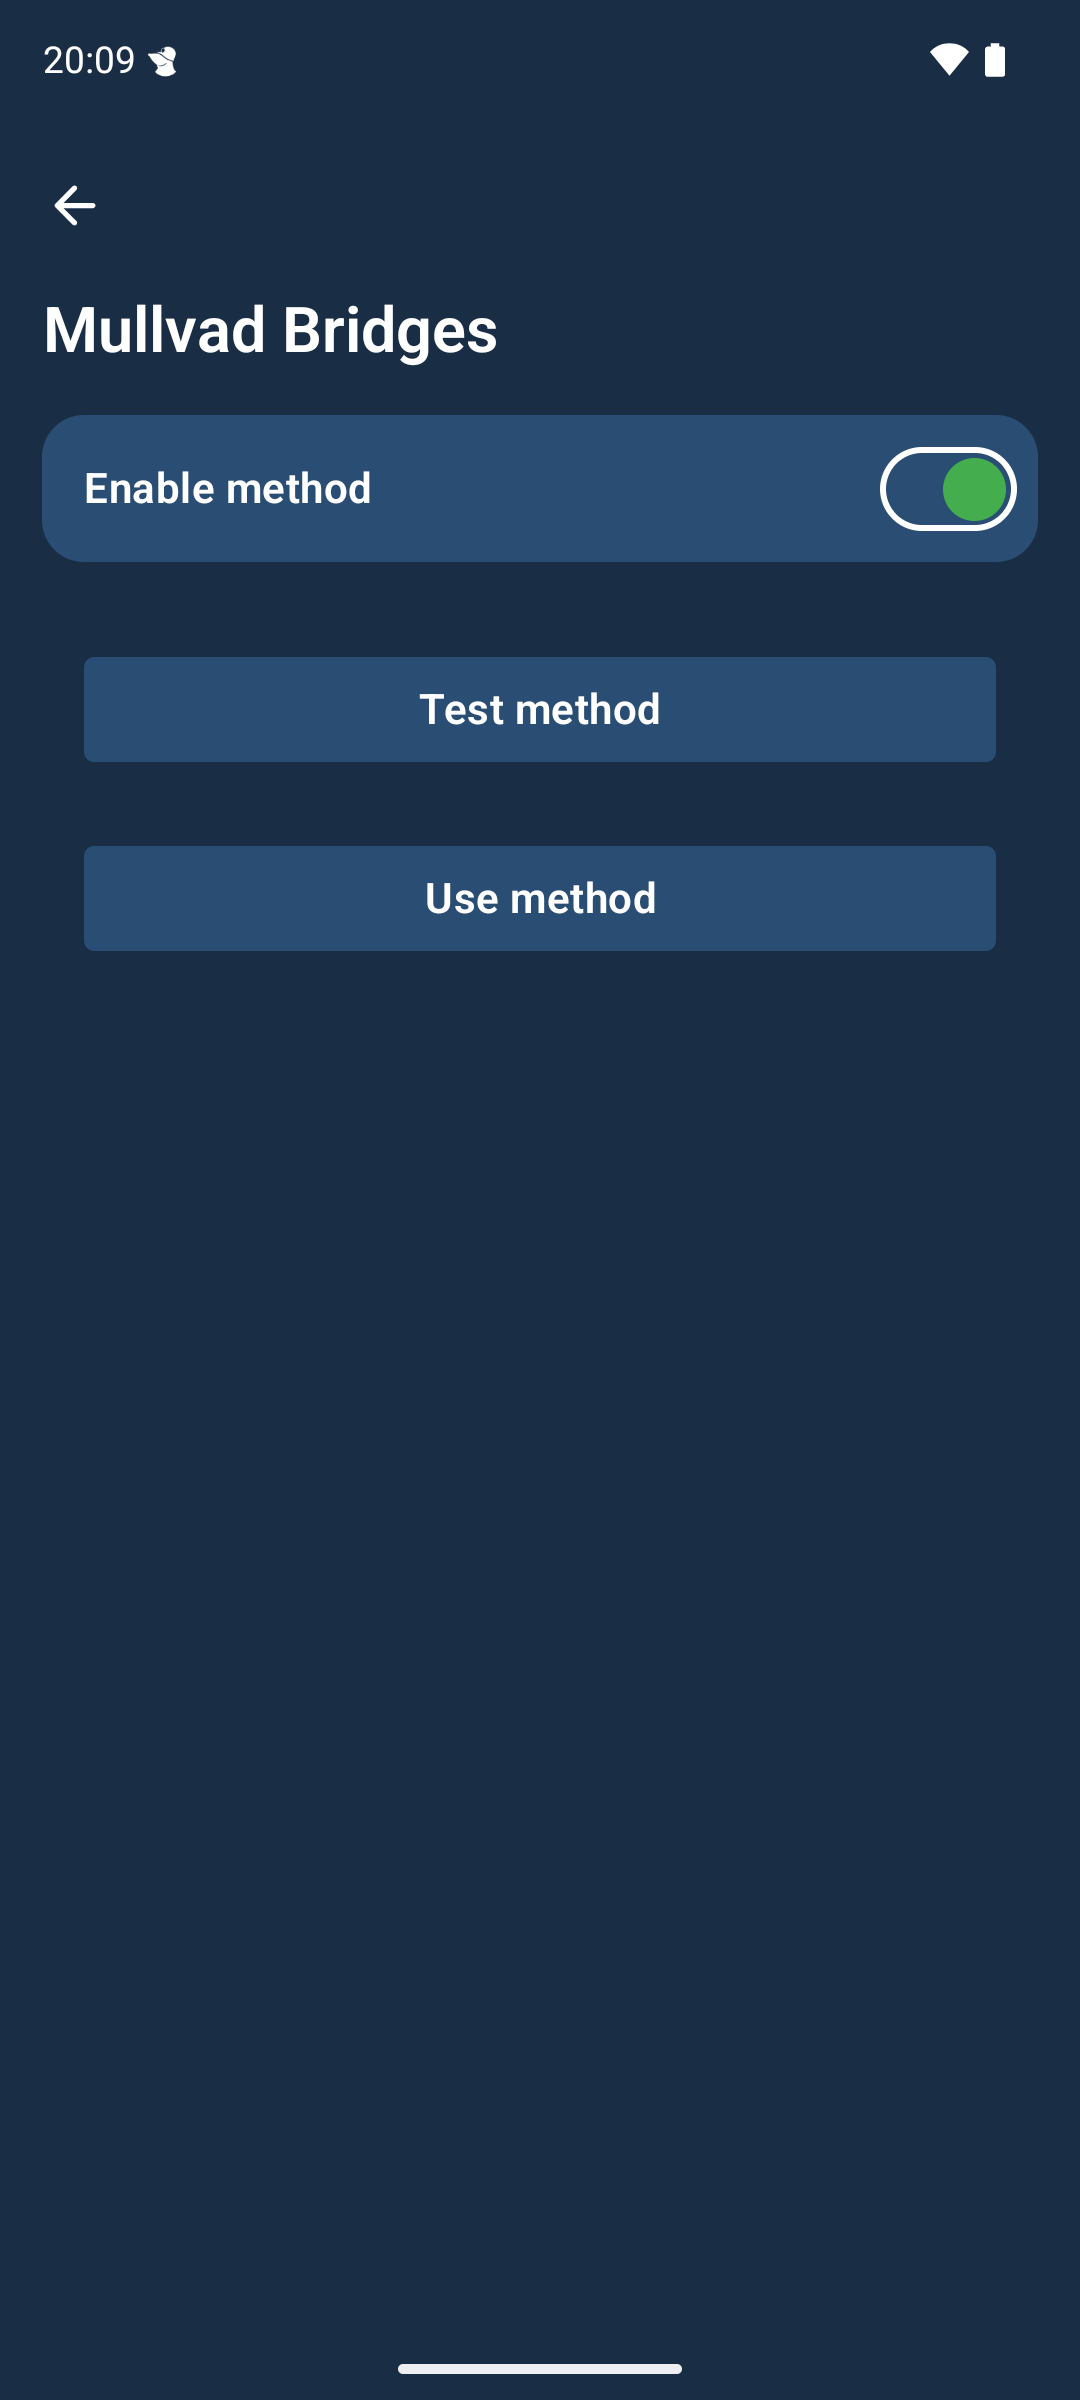
API access
If you have trouble logging in, creating an account or adding time to your account it could help to switch API access methods. To do that you can tap on the method you want to change and then tap on Use method. You can also test any method using Test method and the app will display success or failure at the bottom of the screen.
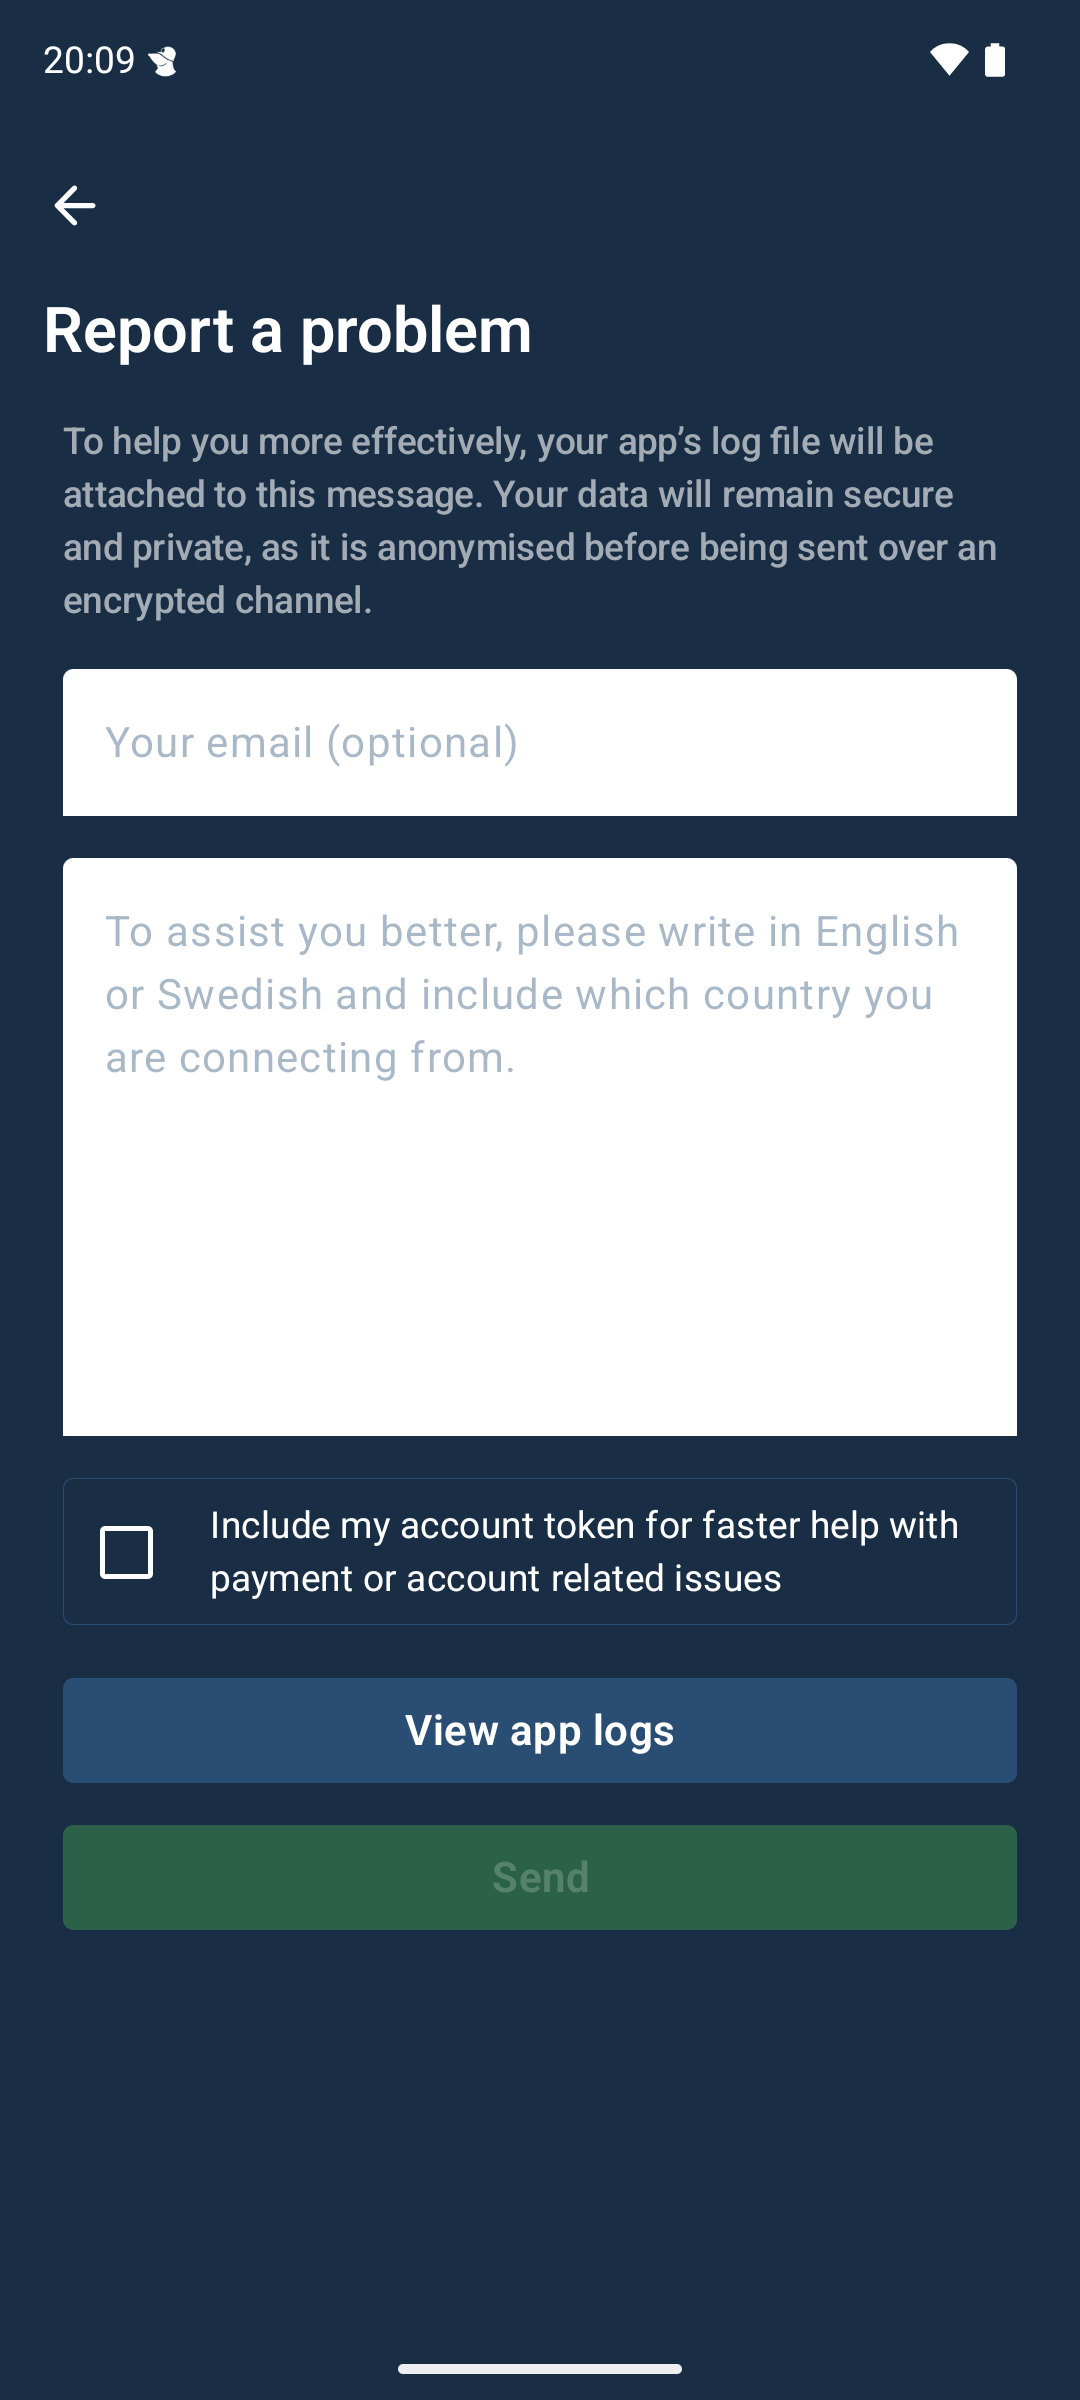
Report a problem
If you are having issues you can let us know by sending a problem report. Enter your email address if you want a reply. Describe your problem in English or Swedish and include which country you are connecting from if you are having issues connecting. By providing which country you are attempting to connect from, you enable us to better assist you.
Android VPN settings
Connecting to Mullvad when the device starts
You can connect to Mullvad automatically when the device is started by following the steps below to enable Always-on VPN.
Blocking connections without VPN
The Mullvad app has a built in kill switch which blocks the Internet if the connection is lost to the Mullvad VPN server you are connected to. If you want your device to only be able to use the Internet when you are connected to Mullvad then you can enable that in the Android settings.
Requirements
- "Block connections without VPN" is available in Android 8 or later (not included in Android TV).
Enable the Android settings
- Open the Android Settings.
- Tap on Network & internet.
- Tap on Advanced.
- Tap on VPN.
- Tap on the gear icon on the right side of Mullvad VPN.
- Enable Always-on VPN.
- Enable Block connections without VPN.
Vulnerabilities
There's a known Android issue where DNS traffic can leak outside the tunnel which we've explained in this blog post.
Additionally, some traffic such as connectivity checks are exempt by Android and will therefore leak outside the tunnel even when "Block connections without VPN" is enabled. You can read more about this in our blog post on leaking connectivity checks and how to prevent it in our guide on configuring connectivity checks on Android.
If you want a detailed explanation of all known vulnerabilities of the android app, we recommend you to check out our security document and our known-issues document.
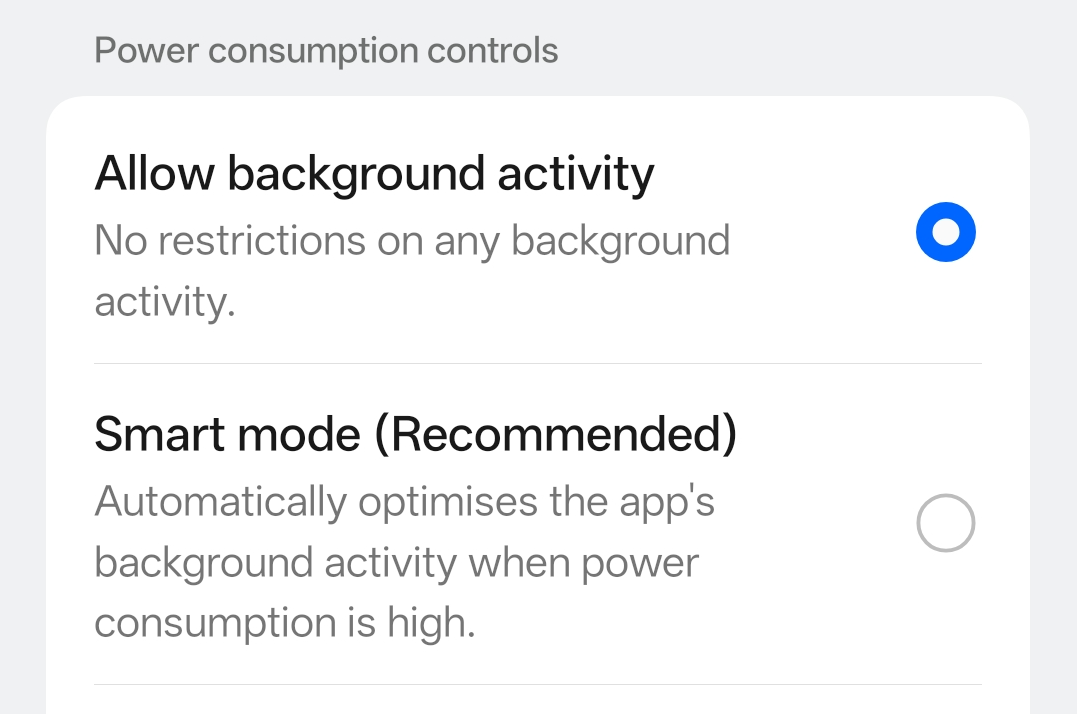
Battery optimization - preventing disconnections
This topic is not about battery usage. If that is your concern, note that the Mullvad app may use more battery if you have enabled DAITA, Quantum-resistant tunnel or Anti-censorship Obfuscation.
The battery optimization settings on some Android devices can cause the Mullvad app to be killed or disconnected when the phone is locked and sleeping, or when running in the background. This is especially likely to happen on phones by certain manufacturers such as Samsung, Motorola, OnePlus and Xiaomi. Another cause can be third-party battery apps.
A solution to this can be to disable battery optimization for the Mullvad app. Below is a non-exhaustive list on how to do this on different types of phones.
Note: This may cause the app to increase its battery usage.
To get notified if the VPN disconnects, enable Always-on VPN.
Samsung
Open the Android Settings app, tap on Battery and device care > Battery > Background usage limits > "Never sleeping apps" and add the Mullvad app there.
Motorola
Open the Android Battery settings and go to "Manage background Apps" and set Mullvad to "Always Allow".
OnePlus Oxygen OS
-
Open settings and go to Apps

-
Click on App management

-
Search for Mullvad VPN and select it
-
Go to Battery usage

-
Select Allow background activity
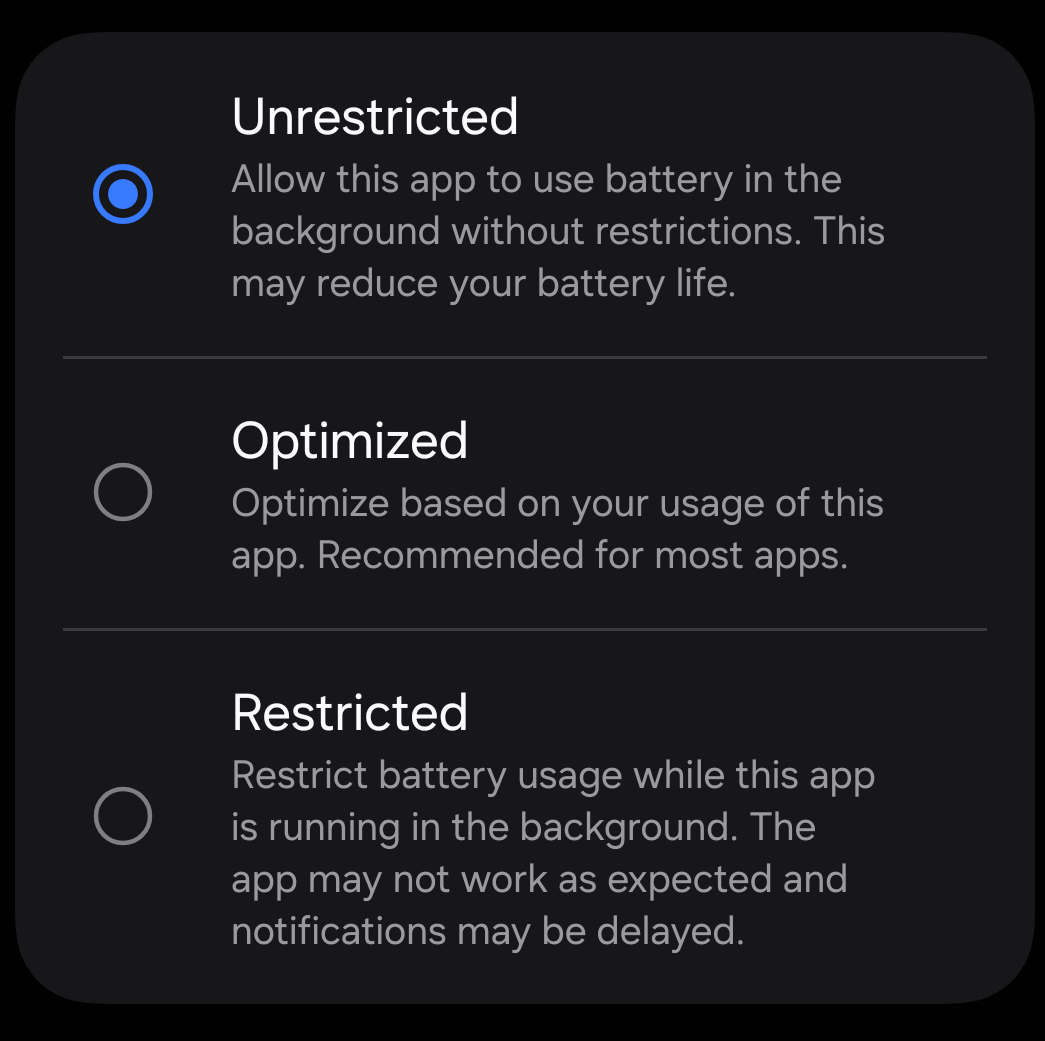
Stock Android (e.g. Google Pixel)
-
Open settings and go to Apps
-
Search for Mullvad VPN and select it
-
Go to Battery (under Usage)

-
Select Unrestricted among the various options
Other devices
If you can not find the battery optimization setting on your phone using the list above we recommend checking out Don’t kill my app! for more detailed guides.
FAQ
Q: The Mullvad app says that the Android VPN permission was denied.
Did you allow the app to set up a VPN connection? If the app did not ask for this then try to restart the device and/or reinstall the app. In some cases you may have to reset the Android Network settings.
Q: Mullvad is losing the VPN connection when using mobile data, or it does not connect with T-Mobile, Sprint or Mint Mobile.
Make sure that you have the correct APN setting for the mobile data in the Android Settings.
Q: Mullvad is disconnecting when the app runs in the background.
This can be due to the battery optimization setting of the app. See this guide for more information on how to change it.
Q: The Mullvad app does not connect from a restricted country or with a public Wi-Fi.
- Try to switch location and connect to different countries and servers.
- UDP traffic might be blocked in the network. Try to enable Anti-censorship obfuscation.
Q: Nothing happens when I tap on the buttons in the Mullvad app.
This can happen if you are using a "blue light filter" app that changes the color tone of the display. It functions as a screen overlay and it blocks the buttons in our app. You have to disable that.
Q: I am unable to access the local network even though I have enabled Local network sharing.
If you have turned on "Block connections without VPN" in the Android system settings then it won't work because it then blocks the local connections outside of the VPN tunnel.
Q: I am not able to update the Mullvad app.
This can happen if you try to install the app from different sources, such as Google Play and our website. The easiest way to resolve this is to update the app from the same source you originally installed the app from. You can also uninstall the app and then install it again from the new source.
Q: When installing Mullvad on my Amazon Fire TV Stick it says "There was a problem parsing the package".
A: The Mullvad app supports Android 9 and newer. If your FireTV / FireStick is too old then you can use the WireGuard app instead which supports Android 7.0 and up.
Q: I am unable to get SOCKS5 proxies on other servers to work
A: Make sure that "Local network sharing" is turned off. The Mullvad Android app currently does not support using a SOCKS5 proxy (other than 10.64.0.1) when "Local network sharing" is turned on.
Split tunneling
Q: My web browser does not work and/or says "This site can't be reached".
If you have excluded the app with split tunneling and enabled "Block connections without VPN" in the Android settings then Android will not allow it to connect outside of the VPN tunnel.
Q: I excluded Firefox beta in Split tunneling, but the normal Firefox also got excluded.
Both Firefox and Firefox Beta have the same internal identifier (UID), so the Android system sees them as the same app in certain regards. This makes it impossible to exclude one of the apps from the tunnel, but not the other. This is something only Mozilla can fix. You can use Firefox Nightly instead. It has a different identifier and can be excluded without affecting the other Firefox versions.
"WireGuard" is a registered trademark of Jason A. Donenfeld.