pfSense with WireGuard
WireGuard Routers Installation Router pfSense
Data ostatniej aktualizacji:
This guide will help you set up WireGuard on pfSense 2.7.0-RELEASE with our servers. We will connect to one of our Swedish servers (se1-wireguard). You will need to change this to match the server you wish to use.
Install the WireGuard package
WireGuard is available as an experimental add-on package.
- Log in to pfSense using the web GUI.
- Go to System → Package Manager → Available Packages.
- Search for "wireguard", then click on the green + Install button and then the ✔ Confirm button.
Generate WireGuard keys and get your IP from our API
- Log in to pfsense using SSH (as admin user).
- Run
cd /usr/local/etc/wireguard/ - Run
wg genkey | tee privkey | wg pubkey > pubkey - Run
echo "public wireguard key"; cat pubkey; echo; echo "private wireguard key"; cat privkey - Run
curl https://api.mullvad.net/wg/ -d account=YOURMULLVADACCOUNTNUMBER --data-urlencode pubkey=YOURPUBLICKEY | tee mullvad-ipReplace YOURMULLVADACCOUNTNUMBER with your Mullvad account number without any spaces, and replace YOURPUBLICKEY with the pubkey above. - The IP-address to use when configuring your WireGuard interface will be returned and saved in the "mullvad-ip" file. You will need this later.
Configure WireGuard
- Log in to pfSense using the web GUI.
- Go to VPN → WireGuard.
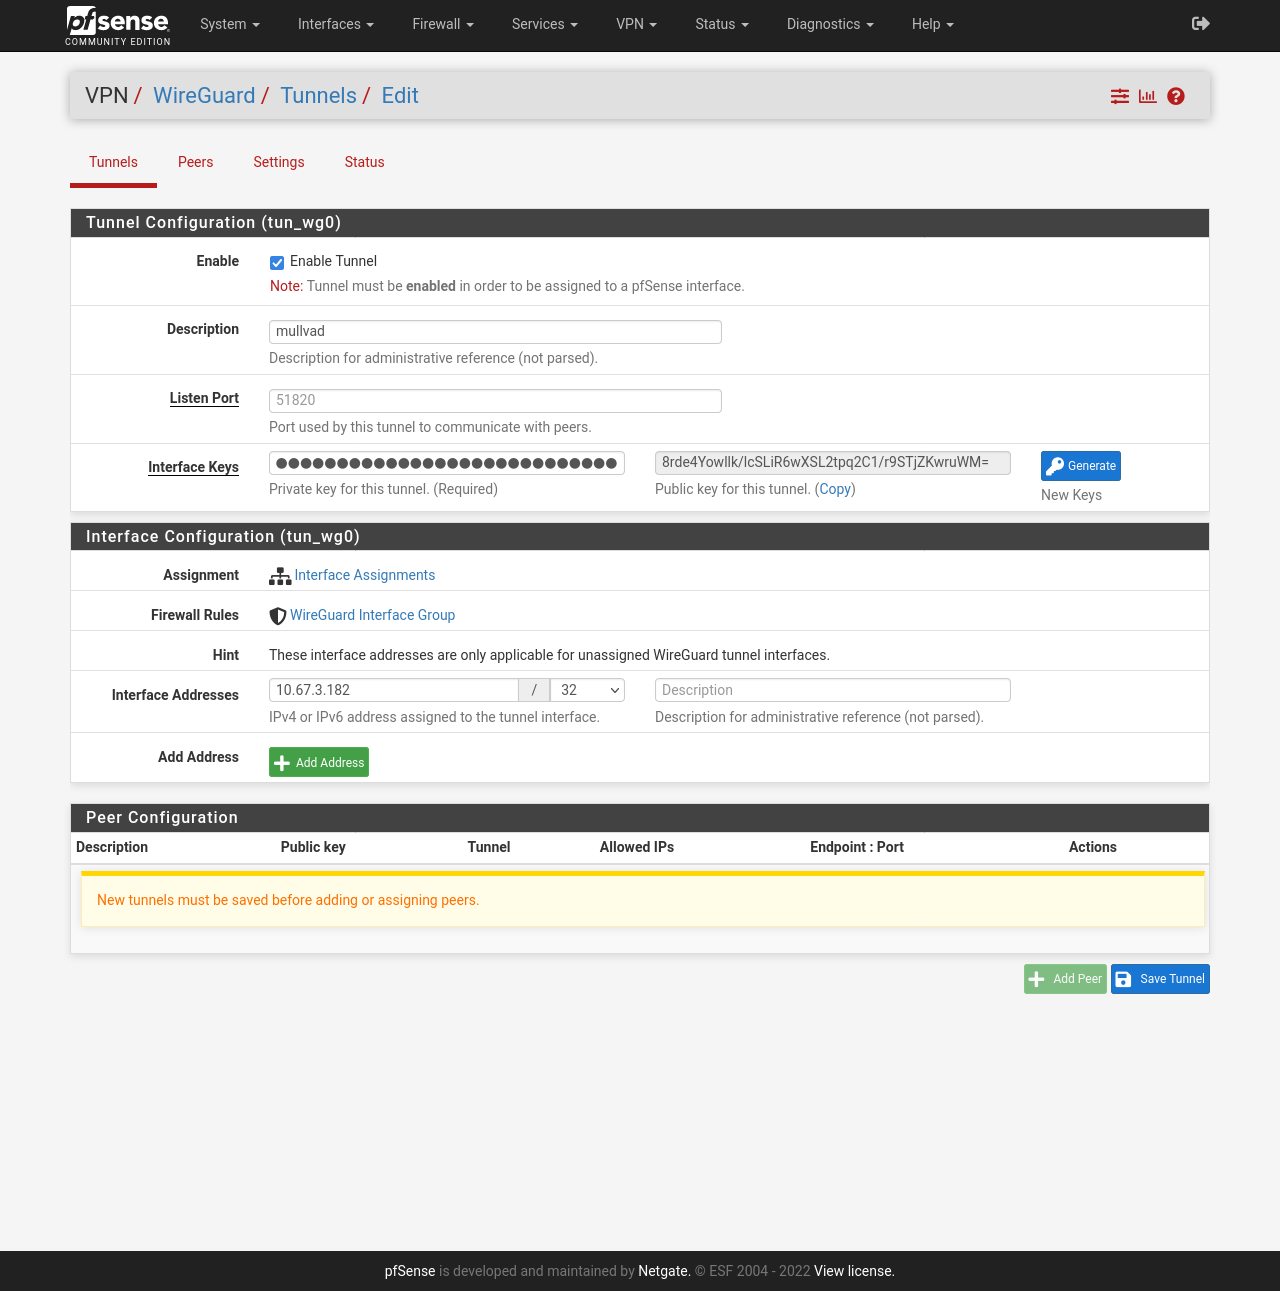
- Click on + Add Tunnel.
- Description: Enter a name for the tunnel. We'll call it "mullvad".
- Listen Port: This can be left empty.
- Interface Keys: Enter your private key that you generated earlier (
cat /usr/local/etc/wireguard/privkey). - Interface Addresses: Enter the IP you got when running the curl command earlier.
- Click on 💾 Save Tunnel.
Peer configuration
Now we will add the WireGuard server (known as a "Peer" in the web GUI). You can find the IP-addresses and Public Keys for the servers in our Servers list.
- In the WireGuard → Tunnels overview, click on the pencil button under "Actions" to edit the tunnel.
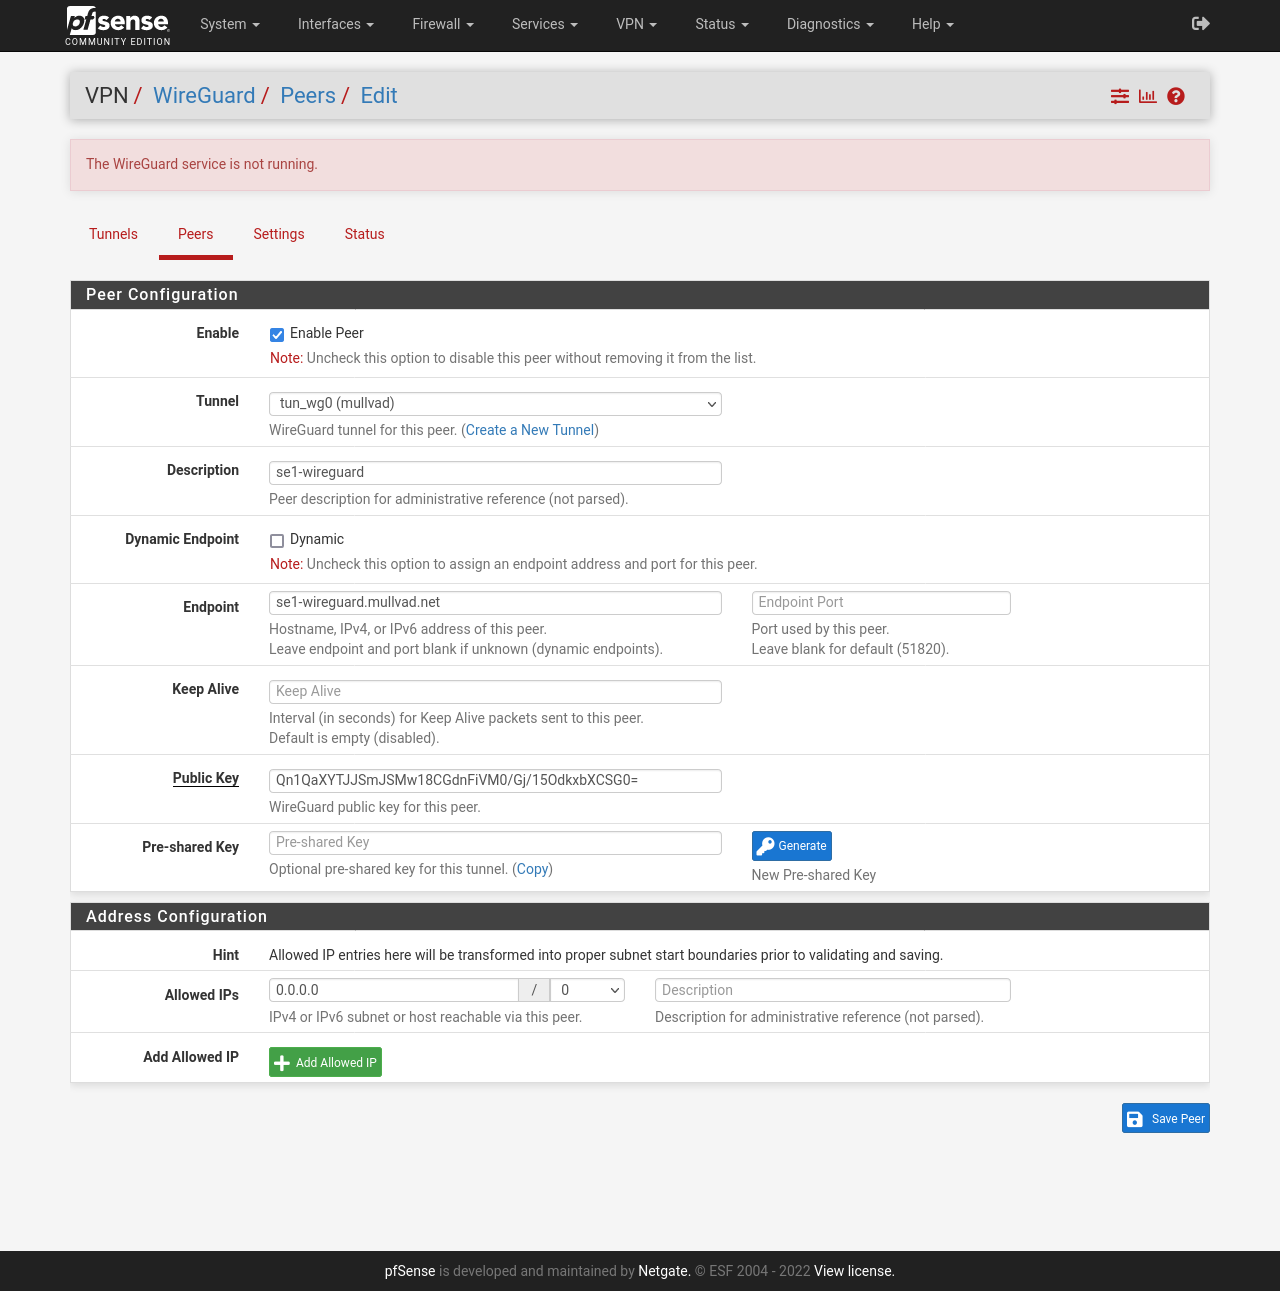
- Click on + Add Peer.
- Tunnel: select "tun_wg0 (mullvad)"
- Description: "se1-wireguard".
- Dynamic Endpoint": Uncheck this so that you're able to manually enter an IP and port.
- Endpoint (This is the WireGuard server of your choice IPv4 address): 193.138.218.220.
- Endpoint Port: 51820.
- Public Key: "Qn1QaXYTJJSmJSMw18CGdnFiVM0/Gj/15OdkxbXCSG0=".
- Allowed IPs: 0.0.0.0/0.
- Click on 💾 Save Peer.
Enable WireGuard
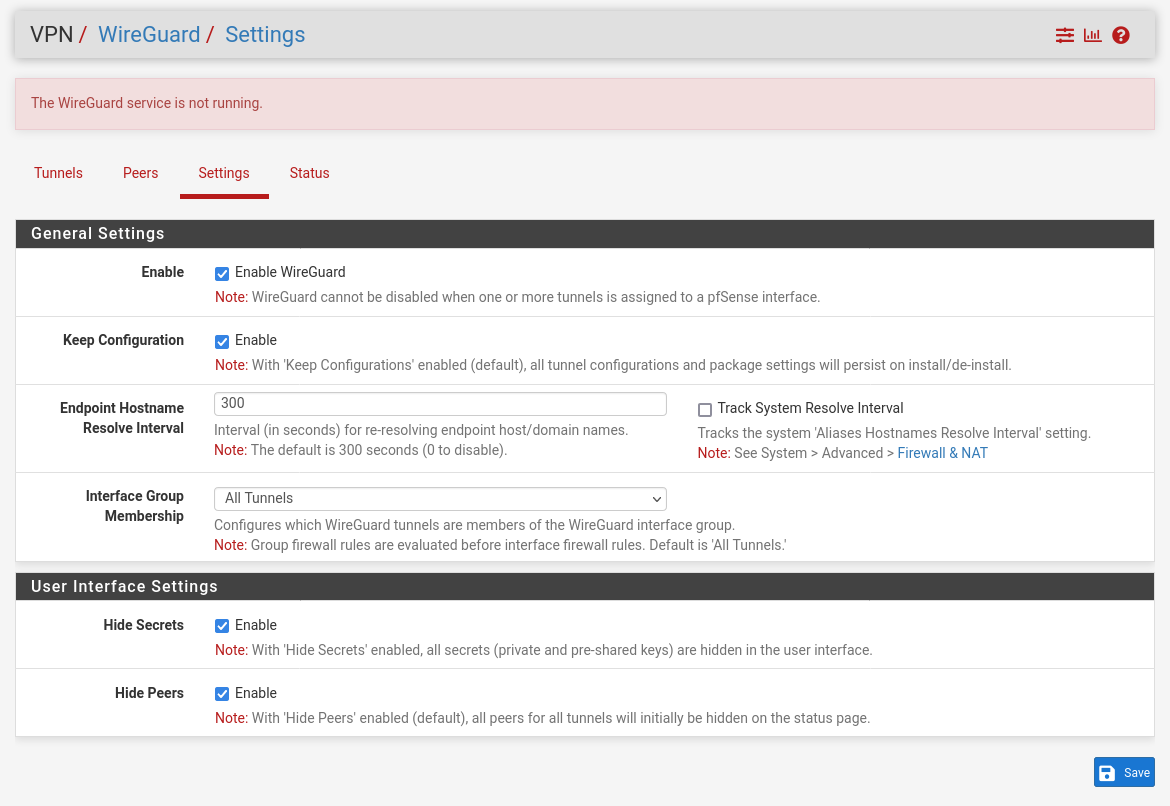
- Go to VPN → WireGuard → Settings.
- Check Enable WireGuard.
- Click on 💾 Save.
Configure interface assignments
- Go to Interfaces → Assignments.
- Available network ports: select "tun_wg0".
- Click + Add.
- Click on OPT1 on the left side.
- Check Enable interface.
- IPv4 Configuration Type: Select "Static IPv4".
- IPv4 Address: Enter the IP you got from the Mullvad API earlier.
- Click on 💾 Save and then click on ✔ Apply Changes.
Add the VPN gateway to the WireGuard tunnel
- Go to System → Routing → Gateways.
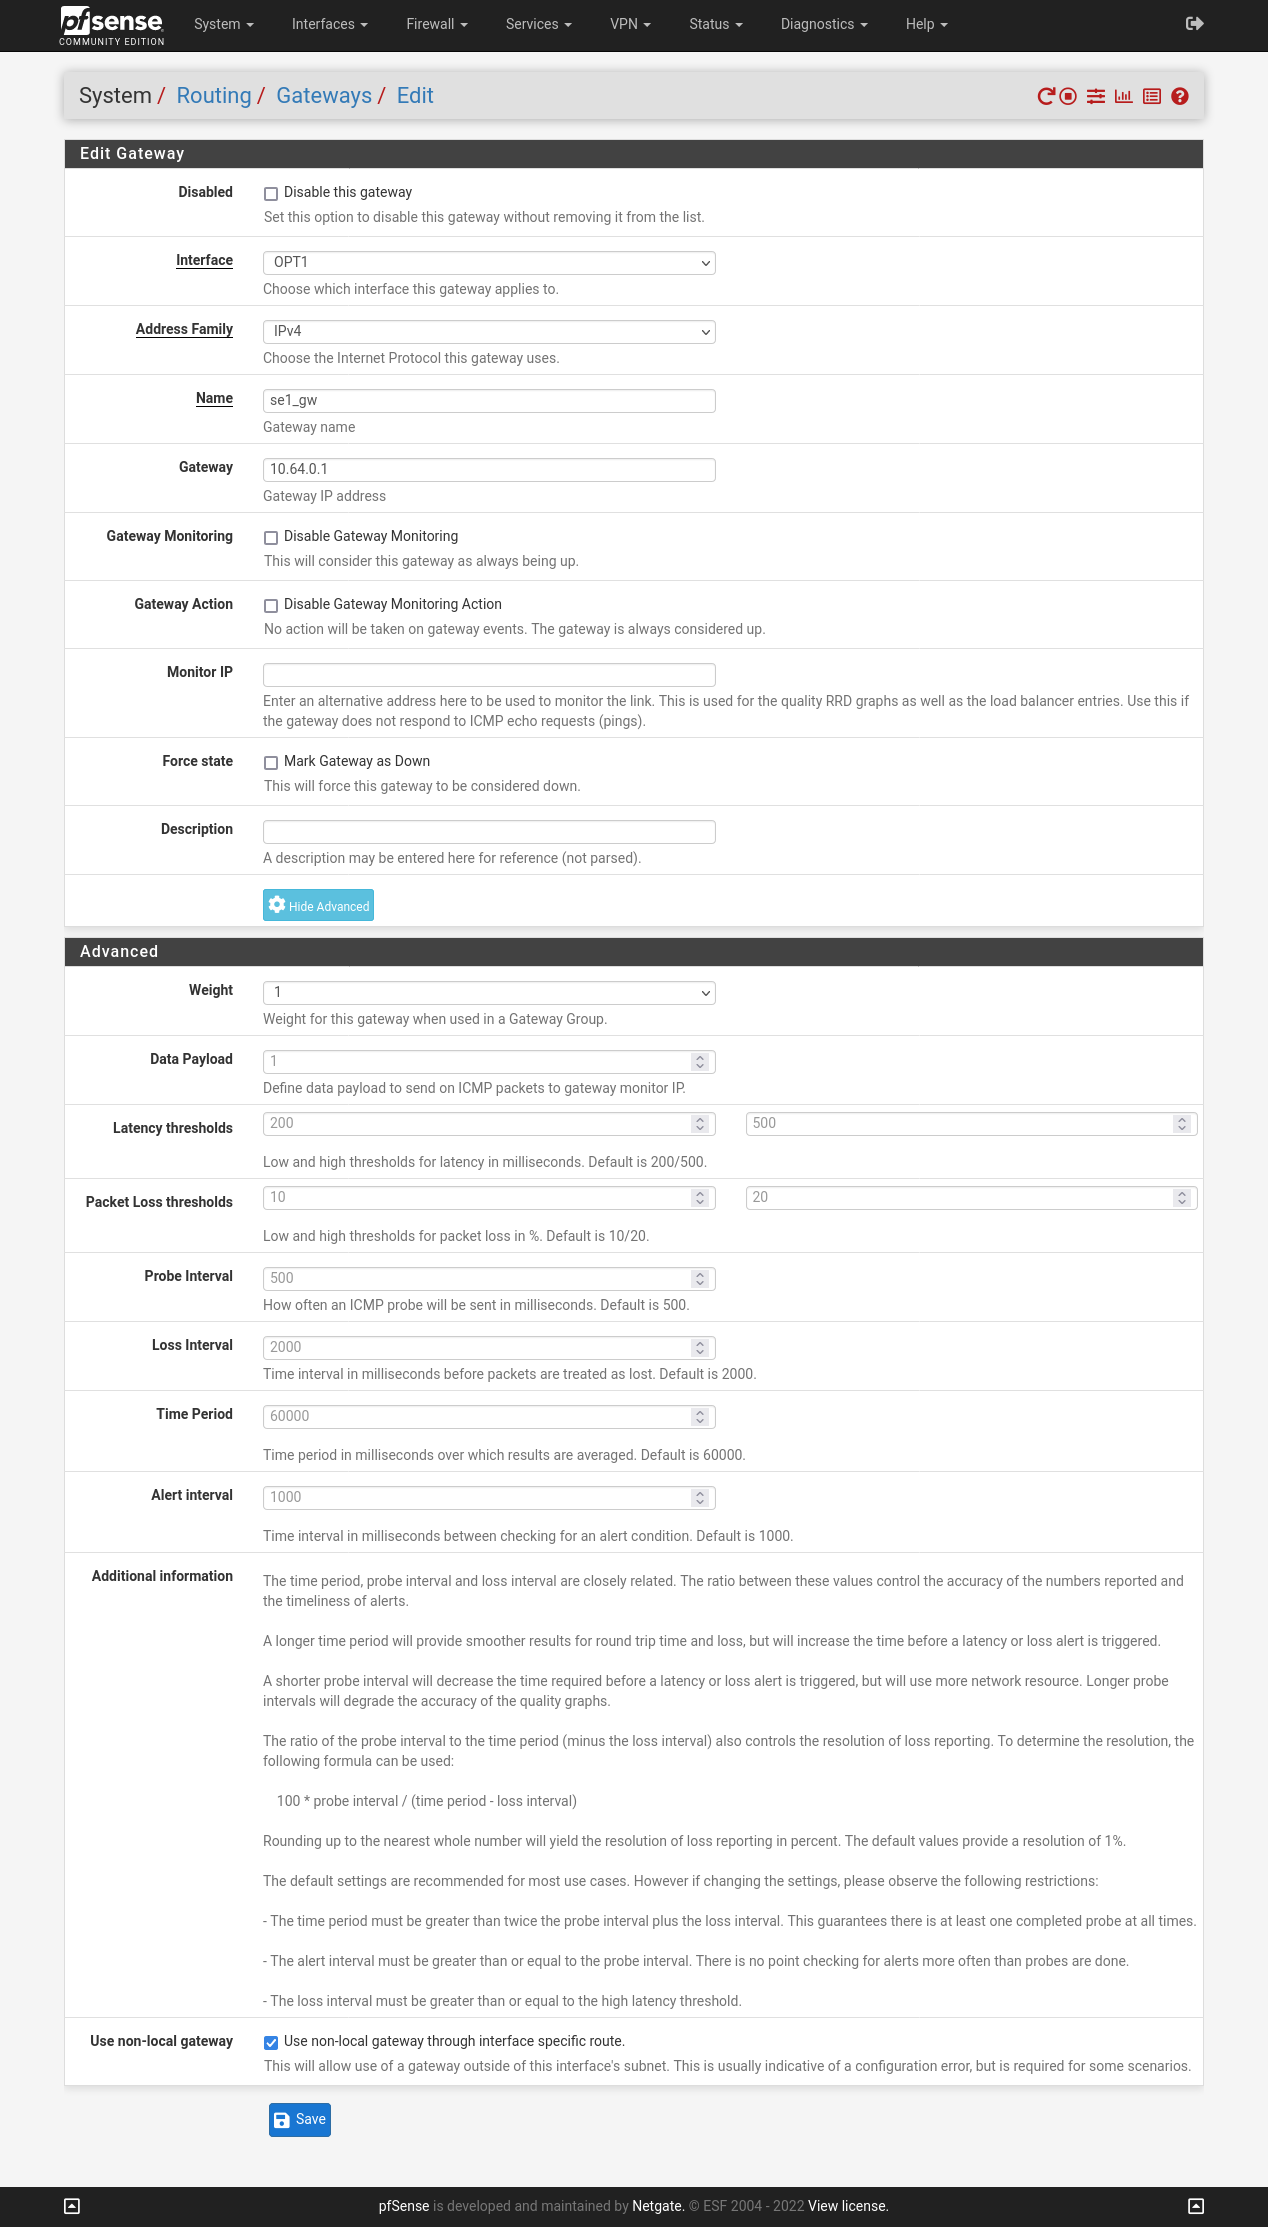
- Click on +Add to add a new gateway.
- Interface: select OPT1.
- Name: enter a name for your gateway. We'll use "se1_gw".
- Gateway: Enter 10.64.0.1.
- Click on the button Display Advanced settings.
- Check Use non-local gateway.
- Click on 💾 Save and then click on ✔ Apply Changes.
Add the gateway to our WireGuard tunnel
- Go to Interfaces → OPT1
- Change IPv4 Upstream gateway to our newly created "se1_gw - 10.64.0.1".
- Click on 💾 Save and then click on ✔ Apply Changes.
Configure the outbound firewall
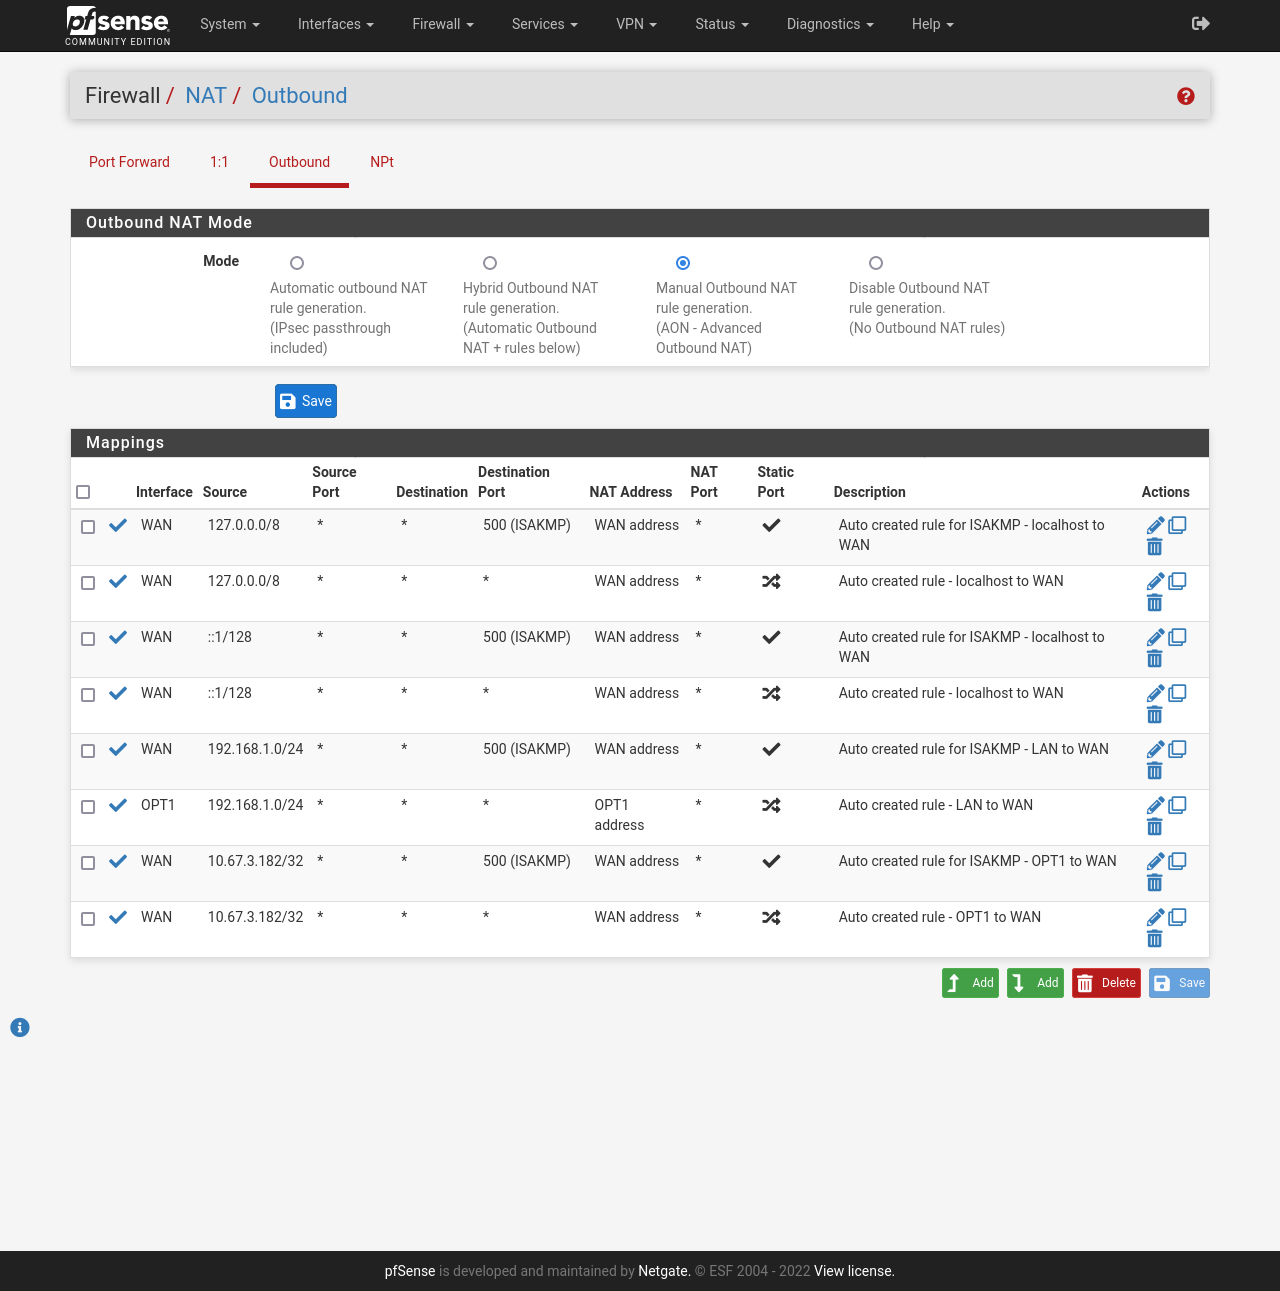
Now it's time to change the NAT firewall rules so that our local clients will exit through the WireGuard tunnel.
- Go to Firewall → NAT → Outbound.
- Select Manual Outbound NAT rule generation.
- Click on 💾 Save and then click on ✔ Apply Changes.
- Locate your current NAT rule that contains 192.168.1.0/24 by default. (Auto created rule - LAN to WAN).
- Click on the pencil button to edit that rule and change the Interface from WAN to OPT1.
- Click on 💾 Save and then click on ✔ Apply Changes.
Configure the firewall rules
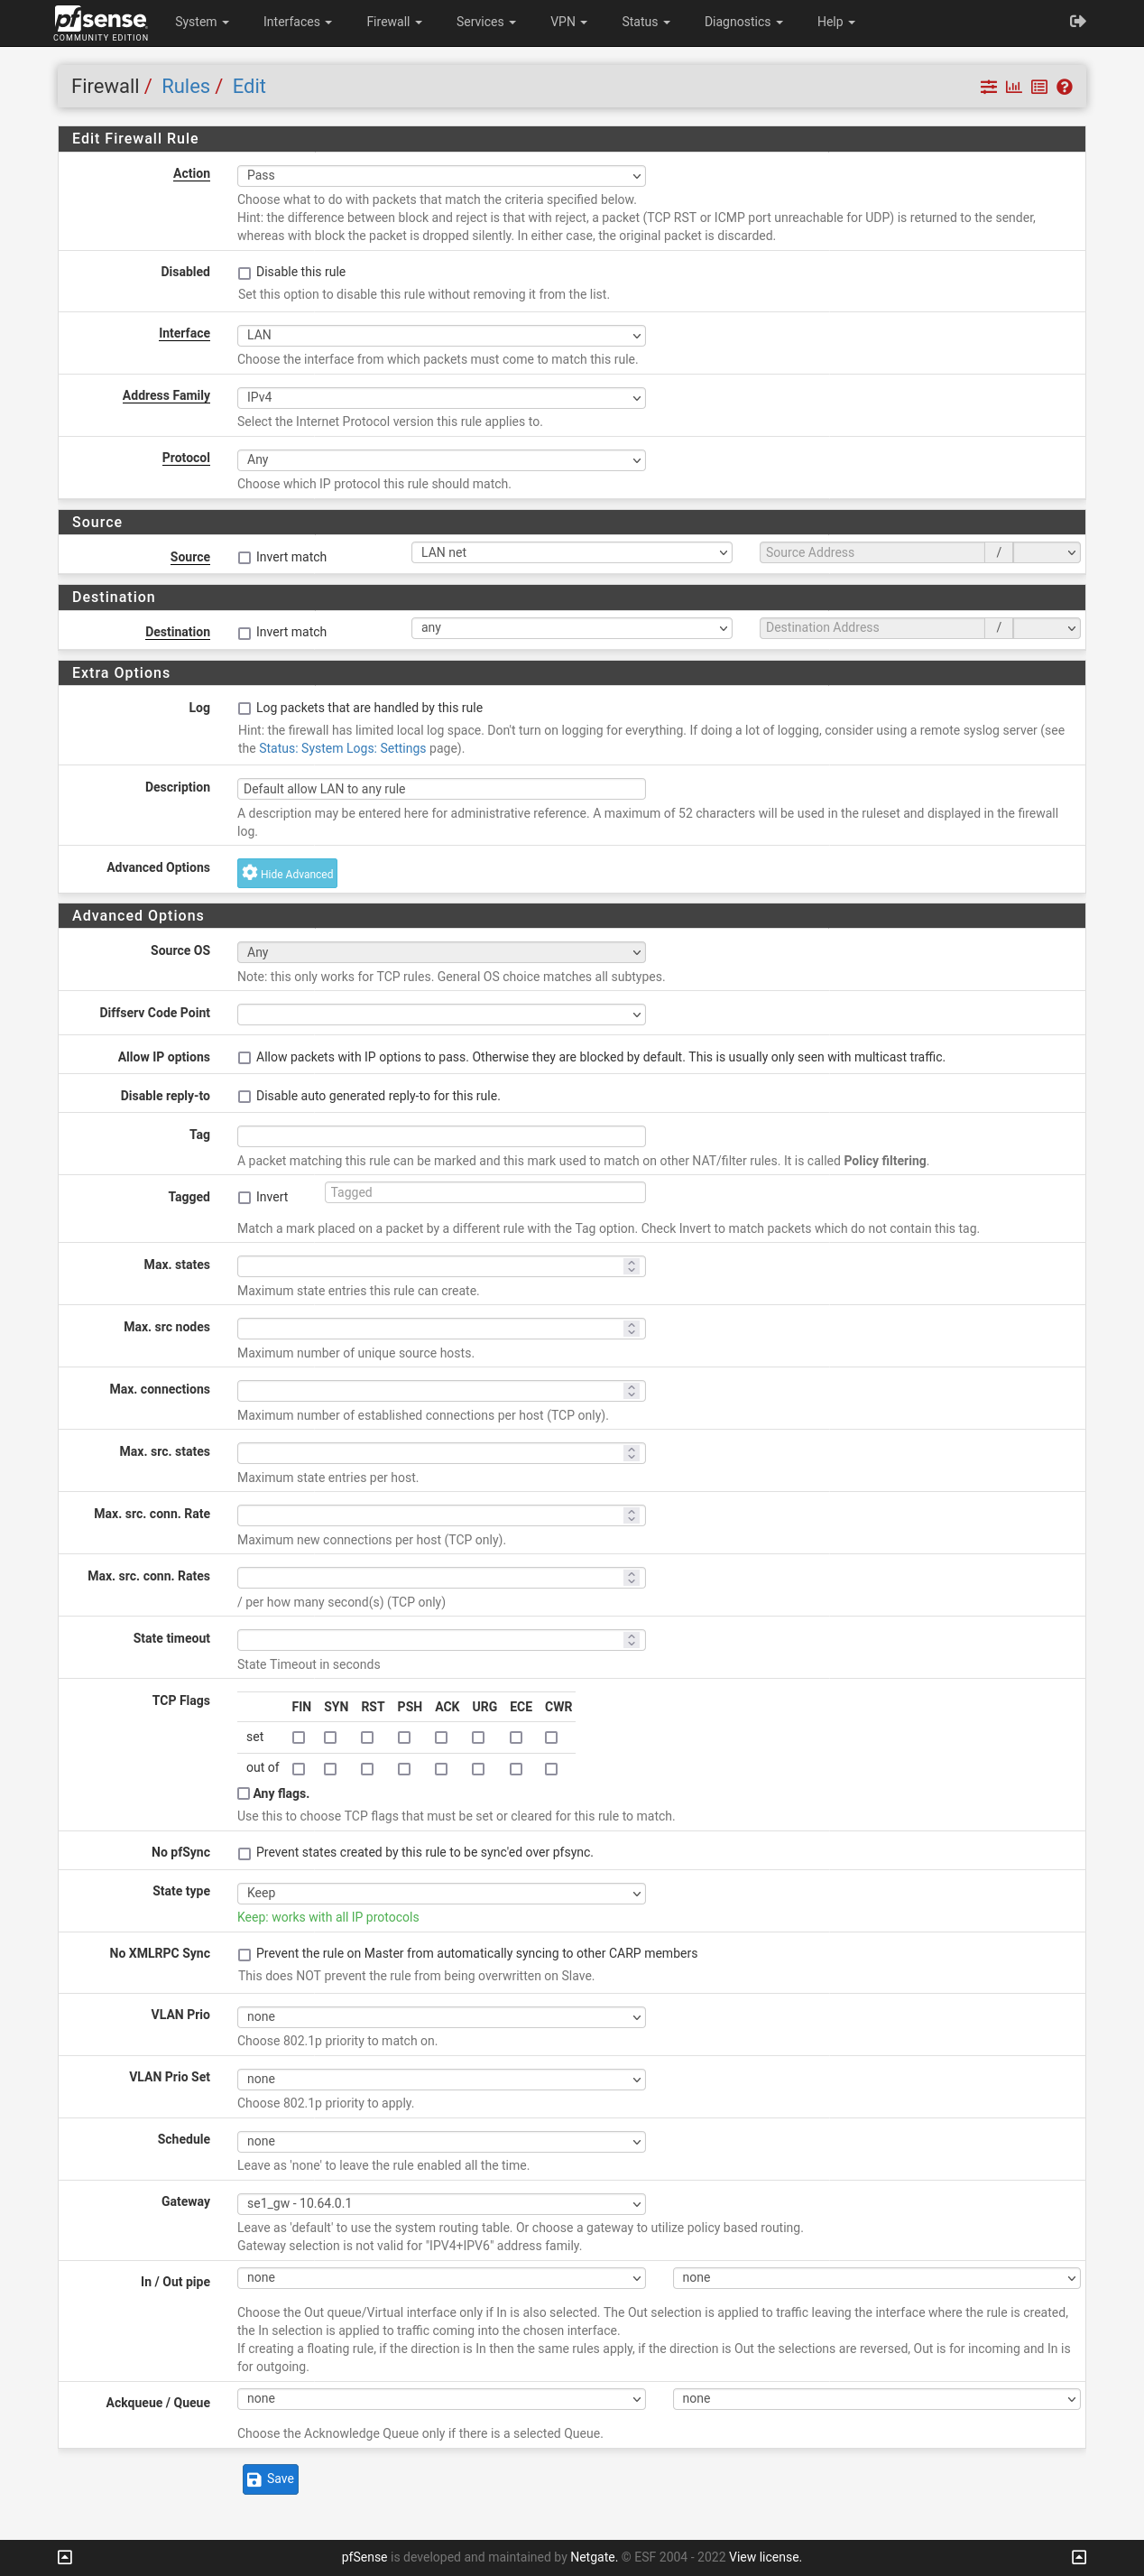
We also need to change the firewall rules so that our clients are allowed to reach the WireGuard gateway.
- Go to Firewall → Rules → LAN.
- Click on the pencil button next to the rule with the description "Default allow LAN to any".
- Click on the button Display Advanced.
- Gateway: select "se1_gw - 10.64.0.1".
- Click on 💾 Save and then click on ✔ Apply Changes.
DNS setup
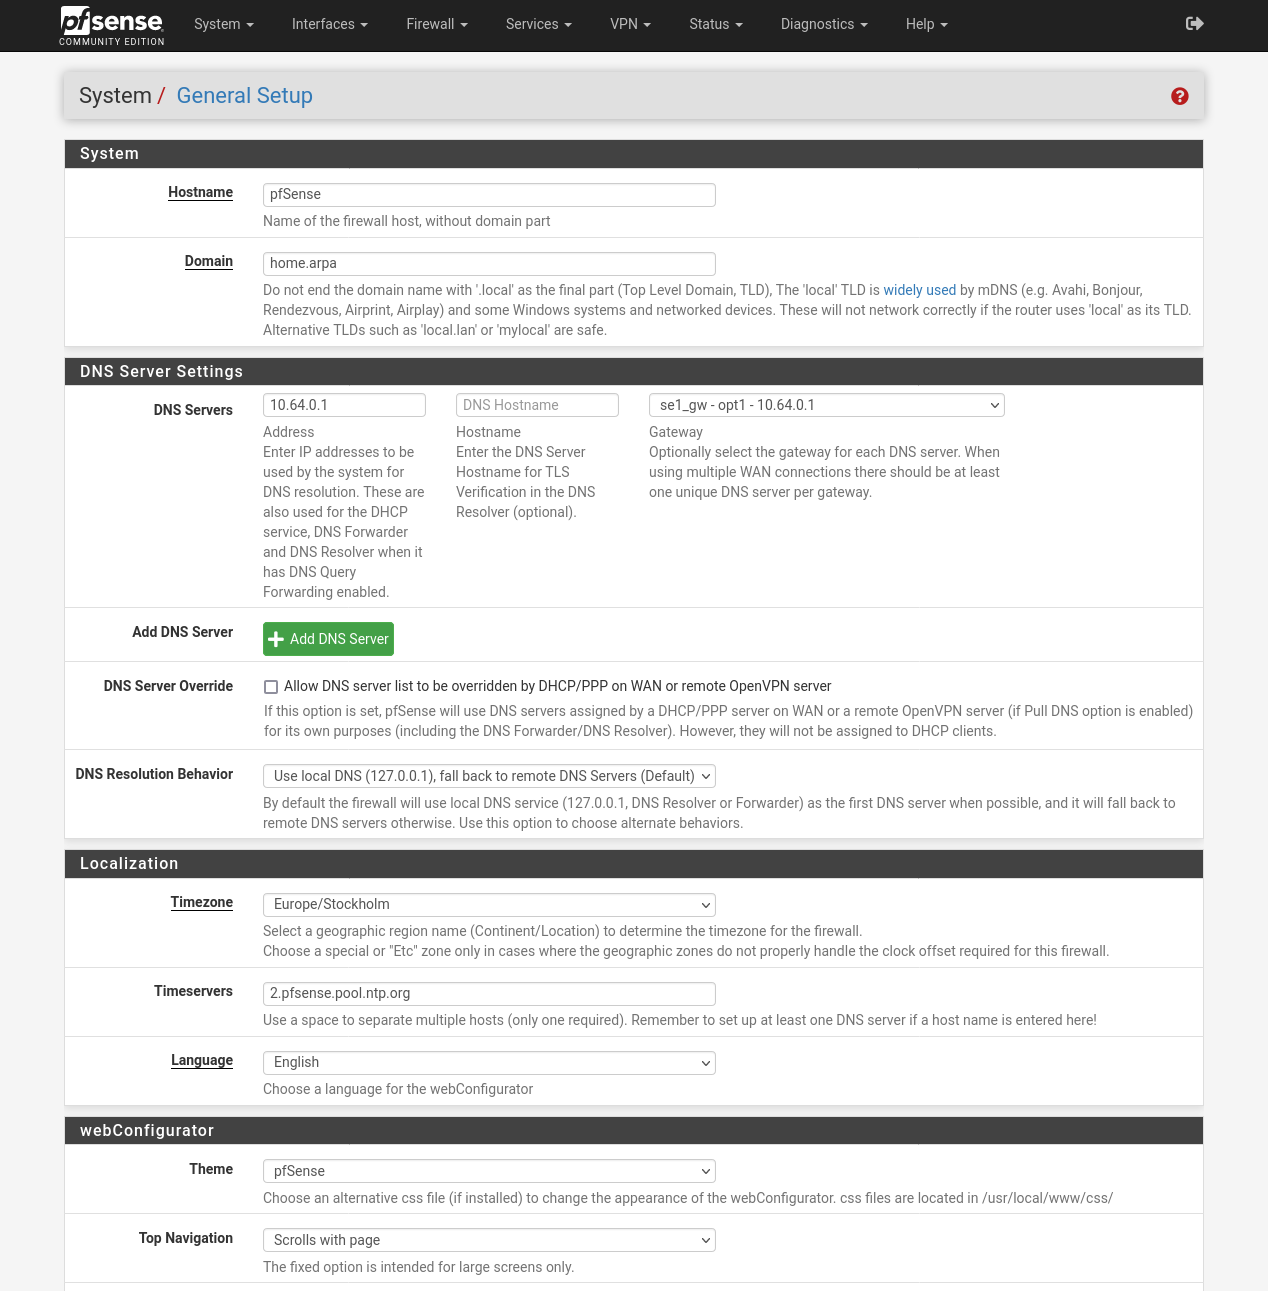
The WireGuard servers run an unfiltered DNS on the internal IP 10.64.0.1. They also have several blocklist filtered DNS options for blocking ads, trackers, malware, adult content and gambling websites. In this guide we will use the unfiltered DNS. If you want to use all the filters then enter 100.64.0.31.
- Go to System → General Setup → DNS.
- DNS Servers: enter "10.64.0.1" and set Gateway to "se1_gw".
- DNS Server Override: Uncheck "Allow DNS server list to be overridden...".
- Click on 💾 Save.
DNS resolver
- Go to Services → DNS Resolver.
- DNS Query Forwarding: check "Enable Forwarding mode".
- Click on 💾 Save and then click on ✔ Apply Changes.
Using recursive DNS (Unbound)
Note that our WireGuard servers hijack DNS queries on port 53. This means that if you use Unbound as a recursive DNS resolver then it won't be able to query the root servers, so it won't work. We recommend that you use DNS forwarding to our DNS server on the WireGuard server instead, as described above. However if you strictly require recursive DNS, then you can create a new Mullvad device without DNS hijacking enabled for your public WireGuard key.
Using IPv6
Mullvad VPN does not provide a /64 subnet prefix. You can use our SOCKS5 proxy on the clients to get an IPv6 exit IP.
Troubleshooting
The DNS does not seem to work and I can’t always ping 10.64.0.1.
Go to VPN > WireGuard > Peers > and set Keep Alive to 25.
If it doesn't help then go to Services > DHCP Server > LAN > Servers > and add 10.64.0.1.
"WireGuard" is a registered trademark of Jason A. Donenfeld.