DD-WRT routers and Mullvad VPN
Routers OpenVPN Installation Router DD-WRT
마지막 업데이트:
What is DD-WRT?
As stated on dd-wrt.com, DD-WRT is a Linux based alternative OpenSource firmware.
This guide uses OpenVPN protocol to connect to the Mullvad VPN servers.
Using Mullvad on your router gives you the following benefits:
- You can secure your whole network and all devices connected to the router.
- You can run Mullvad on more than five devices (all devices connected to the router).
- Via the router, you can even run Mullvad on devices that have no support for OpenVPN.
- A router is designed for routing, naturally, and is not disturbed by other apps and settings like a computer might be.
Installing DD-WRT on your router
Search in the router database on the dd-wrt website to find out if your router is supported. If so read the installation information in the Firmware FAQ.
Expected performance of OpenVPN on a router
Running OpenVPN on a router is demanding due to the encryption, and OpenVPN can only use one CPU core since it's single threaded. On a router with a 400mhz ARM CPU, you can expect performance around 7–10Mbps. It scales relatively linearly, so on a router with 1.6Ghz ARM CPU we would expect performance around 30–40Mbps. Generally x86 CPUs will perform a lot better.
For other speed related questions, please read our speed guide.
Connecting to the router
A DD-WRT router's default IP address is normally 192.168.1.1. Sometimes this address is in conflict with other routers and you might have to change it. If so, try 192.168.10.1, but remember to change the default address everywhere that it is mentioned in this guide.
The first time you connect, you will be prompted to replace the admin login username and password with your own.
Setting up OpenVPN
Follow the instructions below (please read through once before starting).
This guide was written and tested on DD-WRT v3.0 [Beta] build 51440.
VPN tab
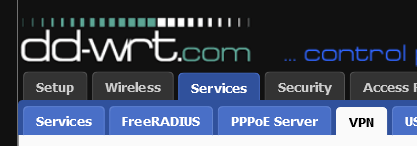
Click on the tab Services and then the subtab VPN. This is where you will set up the Mullvad VPN.
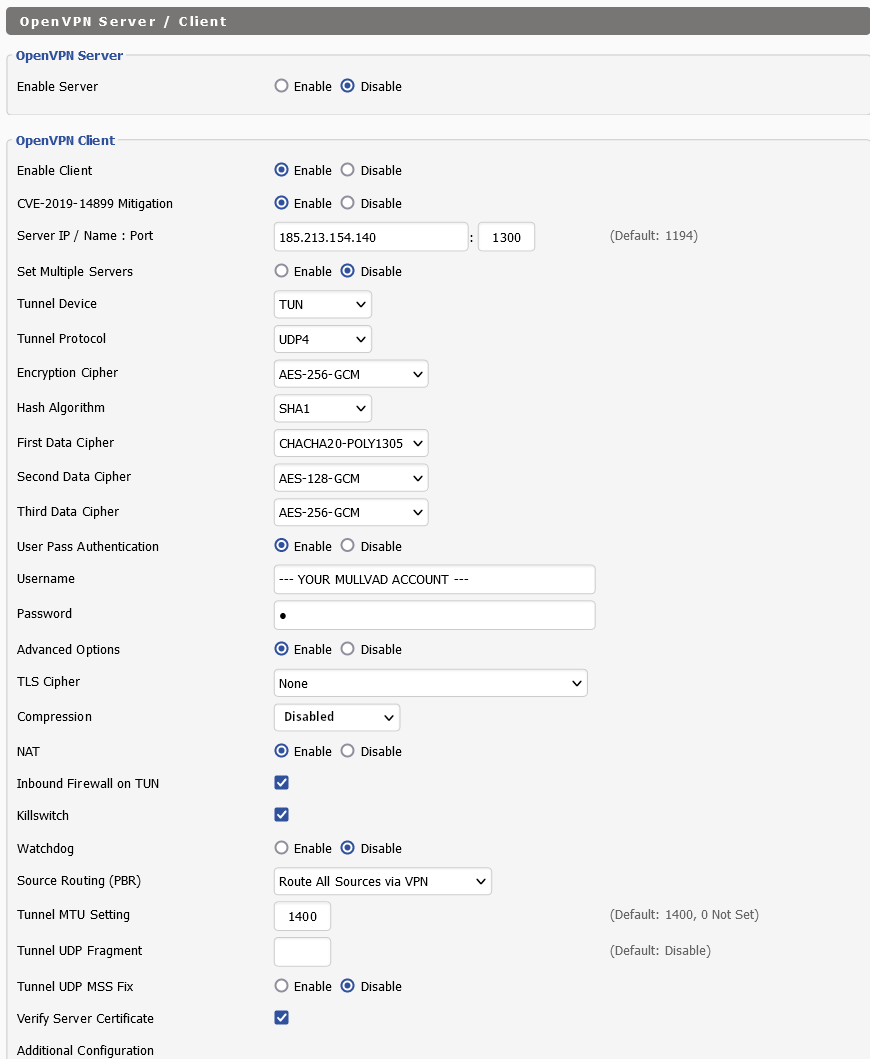
OpenVPN Client: Enable
Next to Enable Client, select Enable.
Server IP / Name : Port
To find the server IP use our Servers list. Make sure to select only OpenVPN in the server type filter in the top. Select the country and city that you want and then click on one of the servers to find the IPv4 address to it.
In this example we'll use 185.213.154.140 (which is the IP address for se-got-010.relays.mullvad.net).
After the server IP you can set the port. Set it to for example 1300. If you need to use TCP then set the port to 443 (and set Tunnel Protocol to TCP4).
Tunnel Protocol
Set this to UDP4 unless you need to connect with TCP4 on port 443.
Encryption Cipher
Change to "AES-256-GCM".
Hash Algorithm
Change to "SHA1".
User Pass Authentication
Change to Enable. Enter your Mullvad account number (without any spaces) as username, and use the password "m".
Advanced Options
Next to Advanced Options, check "Enable".
Compression
Make sure this is set to Disabled and not "No".
NAT
Change to "Enable"
Killswitch
Check the box.
Verify Server Certificate
Check the box.
Click on the picture to open it in a new tab.
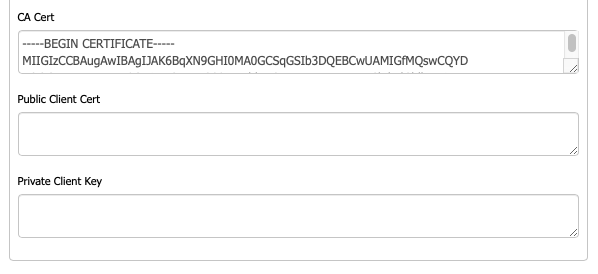
CA Certificate
Copy and paste the following text in the text area:
-----BEGIN CERTIFICATE-----
MIIGIzCCBAugAwIBAgIJAK6BqXN9GHI0MA0GCSqGSIb3DQEBCwUAMIGfMQswCQYD
VQQGEwJTRTERMA8GA1UECAwIR290YWxhbmQxEzARBgNVBAcMCkdvdGhlbmJ1cmcx
FDASBgNVBAoMC0FtYWdpY29tIEFCMRAwDgYDVQQLDAdNdWxsdmFkMRswGQYDVQQD
DBJNdWxsdmFkIFJvb3QgQ0EgdjIxIzAhBgkqhkiG9w0BCQEWFHNlY3VyaXR5QG11
bGx2YWQubmV0MB4XDTE4MTEwMjExMTYxMVoXDTI4MTAzMDExMTYxMVowgZ8xCzAJ
BgNVBAYTAlNFMREwDwYDVQQIDAhHb3RhbGFuZDETMBEGA1UEBwwKR290aGVuYnVy
ZzEUMBIGA1UECgwLQW1hZ2ljb20gQUIxEDAOBgNVBAsMB011bGx2YWQxGzAZBgNV
BAMMEk11bGx2YWQgUm9vdCBDQSB2MjEjMCEGCSqGSIb3DQEJARYUc2VjdXJpdHlA
bXVsbHZhZC5uZXQwggIiMA0GCSqGSIb3DQEBAQUAA4ICDwAwggIKAoICAQCifDn7
5E/Zdx1qsy31rMEzuvbTXqZVZp4bjWbmcyyXqvnayRUHHoovG+lzc+HDL3HJV+kj
xKpCMkEVWwjY159lJbQbm8kkYntBBREdzRRjjJpTb6haf/NXeOtQJ9aVlCc4dM66
bEmyAoXkzXVZTQJ8h2FE55KVxHi5Sdy4XC5zm0wPa4DPDokNp1qm3A9Xicq3Hsfl
LbMZRCAGuI+Jek6caHqiKjTHtujn6Gfxv2WsZ7SjerUAk+mvBo2sfKmB7octxG7y
AOFFg7YsWL0AxddBWqgq5R/1WDJ9d1Cwun9WGRRQ1TLvzF1yABUerjjKrk89RCzY
ISwsKcgJPscaDqZgO6RIruY/xjuTtrnZSv+FXs+Woxf87P+QgQd76LC0MstTnys+
AfTMuMPOLy9fMfEzs3LP0Nz6v5yjhX8ff7+3UUI3IcMxCvyxdTPClY5IvFdW7CCm
mLNzakmx5GCItBWg/EIg1K1SG0jU9F8vlNZUqLKz42hWy/xB5C4QYQQ9ILdu4ara
PnrXnmd1D1QKVwKQ1DpWhNbpBDfE776/4xXD/tGM5O0TImp1NXul8wYsDi8g+e0p
xNgY3Pahnj1yfG75Yw82spZanUH0QSNoMVMWnmV2hXGsWqypRq0pH8mPeLzeKa82
gzsAZsouRD1k8wFlYA4z9HQFxqfcntTqXuwQcQIDAQABo2AwXjAdBgNVHQ4EFgQU
faEyaBpGNzsqttiSMETq+X/GJ0YwHwYDVR0jBBgwFoAUfaEyaBpGNzsqttiSMETq
+X/GJ0YwCwYDVR0PBAQDAgEGMA8GA1UdEwEB/wQFMAMBAf8wDQYJKoZIhvcNAQEL
BQADggIBADH5izxu4V8Javal8EA4DxZxIHUsWCg5cuopB28PsyJYpyKipsBoI8+R
XqbtrLLue4WQfNPZHLXlKi+A3GTrLdlnenYzXVipPd+n3vRZyofaB3Jtb03nirVW
Ga8FG21Xy/f4rPqwcW54lxrnnh0SA0hwuZ+b2yAWESBXPxrzVQdTWCqoFI6/aRnN
8RyZn0LqRYoW7WDtKpLmfyvshBmmu4PCYSh/SYiFHgR9fsWzVcxdySDsmX8wXowu
Ffp8V9sFhD4TsebAaplaICOuLUgj+Yin5QzgB0F9Ci3Zh6oWwl64SL/OxxQLpzMW
zr0lrWsQrS3PgC4+6JC4IpTXX5eUqfSvHPtbRKK0yLnd9hYgvZUBvvZvUFR/3/fW
+mpBHbZJBu9+/1uux46M4rJ2FeaJUf9PhYCPuUj63yu0Grn0DreVKK1SkD5V6qXN
0TmoxYyguhfsIPCpI1VsdaSWuNjJ+a/HIlKIU8vKp5iN/+6ZTPAg9Q7s3Ji+vfx/
AhFtQyTpIYNszVzNZyobvkiMUlK+eUKGlHVQp73y6MmGIlbBbyzpEoedNU4uFu57
mw4fYGHqYZmYqFaiNQv4tVrGkg6p+Ypyu1zOfIHF7eqlAOu/SyRTvZkt9VtSVEOV
H7nDIGdrCC9U/g1Lqk8Td00Oj8xesyKzsG214Xd8m7/7GmJ7nXe5
-----END CERTIFICATE-----
Apply Settings
Click on the green Apply Settings button.
Enable IPv6
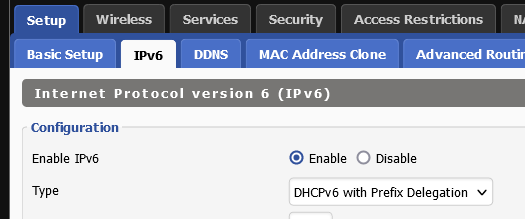
- Click on the Setup tab and then the sub tab IPv6.
- Next to Enable IPv6, select Enable. Mullvad will not function without this.
- Click on the Type drop-down menu and select DHCPv6 with Prefix Delegation.
No other setting needs to be changed. - Click on Apply Settings.
Check the connection status
Click on the Status tab and then the subtab OpenVPN.
In the top it should say:
State
Client: CONNECTED SUCCESS
Click on the Refresh button to update the status.
Set the DNS
Now you will set the DNS to Mullvad's DNS. This will ensure that information is not leaked to the provider running the local network and will therefore keep them from seeing which domain names are looked up.
Basic Setup tab
While still on the Setup tab, click on the Basic Setup tab

Static DNS
Set the following DNS servers:
Static DNS 1: 10.8.0.1
Note that the DNS server 193.138.218.74 is decommissioned and no longer works

Next to Local DNS , change the four fields so that the string reads 1.1.1.1 (or any other DNS server you might wish to use)
Apply
Click on the Apply Settings button.
Secure your WiFi
Wireless Security tab
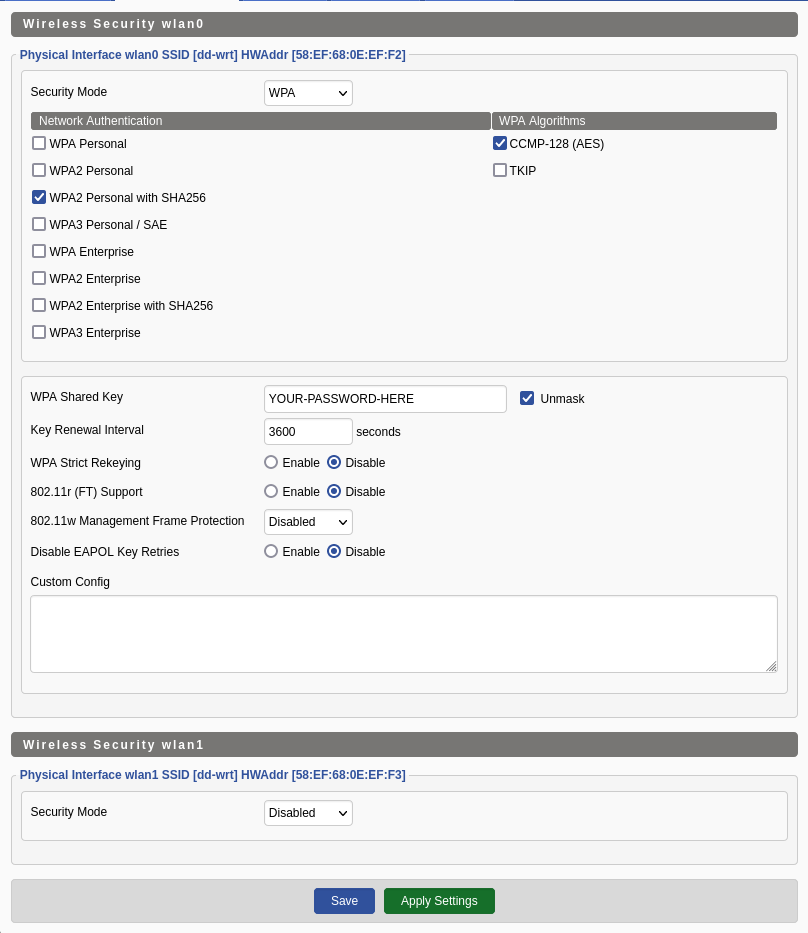
Click on the tab Wireless and then the subtab Wireless Security.
Encryption and password
By default, the WiFi is unprotected on DD-WRT. You need to set Security Mode to WPA. Set the algorithm to CCMP-238 (AES) and enter a strong password in the WPA Shared Key field.
Some routers have several WiFi networks; make sure you secure all of them.
Click on the Apply Settings button.
Test your IP address
Use our Connection check to see which IP address you are using. It should be one of Mullvad's and not your own.
Troubleshooting
Try the following:
- Enter verb 6 in the Additional Configuation to make the log more detailed.
- Look at the OpenVPN log under Status > OpenVPN.
- Assign a different IP address to your router (in case of conflict with other devices) under Setup > Basic Setup.
- Check that you correctly followed all of the instructions (the text may be more updated than the screenshots).
- Restart the router.
- Restart the computer/device.
