WireGuard on a router
WireGuard Routers Installation Router OpenWrt
Actualizado por última vez:
In this guide, we walk you through the steps to set up and run WireGuard® on a router.
If you run into any issues while testing WireGuard, please contact support@mullvadvpn.net and let us know what you experience.
Installing OpenWrt on your router
(Version 22.03.2 has been used here)
First, check OpenWrt's list of supported routers to make sure yours is included.
Installing WireGuard and Mullvad on your router comes with some benefits:
- You can secure your whole network and all devices connected to the router.
- You can run Mullvad on more than five devices (all devices connected to the router).
- Via the router, you can even run Mullvad on devices that have no support for WireGuard.
- A router is designed for routing, naturally, and is not disturbed by other programs and settings like a program in a computer might be. It works well and is stable.
Installing WireGuard
What you need in order to proceed:
- a router with a fresh installation of OpenWrt.
- a public/private key pair to use with WireGuard (will be described below).
- an IP address to use (will be described below).
Update the router's firmware to OpenWRT
Follow your router's instructions on how to connect and update the firmware to the OpenWrt firmware that you previously downloaded.
The router normally displays some status information and then restarts. Take extra care in downloading the correct version since doing this incorrectly could "brick" your router, making it completely unusable.
Initial configuration of OpenWrt
- Open a browser and navigate to http://192.168.1.1/.
- Click the Login button. This logs you in with the default root user and no password.
- Once the Status page loads, you will see a message at the top saying “No password set!” Click on System - Administration
- On the Router Password page, set a secure password. Click the Save button.
- On the same page, in the SSH Access section, set the interface to LAN. Click the Save & Apply button.
Install WireGuard
1. From the System drop-down menu, click on Software , Click "Update lists...", then when finished updating click "Dismiss"
2. In the Download and install package field enter: luci-proto-wireguard and click OK, click Install. Then Dismiss the windows when installed. Repeat and make sure wireguard-tools is installed also.
3. Click System - Reboot (Make sure to reboot the router otherwise other steps will most likely fail)
Public/private key pair
If you do not have a public/private key pair to use with WireGuard, then you can use SSH to connect to the router as described earlier, and run:
wg genkey | tee privatekey | wg pubkey > publickey
Your public key will be in the file "publickey" and your private key in the file "privatekey".
Display the contents of publickey by issuing: cat publickey which is later used for pushing it to the api.
Display the contents of privatekey issuing: cat privatekey which is later used when configuring the WGInterface.
If you're running WireGuard on multiple devices, generate a separate key pair for each device. Also make sure to connect the router to a unique server that you do not use on other devices that will be using the router's VPN. You will otherwise run into connectivity issues.
Getting an IP to use with Mullvad
While connected to the router using ssh:
First install curl: opkg update && opkg install curl
curl https://api.mullvad.net/wg/ -d account=YOURMULLVADACCOUNTNUMBER --data-urlencode pubkey=YOURPUBLICKEY
Replace the placeholders in the curl command above with your Mullvad account number and public key.
The IP:address to use with Mullvad will be returned.
Another option is to upload your public key in your account on our website.
Add the WireGuard interface
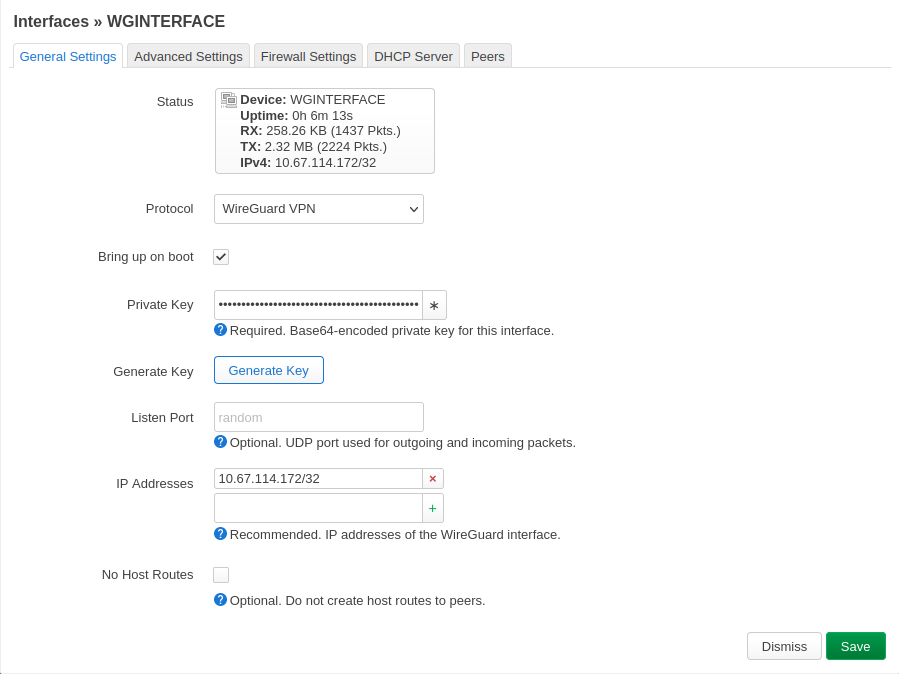
In the main menu, select Network- Interfaces and then click on "Add new interface". Name the interface WGINTERFACE and select Protocol WireGuard VPN and press Create interface in order to start configure the new interface.
Configure WGInterface settings
Make the following changes:
- Private Key – use the one you previously generated.
- Public Key – use the one you previously generated (available in versions newer than 22.03.2).
- IP Addresses – replace 10.67.114.172/32 with the IP address you received from Mullvad

Click image to enlarge.
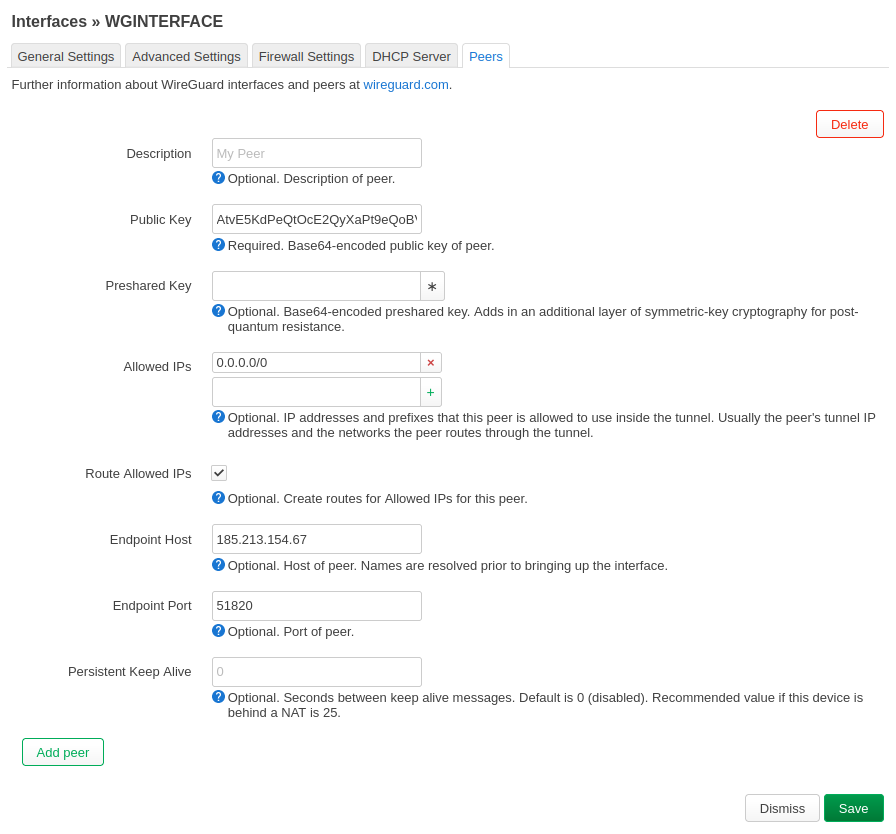
Click Peers, then Add Peer
- Public Key – use the key that corresponds with the Mullvad WireGuard server of your choosing from Servers
- Route Allowed IPs - Make sure this is checked
- Endpoint Host (Peers)– use the IP address that corresponds with the Mullvad WireGuard server of your choosing.
- Endpoint Port - change to 51820
- Allowed IPs - change to 0.0.0.0/0
Then click on Save.
Click image to enlarge.
Click on the Advanced Settings tab and check the box next to "Force link". Leave the other options on this page as is (Setting does not exist on some versions)
Save and apply settings!
Add new firewall zone
From the Network drop-down menu, click on Firewall.
Under Zones. Create a new zone and set it up as shown below. We named ours "WGZONE".
Input: reject
Output: accept
Forward: reject
Masquerading: checked
MSS clamping: checked
Covered networks: WGINTERFACE
Click Save.
Click on Edit the lan zone and set "Allow forward to destination zones" to WGZONE:WGINTERFACE" as the only option under allowed destinations.
DHCP and DNS settings
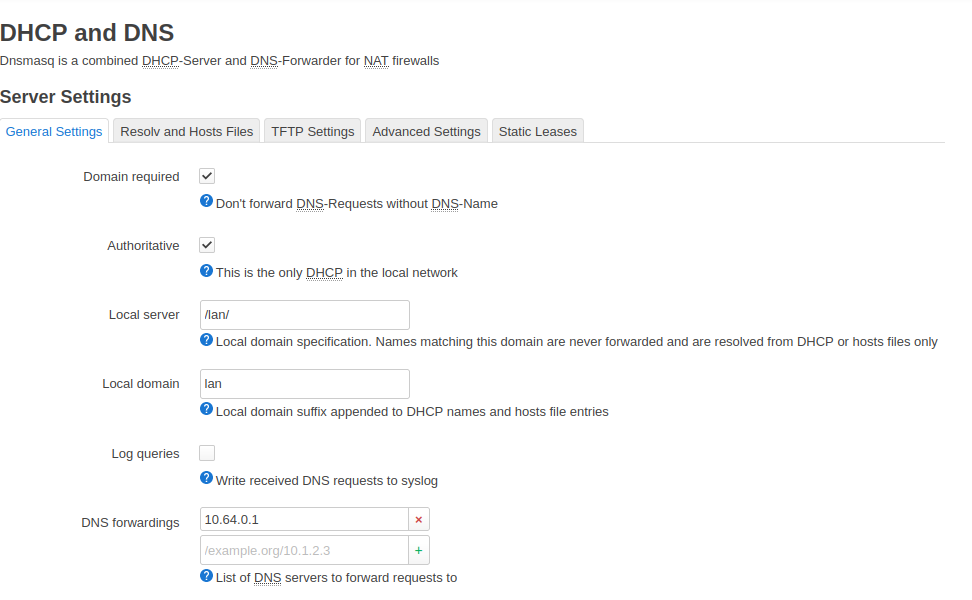
Under Network go to DHCP and DNS → Forwards
Next to DNS forwards, add 10.64.0.1
Change IP on LAN Interface (optional)
If you have other routers in the network that use the IPs 192.168.0.1 or 192.168.1.1 then you can change the IP of the WireGuard router so they don't conflict.
Navigate to Network → Interfaces → LAN (click edit) and make the following changes:
- IPv4 address – change this to "192.168.99.1".
Keep in mind that after this you will need to access the OpenWRT router on the IP 192.168.99.1.
Change DNS on LAN Interface
If you'd like to learn more about DNS leaks, check out our guide on DNS leaks.
No content blocking
Click on DHCP server - Advanced Settings - DHCP-Options: 6,10.64.0.1
DNS content blocking
To use our content blocking DNS, see Custom DNS entries for use with our VPN service. This example uses 100.64.0.7 (which enables ad blocking, tracker blocking and malware blocking).
Click on DHCP server - Advanced Settings - DHCP-Options: 6,100.64.0.7
Some Internet providers like Starlink may use CGNAT which uses the same IP range as our content blocking DNS. In this case the DNS IP will not work by default. You can add a static route to make sure that the DNS IP you select is using the VPN tunnel.
Go to Network > Routes > Static IPv4 Routes and add the following:
Interface: WGINTERFACE
Route type: unicast
Target: 100.64.0.7/32 (use the same DNS IP that you set in the DHCP-Options above)
Restart the router
In order to make everything start properly, restart the router. Some settings require you to restart the WGInterface in order for the changes to be applied. Sometimes you need to restart the router more than once!
Check your IP address and DNS
Use our Connection check to see which IP address you are using. It should be one of Mullvad's and not your own. Make sure that there are no DNS leaks.
Multihop using SOCKS5 (optional)
With WireGuard you can make use of multihop, which routes your Internet traffic through an entry server to an exit server, instead of using only an exit server.
All of our WireGuard servers are connected to all other WireGuard servers via WireGuard tunnels. In addition, each of the servers have a SOCKS5 proxy installed which makes it possible to enter a SOCKS5 proxy in a web browser (or other program) and get multihop.
See our WireGuard SOCKS5 guide to learn how to use a SOCKS5 proxy in a web browser. You can find the SOCKS5 proxy addresses in our Servers list, for example us10-wg.socks5.relays.mullvad.net.
To allow resolving the internal IP address of the SOCKS5 proxy you may have to disable "DNS rebind protection" in OpenWrt under Network > DHCP and DNS.
Using IPv6
Mullvad VPN does not provide a /64 subnet prefix. You can use our SOCKS5 proxy on the clients to get an IPv6 exit IP.
Troubleshooting
DNS leaks
If the router is leaking the DNS servers from your Internet provider then try to change some of the following settings and then restart the router and the computers/devices in the local network that are connected to the router.
- Network > Interfaces > WAN (click edit) > Advanced Settings > Use DNS servers advertised by peer (disable)
- Network > DHCP and DNS > Advanced Settings > Strict order (enable)
- Network > Interfaces > LAN > DHCP Server > Advanced Settings > "Force DHCP on this network even if another server is detected" (enable)
- Network > Interfaces > LAN > DHCP Server > IPv6 Settings > Router Advertisement-Service (disable)
IPv6 leak
If you have an IPv6 Internet address that leaks then change Allowed IPs from 0.0.0.0/0 to 0.0.0.0/0,::0/0.
Some websites don't load on some computers/devices
Try to go to Interfaces > WGINTERFACE > Advanced Settings and set MTU to 1280.
Firmware version
To find out which version of WireGuard you have running, SSH to the router and issue the command dmesg | grep -i wireguard.
The router will respond with the version of WireGuard, for example "[ 10.339423] wireguard: WireGuard 0.0.20170517 loaded. See www.wireguard.io for information."
General problems
Restart the router. Some settings, like the watchdog and adding the WireGuard interface, need a restart in order for changes to be applied.
Important: Your router needs to have the proper time and date, otherwise you'll likely run into connectivity issues.
"WireGuard" is a registered trademark of Jason A. Donenfeld.


