Mullvad Browser Extension
最近更新时间:
The Mullvad Browser Extension improves your browsing experience while using Mullvad VPN. This guide shows you how to install and use it and what settings it provides.
What this guide covers
Installation
The Mullvad Browser Extension comes pre-installed in the Mullvad Browser. It is also compatible with Firefox and any other Firefox-based browser. It is not compatible with Chrome or Chrome-based browsers. To install it in Firefox follow these instructions.
- Go to the Downloads page.
- Click on the green Install button.
- In the popup in the top right part of the browser, click on Continue to Installation.
- Click on Add.
- Check Allow this extension to run in Private Windows. This is required when using a new private window or private browsing mode.
- Click on Okay.
The extension appears on the toolbar with a Mullvad icon in the top right corner of the browser.
![]()
Using the Mullvad Browser extension
Connection status
When clicking on the Mullvad extension button on the toolbar, the extension will check your connection and display the result.
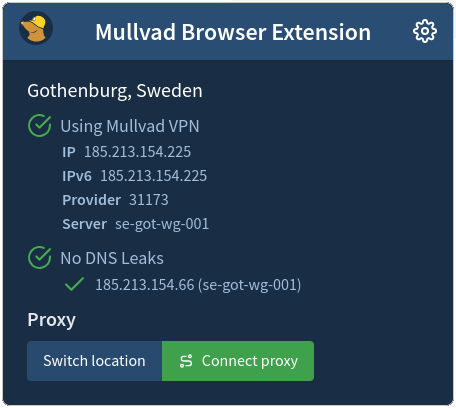
You'll see the following information:
- Location
- Whether you are using Mullvad VPN or not
- Your IP address
- Provider
- Mullvad VPN server in use (if connected)
- DNS server
You may also see some recommendations in the top. Read more about that below under Privacy recommendations.
SOCKS5 proxy
When you are connected to a WireGuard server with Mullvad VPN then you can click on Select location to connect through the SOCKS5 proxy on a Mullvad VPN server. This allows you to use another location (server, city or country) only in the browser. This creates a Multihop as your encrypted Internet traffic will first go to the Mullvad VPN server that you are connected to, and from there it jumps to another server.
Selecting a location
In the "Select proxy server location" window you can click directly on a country or click on the angle bracket ">" to expand the country to view the available cities. Click on the city or click on the bracket next to the city to show the available proxies, if you want to select a specific one.

When the proxy is connected you will see the country code of the proxy on top of the Mullvad icon.
Internet blocked
Keep in mind that if you disconnect Mullvad VPN then you can not reach our SOCKS5 proxy. The Mullvad Browser will appear to be blocking Internet access, however your DNS will be leaking (even if you have enabled "Proxy DNS").
Exit IP
The Mullvad VPN servers have multiple exit IPs, but if you use the proxy then you will always get the same exit IP address - that of the proxy.
IPv6
In addition to IPv4 the proxy also provides IPv6 connectivity with an IPv6 address, even if you have not enabled that for the VPN connection.
Note: Unproxied DNS requests
If another extension is using the dns API permission, then the Mullvad Browser Extension DNS requests might not be proxied. This is notably the case if Uncloak canonical names is enabled in the uBlock Origin settings. However since our proxy only works when you are connected to Mullvad, any DNS requests outside the proxy made by a third-party extension should not leak.
Privacy recommendations
The Mullvad extension checks some of your browser settings and shows a recommendation if a privacy issue is detected.
There are four recommendations:
1. Enable/Disable Mullvad DoH (encrypted DNS)
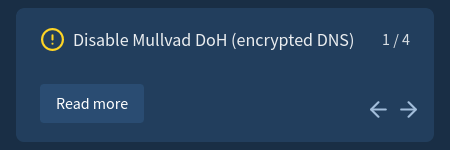
Depending on if you are connected to Mullvad VPN or not, the recommendation is to either turn off or turn on Mullvad DNS-over-HTTPS encrypted secure DNS.
Disable Mullvad DoH
If you are connected to Mullvad VPN then the Mullvad extension will recommend that you disable Mullvad DoH (encrypted DNS). It is faster to use the DNS server on the Mullvad VPN server that you are connected to. To turn it off, do the following in Firefox:
- Click on the menu button in the top right corner and select Settings.
- Click on Privacy & Security in the left side.
- Scroll down to the bottom.
- Under Enable secure DNS using select Off.
Enable Mullvad DoH
If you are not connected to Mullvad VPN then the Mullvad extension will recommend that you enable Mullvad DoH (encrypted DNS). It is better to use our non-logging privacy DNS than your Internet provider's DNS. To turn it on, do the following in Firefox:
- Click on the menu button in the top right corner and select Settings.
- Click on Privacy & Security in the left side.
- Scroll down to the bottom.
- Under Enable secure DNS using select Max Protection.
- Under Choose provider click on the drop down list and select Custom.
- In the text field that appears, paste one of the following, then press Enter on your keyboard to set it.
https://base.dns.mullvad.net/dns-query
https://extended.dns.mullvad.net/dns-query
https://all.dns.mullvad.net/dns-query
2. Install uBlock Origin
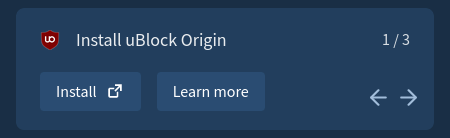
uBlock Origin is a free open source extension for content blocking. It can block ads, trackers, malware and annoyances on the Internet.
- Click on Install to open the uBlock Origin extension page.
- Click on Add to Firefox.
- Click on Add.
- Check Allow this extension to run in Private Windows.
- Click on Okay.
3. Use HTTPS-only mode
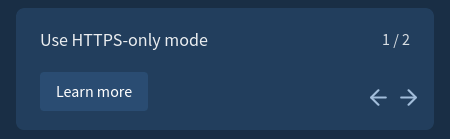
Enabling HTTPS-only mode makes sure that your website connections are encrypted. You will get a warning if an encrypted connection is not available when you visit a website.
- Click on the menu button in the top right corner and select Settings.
- Click on Privacy & Security in the left side.
- Scroll down almost to the bottom to find HTTPS-Only Mode.
- Select Enable HTTPS-Only Mode in all windows.
4. Change your default search engine
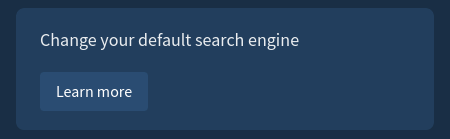
We recommend changing to a search engine that is respectful of your privacy.
- Click on the menu button in the top right corner and select Settings.
- Click on Search in the left side.
- Under Default Search Engine, click on the drop down menu.
- Select DuckDuckGo.
Other recommended seach engines are Mojeek, Brave Search, Startpage and MetaGer.
Settings
Click on the gear icon in the top right corner in the Mullvad extension to show the settings.
WebRTC
WebRTC allows audio and video communication to work inside web pages. In very rare and specific circumstances it could leak your real IP address when connected to a VPN. Read our WebRTC guide to learn more about it. If you want to be sure that no leak can happen, or if you don't want to use WebRTC, you can toggle it off in here.