Shadowsocks with v2ray
Bridges Windows Linux Android Mobile macOS Desktop Shadowsocks V2Ray Feature Multihop Censorship circumvention
Última atualização:
This guide will show you how to connect using Shadowsocks with v2ray and the Mullvad app.
What this guide covers
Using Windows
Requirements
Download and install:
Download:
- Unzip the Shadowsocks-4.4.1.0.zip file.
- Right click on the “v2ray-plugin-windows-amd64-v1.3.2.tar.gz” file and extract it with 7-Zip. Right click on the extracted .tar file and extract it with 7-Zip also.
- Move the extracted file (v2ray-plugin_windows_amd64.exe) to the Shadowsocks folder.
- Start the Shadowsocks app. Enter the information from the screenshot below and click on Apply. Shadowsocks runs in the Windows taskbar tray and connects automatically.
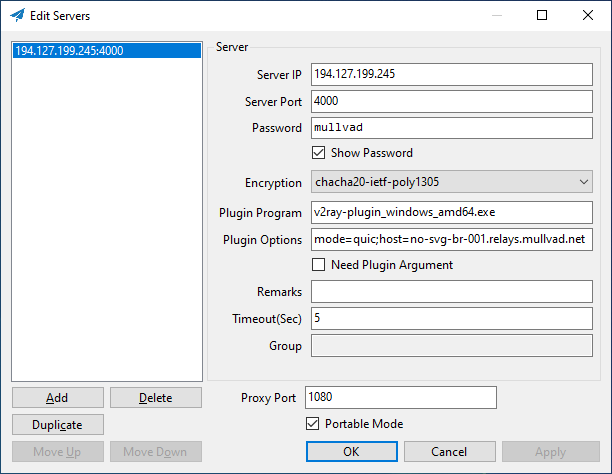
Ignore some of the settings in the screenshot above and use the following settings:
Server IP: 185.65.135.115
Server Port: 1300
Password: mullvad
Encryption: chacha20-ietf-poly1305
Plugin Program: v2ray-plugin_windows_amd64.exe
Plugin Options: mode=quic;host=se-sto-br-001.relays.mullvad.net
Proxy Port: 1080 -
Go to the Mullvad app settings > Split tunneling and click on the button “Find another app” in the bottom. Browse to the location of the Shadowsocks app (in the Downloads folder) and select Shadowsocks.exe and click on Add.
-
Open the Command Prompt and run the following commands:
mullvad bridge set custom set socks5 local 1080 185.65.135.115 1300

mullvad relay set tunnel-protocol openvpn

mullvad bridge set state on

mullvad connect
Other ports
If it doesn't work then you can try to change the Server Port from 1300 in the Shadowsocks app and the mullvad bridge command. You can use any port between 1300 - 32999. Try port 53 and 443 for example.
Other bridge servers (quic)
To use other Mullvad bridge servers replace the Server IP and replace the hostname ("xx-xxx-br-001.relays.mullvad.net") from the Plugin Options field. Then use the same IP with the mullvad bridge command above. You can find more bridge servers in our Servers list.
Connect using websockets
In case it does not work then try to connect using websockets instead of quic. In the Shadowsocks app in the “Plugin Options” field change the text “mode=quic” to only “tls” (don’t change it to “mode=tls”). Edit the Server IP and use the same IP with the mullvad bridge command. Here is one you can use with websockets only:
- 193.138.7.133 (fi-hel-br-101.relays.mullvad.net) 🇫🇮 TLS
Using Linux
Requirements
Download and install:
Using Ubuntu 22.04 or newer
Open the Terminal and run the following command to install the v2ray plugin for Shadowsocks:
sudo apt install shadowsocks-v2ray-plugin
Run the following Mullvad commands:
1. Set Mullvad to use a specific bridge server and port:
mullvad bridge set custom set socks5 local 1080 185.65.135.115 1300
2. Connect Shadowsocks outside the VPN:
mullvad-exclude ss-local -s 185.65.135.115 -p 1300 -l 1080 -k mullvad -m chacha20-ietf-poly1305 -b 127.0.0.1 --fast-open --no-delay --plugin ss-v2ray-plugin --plugin-opts "mode=quic;host=se-sto-br-001.relays.mullvad.net"
3. Set Mullvad to use OpenVPN protocol:
mullvad relay set tunnel-protocol openvpn
4. Set Mullvad to use Bridge mode:
mullvad bridge set state on
5. Connect Mullvad:
mullvad connect
Other ports
If it doesn't work then you can try to change the server port from 1300 in both command #1 and #2 above where it says "1300". You can use any port between 1300 - 32999. Try port 53 and 443 for example.
Other bridge servers (quic)
You can find more bridge servers in our Servers list. To use other Mullvad bridge servers replace the server IP in both command #1 and #2 above, and replace the hostname ("xx-xxx-br-001.relays.mullvad.net") in command #2.
Connect using websockets
In case it does not work then try to connect using websockets instead of quic. First change the server IP in command #1 above:
mullvad bridge set custom set socks5 local 1080 185.65.135.116 1300
Then use the following command instead of command #2 above which includes the websockets server IP and its hostname.
mullvad-exclude ss-local -s 185.65.135.116 -p 1300 -l 1080 -k mullvad -m chacha20-ietf-poly1305 -b 127.0.0.1 --fast-open --no-delay --plugin ss-v2ray-plugin --plugin-opts "tls;host=se-sto-br-001.relays.mullvad.net"
Using Ubuntu 20.04
If you have the older Ubuntu 20.04 which does not have the v2ray plugin package then you can download it (64-bit version) using the following commands.
wget https://github.com/shadowsocks/v2ray-plugin/releases/download/v1.3.2/v2ray-plugin-linux-amd64-v1.3.2.tar.gz

tar xvf v2ray-plugin-linux-amd64-v1.3.2.tar.gz

mv v2ray-plugin_linux_amd64 ss-v2ray-plugin
Using Fedora
First see the Ubuntu 20.04 instructions above to download the v2ray plugin.
You can install Shadowsocks using Snap. First install Snap:
sudo dnf install snapd
Then log out from Linux and log back in again. Then use the following commands to configure Snap, install Shadowsocks and add it (temporarily) to your command path:
sudo ln -s /var/lib/snapd/snap /snap
sudo snap install shadowsocks-rust
export PATH="$PATH:/snap/shadowsocks-rust/current/bin"
Run the following Mullvad commands:
1. Set Mullvad to use a specific bridge server and port:
mullvad bridge set custom set socks5 local 1080 185.65.135.115 1300
2. Connect Shadowsocks outside the VPN:
mullvad-exclude sslocal -s 185.65.135.115:1300 -k mullvad -m chacha20-ietf-poly1305 -b 127.0.0.1:1080 --tcp-fast-open --tcp-no-delay --plugin ./ss-v2ray-plugin --plugin-opts "mode=quic;host=se-sto-br-001.relays.mullvad.net"
3. Set Mullvad to use OpenVPN protocol:
mullvad relay set tunnel-protocol openvpn
4. Set Mullvad to use Bridge mode:
mullvad bridge set state on
5. Connect Mullvad:
mullvad connect
Other bridge servers (quic)
You can find more bridge servers in our Servers list. To use other Mullvad bridge servers replace the server IP in both command #1 and #2 above, and replace the hostname ("xx-xxx-br-001.relays.mullvad.net") in command #2.
Connect using websockets
In case it does not work then try to connect using websockets instead of quic. First change the server IP in command #1 above:
mullvad bridge set custom set socks5 local 1080 185.65.135.116 1300
Then use the following command instead of command #2 above which includes the websockets server IP and its hostname.
mullvad-exclude sslocal -s 185.65.135.116:1300 -k mullvad -m chacha20-ietf-poly1305 -b 127.0.0.1:1080 --tcp-fast-open --tcp-no-delay --plugin ./ss-v2ray-plugin --plugin-opts "tls;host=se-sto-br-001.relays.mullvad.net"
Using Android
Requirements
Download and install:
Configure the Shadowsocks app
- Tap on the ☰ menu icon, then Settings.
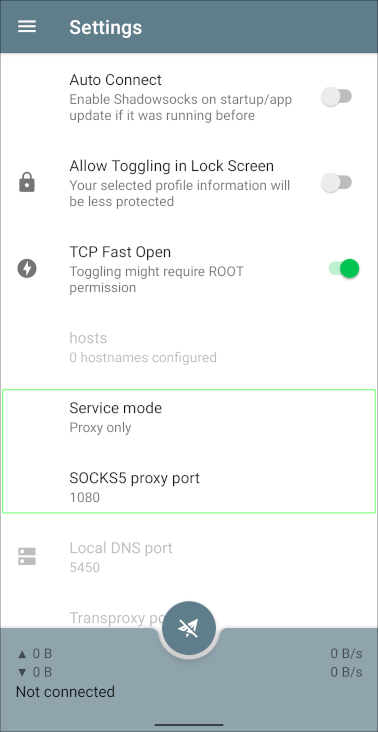
- Tap on Advanced and then tap on Service mode and select Proxy only.
- Make sure that the SOCKS5 proxy port is set to 1080.
- Tap on your device's back button.
- Tap on the plus icon on the tool bar and select Manual Settings.
- Tap on Server, enter 193.138.7.133 and tap on OK.
- Tap on Remote Port, change the number to 1300 and tap on OK.
- Tap on Password, change it to mullvad and tap on OK.
- Tap on Encrypt Method, select chacha20-ietf-poly1305 and tap on OK.
- Scroll down and select Plugin: v2ray.
- Tap on Configure...
- Tap on Transport mode, select websocket-tls.
- Tap on Hostname, enter fi-hel-br-101.relays.mullvad.net and tap on OK.
- Tap on the checkmark icon in the top right corner two times to save the settings.
Configure the OpenVPN app
- Download an OpenVPN configuration file for Android and make sure that Connect via bridges is checked.
- Open the OpenVPN for Android app.
- Tap on the + icon and tap on import and then choose the OpenVPN configuration file that you downloaded before.
- Tap on the pen edit icon next to the profile you imported.
- In the top bar, scroll left and tap on Advanced. Then scroll down and tap on Custom Options.
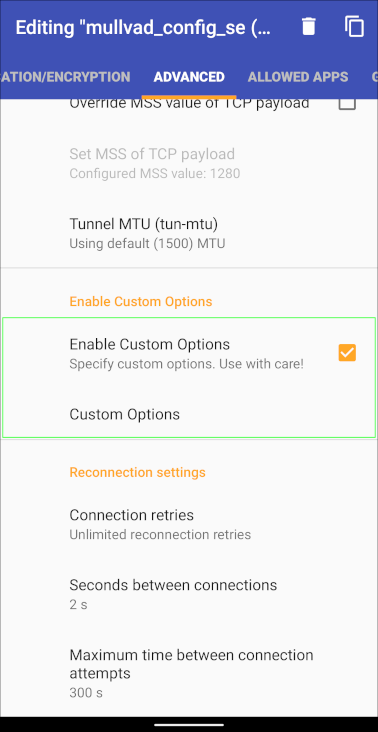
- On a new line add:
socks-proxy 127.0.0.1 1080 - Tap on OK. Then in the top bar tap on Allowed apps.
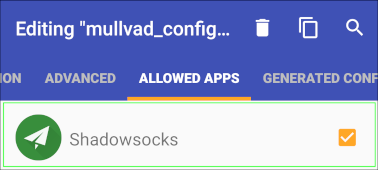
- Make sure that VPN is used for all apps but exclude selected is enabled.
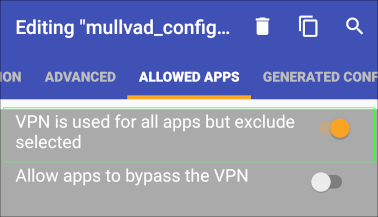
- Scroll down the list and find Shadowsocks and tap on the square icon to enable it.
- Tap on your device's back button.
Connect using Shadowsocks
- In the Shadowsocks app, tap on your profile and then tap on the connect icon in the bottom (looks like a paper airplane).
- In the OpenVPN app, tap on the server profile to connect to it. The first time you connect to a profile, you will be asked for a username and password. Use the following:
username – use your Mullvad account number (without any spaces)
password – use the letter m - In the log window it should say "Initialization Sequence Completed" in the bottom.
- Tap on the arrow button in the top left corner.
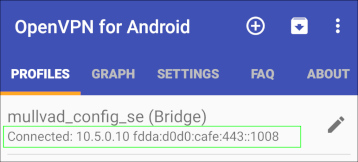
- Both apps should now say "Connected".
- Verify your connection with our Connection check. Note that it will only show the OpenVPN exit server, not the Shadowsocks server.
Other ports and servers (websockets)
If it doesn't work then try to change the Server, Remote Port and Hostname.
- Open the Shadowsocks app and disconnect by tapping on the paper airplane icon.
- Edit your profile by tapping on the pen icon.
- Tap on Server and enter one of the following Server IPs:
- 146.70.117.131 (de-fra-br-101.relays.mullvad.net) 🇩🇪 TLS
- 193.32.248.77 (de-ber-br-001.relays.mullvad.net) 🇩🇪 TLS
- Tap on Remote Port and change it to any port between 1300 - 32999. Try for example port 53 and 443. Then tap on OK.
- Scroll down and tap on Configure... under Plugin.
- Tap on Hostname and enter the corresponding hostname for the Server IP that you selected above.
- Tap on the checkmark icon in the top right corner to save it. Do this again to save the profile.
- Tap on the paper airplane icon to connect and then open the OpenVPN app and try to connect again.
Using macOS
Requirements
Download and install:
Open the Terminal app and install Homebrew by running the following command:
/bin/bash -c "$(curl -fsSL https://raw.githubusercontent.com/Homebrew/install/HEAD/install.sh)"
Then install Shadowsocks and the v2ray plugin using Brew:
brew install shadowsocks-libev v2ray-plugin
Configure Tunnelblick
- Visit our OpenVPN configuration file generator.
- Select a country and (if available) a city.
- Click on Advanced and enable Connect via bridges.
- Click on Download zip archive.
- Double-click on the Zip file to extract it.
- Double-click on the Mullvad.tblk file to open it with Tunnelblick, and install it.
Connect using Shadowsocks
In the Terminal app, connect to one of our bridge servers using Shadowsocks and v2ray using the following command:
ss-local -s 193.138.7.133 -p 1300 -l 1080 -k mullvad -m chacha20-ietf-poly1305 -b 127.0.0.1 --fast-open --no-delay --plugin v2ray-plugin --plugin-opts "tls;host=fi-hel-br-101.relays.mullvad.net" -v
Then connect with Tunnelblick:
- Click on the Tunnelblick icon in the macOS top menu bar and click on VPN Details...
- Click on the server configuration and then the Connect button.
- The Log window will say "Initialization Sequence Completed" when it connects successfully.
- Visit our Connection check to make sure that you are connected.
Other ports and servers (websockets)
If it doesn't work then press control+c on the keyboard to stop ss-local in the Terminal. You can try to change the port in the ss-local command where it says "1300". You can use any port between 1300 - 32999. Try port 53 and 443 for example. You can also try replace the server IP and hostname in the command with the following server IP and hostname:
- 146.70.117.131 (de-fra-br-101.relays.mullvad.net) 🇩🇪 TLS
- 193.32.248.77 (de-ber-br-001.relays.mullvad.net) 🇩🇪 TLS
Save and close the file in TextEdit. Click on Connect in Tunnelblick and enter your computer login password to update the configuration. Then click on Connect again.